


To manage the redhat enterprise virtualization hypervisor (RHEV-H) , you have to configure the Redhat Enterprise Virtualization Manager (RHEV-M) on Redhat Enterprise Linux 6.x operating system. RHEV-M provides a feature rich graphical based web interface to manage the virtual infrastructure from single point. It provides host management ,guest management,storage management and high availability infrastructure. We can access the web-portal on both “http” and “https” with ports 90 and 443 respectively.By default RHEV-M uses “postgresql” database but we can also provide the external database to setup the RHEV-M environment. Let’s see how we can install and configure the Redhat Enterprise virtualization Manager.
Prerequisite:
- Redhat Enterprise Linux 6.x Operating System with internet connectivity
- Redhat Valid Subscription account or Trail account.
Registering RHEL 6.x with Redhat Network.
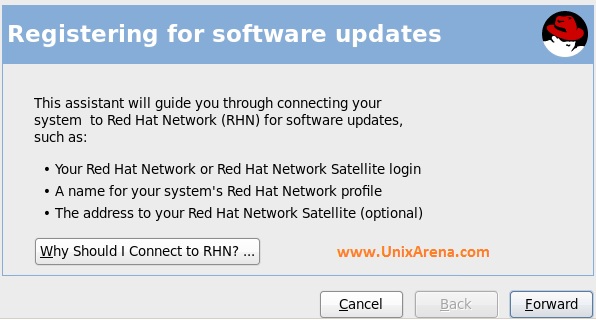
1. Login to Redhat Linux 6.x host and register with Redhat network using the valid Redhat Enterprise virtualization Subscription.
- Gnome-> System – > Register with RHN network or
- command line – Execute “rhn_register”.
2.Go with “Redhat Classic network”. If your system requires proxy for internet connection, click on “Advance network configuration” to enter the proxy information.

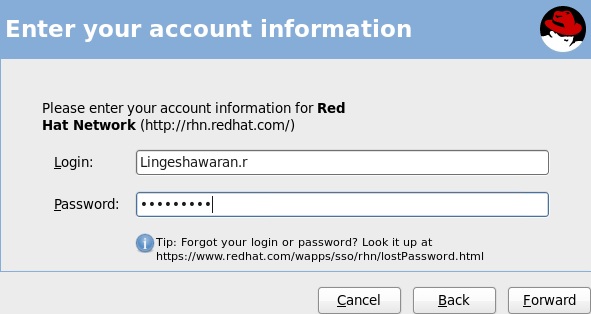
3.Enter the username /password to connect to redhat network.
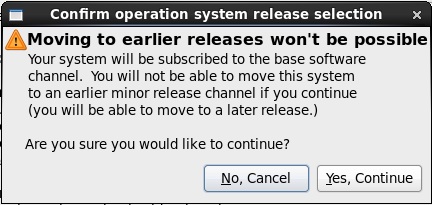
4.Select the system update model. If you do not want to update the system with major release, just select “Limited Updates” .
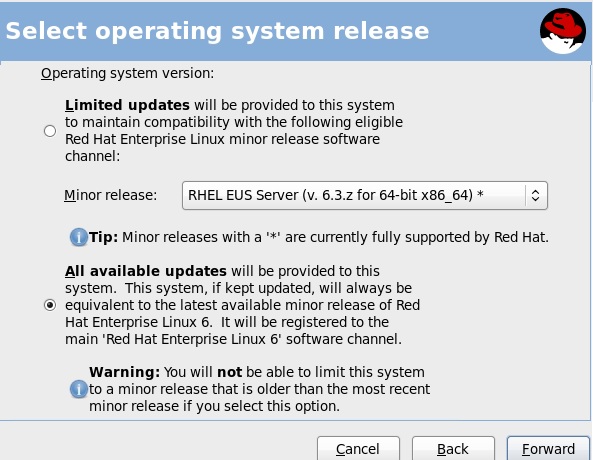
I am proceeding with “All Available Updates” since its a LAB environment.Click Yes to continue
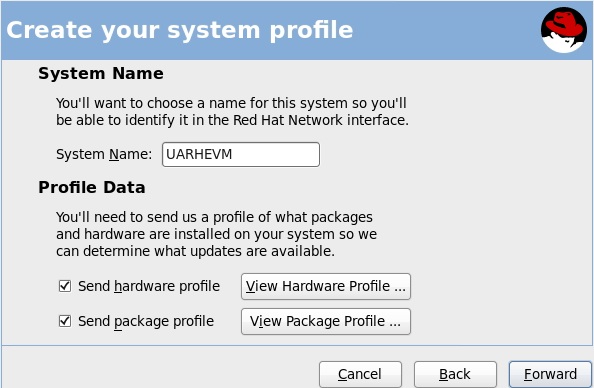
.5.Create the system profile.
6.Review the subscription details and click forward to continue.

7.Click to finish the registration.
8.Open a terminal or login to server using ssh. Add the redhat channel for the software update.
# rhn-channel --add --channel=rhel-x86_64-server-6
# rhn-channel --add --channel=rhel-x86_64-server-supplementary-6
# rhn-channel --add --channel=rhel-x86_64-server-6-rhevm-3.4
# rhn-channel --add --channel=jbappplatform-6-x86_64-server-6-rpm
9.Install the RHEV-M rpm using below command.
[root@UARHEVM ~]# yum install rhevm
Loaded plugins: product-id, rhnplugin, security, subscription-manager, versionlock
Updating certificate-based repositories.
Unable to read consumer identity
Setting up Upgrade Process
Resolving Dependencies
--> Running transaction check
---> Package rhevm.noarch 0:3.1.0-55.el6ev will be updated
--> Processing Dependency: rhevm = 3.1.0-55.el6ev for package: rhevm-notification-service-3.1.0-55.el6ev.noarch
--> Processing Dependency: rhevm = 3.1.0-55.el6ev for package: rhevm-dbscripts-3.1.0-55.el6ev.noarch
--> Processing Dependency: rhevm = 3.1.0-55.el6ev for package: rhevm-userportal-3.1.0-55.el6ev.noarch
--> Processing Dependency: rhevm = 3.1.0-55.el6ev for package: rhevm-restapi-3.1.0-55.el6ev.noarch
--> Processing Dependency: rhevm = 3.1.0-55.el6ev for package: rhevm-backend-3.1.0-55.el6ev.noarch
--> Processing Dependency: rhevm = 3.1.0-55.el6ev for package: rhevm-genericapi-3.1.0-55.el6ev.noarch
--> Processing Dependency: rhevm = 3.1.0-55.el6ev for package: rhevm-tools-common-3.1.0-55.el6ev.noarch
--> Processing Dependency: rhevm = 3.1.0-55.el6ev for package: rhevm-webadmin-portal-3.1.0-55.el6ev.noarch
10.Once the RHEV-M is installed, just begin the RHEV-M configuration using “engine-setup” command.According to my environment , i have answered to “engine-setup” questions. Please alter it according to your environment.
[root@UARHEVM ~]# engine-setup
[ INFO  ] Stage: Initializing
[ INFO  ] Stage: Environment setup
          Configuration files: ['/etc/ovirt-engine-setup.conf.d/10-packaging.conf']
          Log file: /var/log/ovirt-engine/setup/ovirt-engine-setup-20141003055244-ef2xzx.log
          Version: otopi-1.2.2 (otopi-1.2.2-1.el6ev)
[ INFO  ] Stage: Environment packages setup
[ INFO  ] Stage: Programs detection
[ INFO  ] Stage: Environment setup
[ INFO  ] Stage: Environment customization

          --== PRODUCT OPTIONS ==--

          --== PACKAGES ==--

[ INFO  ] Checking for product updates...
          Setup has found updates for some packages, do you wish to update them now? (Yes, No) [Yes]:
[ INFO  ] Checking for an update for Setup...
          Setup will not be able to rollback new packages in case of a failure, because installed ones were not found in enabled repositories.
          Do you want to abort Setup? (Yes, No) [Yes]: No

          --== NETWORK CONFIGURATION ==--

          Host fully qualified DNS name of this server [UARHEVM]:
[WARNING] Host name UARHEVM has no domain suffix
[WARNING] Failed to resolve UARHEVM using DNS, it can be resolved only locally
          Setup can automatically configure the firewall on this system.
          Note: automatic configuration of the firewall may overwrite current settings.
          Do you want Setup to configure the firewall? (Yes, No) [Yes]:
[ INFO  ] iptables will be configured as firewall manager.

          --== DATABASE CONFIGURATION ==--

          Where is the Engine database located? (Local, Remote) [Local]:
          Setup can configure the local postgresql server automatically for the engine to run. This may conflict with existing applications.
          Would you like Setup to automatically configure postgresql and create Engine database, or prefer to perform that manually? (Automatic, Manual) [Automatic]:

          --== OVIRT ENGINE CONFIGURATION ==--

          Application mode (Both, Virt, Gluster) [Both]:
          Default storage type: (NFS, FC, ISCSI, POSIXFS, GLUSTERFS) [NFS]:
          Engine admin password:
          Confirm engine admin password:
[WARNING] Password is weak: it is based on a dictionary word
          Use weak password? (Yes, No) [No]: yes

          --== PKI CONFIGURATION ==--

          Organization name for certificate [Test]: UARHEVZONE

          --== APACHE CONFIGURATION ==--

          Setup can configure apache to use SSL using a certificate issued from the internal CA.
          Do you wish Setup to configure that, or prefer to perform that manually? (Automatic, Manual) [Automatic]:
          Setup can configure the default page of the web server to present the application home page. This may conflict with existing applications.
          Do you wish to set the application as the default page of the web server? (Yes, No) [Yes]:

          --== SYSTEM CONFIGURATION ==--

          Configure WebSocket Proxy on this machine? (Yes, No) [Yes]:
          Configure an NFS share on this server to be used as an ISO Domain? (Yes, No) [Yes]:
          Local ISO domain path [/var/lib/exports/iso]:
          Local ISO domain ACL [0.0.0.0/0.0.0.0(rw)]:
          Local ISO domain name [ISO_DOMAIN]:

          --== MISC CONFIGURATION ==--

          Would you like transactions from the Red Hat Access Plugin sent from the RHEV Manager to be brokered through a proxy server? (Yes, No) [No]:

          --== END OF CONFIGURATION ==--

[ INFO  ] Stage: Setup validation
[WARNING] Warning: Not enough memory is available on the host. Minimum requirement is 4096MB, and 16384MB is recommended.
          Do you want Setup to continue, with amount of memory less than recommended? (Yes, No) [No]: Yes

          --== CONFIGURATION PREVIEW ==--

          Engine database name                    : engine
          Engine database secured connection      : False
          Engine database host                    : localhost
          Engine database user name               : engine
          Engine database host name validation    : False
          Engine database port                    : 5432
          NFS setup                               : True
          PKI organization                        : UARHEVZONE
          Application mode                        : both
          Firewall manager                        : iptables
          Update Firewall                         : True
          Configure WebSocket Proxy               : True
          Host FQDN                               : UARHEVM
          NFS export ACL                          : 0.0.0.0/0.0.0.0(rw)
          NFS mount point                         : /var/lib/exports/iso
          Datacenter storage type                 : nfs
          Configure local Engine database         : True
          Set application as default page         : True
          Configure Apache SSL                    : True
          Require packages rollback               : False
          Upgrade packages                        : True

          Please confirm installation settings (OK, Cancel) [OK]:
[ INFO  ] Stage: Transaction setup
[ INFO  ] Stopping engine service
[ INFO  ] Stopping websocket-proxy service
[ INFO  ] Stage: Misc configuration
[ INFO  ] Stage: Package installation
[ INFO  ] Yum Downloading: rhel-x86_64-server-6/filelists 22 M(98%)
[ INFO  ] Yum Status: Downloading Packages
[ INFO  ] Yum Download/Verify: iptables-1.4.7-11.el6.x86_64
[ INFO  ] Yum Download/Verify: iptables-ipv6-1.4.7-11.el6.x86_64
[ INFO  ] Yum Download/Verify: rhevm-cli-3.4.0.6-4.el6ev.noarch
[ INFO  ] Yum Status: Check Package Signatures
[ INFO  ] Yum Status: Running Test Transaction
[ INFO  ] Yum Status: Running Transaction
[ INFO  ] Yum update: 1/6: iptables-1.4.7-11.el6.x86_64
[ INFO  ] Yum update: 2/6: iptables-ipv6-1.4.7-11.el6.x86_64
[ INFO  ] Yum update: 3/6: rhevm-cli-3.4.0.6-4.el6ev.noarch
[ INFO  ] Yum updated: 4/6: rhevm-cli
[ INFO  ] Yum updated: 5/6: iptables-ipv6
[ INFO  ] Yum updated: 6/6: iptables
[ INFO  ] Yum Verify: 1/6: rhevm-cli.noarch 0:3.4.0.6-4.el6ev - u
[ INFO  ] Yum Verify: 2/6: iptables.x86_64 0:1.4.7-11.el6 - u
[ INFO  ] Yum Verify: 3/6: iptables-ipv6.x86_64 0:1.4.7-11.el6 - u
[ INFO  ] Yum Verify: 4/6: rhevm-cli.noarch 0:3.1.1.2-1.el6ev - ud
[ INFO  ] Yum Verify: 5/6: iptables-ipv6.x86_64 0:1.4.7-5.1.el6_2 - ud
[ INFO  ] Yum Verify: 6/6: iptables.x86_64 0:1.4.7-5.1.el6_2 - ud
[ INFO  ] Stage: Misc configuration
[ INFO  ] Initializing PostgreSQL
[ INFO  ] Creating PostgreSQL 'engine' database
[ INFO  ] Configuring PostgreSQL
[ INFO  ] Creating Engine database schema
[ INFO  ] Creating CA
[ INFO  ] Configuring WebSocket Proxy
[ INFO  ] Generating post install configuration file '/etc/ovirt-engine-setup.conf.d/20-setup-ovirt-post.conf'
[ INFO  ] Stage: Transaction commit
[ INFO  ] Stage: Closing up

          --== SUMMARY ==--

[WARNING] Warning: Not enough memory is available on the host. Minimum requirement is 4096MB, and 16384MB is recommended.
          SSH fingerprint: B4:01:10:44:9D:09:73:87:67:0F:6D:8F:E3:9C:46:A6
          Internal CA 20:F8:28:D5:7B:34:C6:5E:0E:11:72:6F:A9:8B:40:5E:1A:C2:04:6D
          Web access is enabled at:
              http://UARHEVM:80/ovirt-engine
              https://UARHEVM:443/ovirt-engine
          Please use the user "admin" and password specified in order to login

          --== END OF SUMMARY ==--

[ INFO  ] Starting engine service
[ INFO  ] Restarting httpd
[ INFO  ] Restarting nfs services
[ INFO  ] Stage: Clean up
          Log file is located at /var/log/ovirt-engine/setup/ovirt-engine-setup-20141003055244-ef2xzx.log
[ INFO  ] Generating answer file '/var/lib/ovirt-engine/setup/answers/20141003055834-setup.conf'
[ INFO  ] Stage: Pre-termination
[ INFO  ] Stage: Termination
[ INFO  ] Execution of setup completed successfully
[root@UARHEVM ~]#
12. You can access the Redhat Enterprise Virtualization Manager from the web using below mentioned web links.
- http://Server-IP:80/ovirt-engine
- https://Server-IP:443/ovirt-engine
We have successfully installed and configured the Redhat Enterprise virtualization Manager . In the next article, we will see how to play with RHEV-M web portal and creating the virtual Machines. Stay Tuned with UnixArena.
Share it ! Comment it !! Be Sociable !!!