

Helm is a package manager for Kubernetes that allows you to define, install, and upgrade even the most complex Kubernetes applications. Helm is one of the most vital tools in DevOps. Kustomize is a built-in tool for Kubernetes that allows you to customize raw, template-free YAML files for multiple purposes, including managing multiple versions of Kubernetes manifests for different environments. It provides a simpler and more flexible way to manage and customize your Kubernetes resources without the need for a package manager.
On the other hand, Helm provides a powerful templating engine that allows you to define and manage complex Kubernetes applications with multiple components. It also provides a packaging format for distributing applications, making it easier to share and reuse configurations and applications across different environments. Chart repository and release management features added advantages when you use helm.
Environment:
root@kmaster1:~# kubectl version --short
Client Version: v1.22.0
Server Version: v1.22.15
root@kmaster1:~#
Creating the first helm chart:
Here is a step-by-step guide on how to create your first Helm chart:
Install Helm Make sure you have Helm installed on your system. You can find instructions for installing Helm on the Helm website: https://helm.sh/docs/intro/install/
root@kmaster1:~# helm version
version.BuildInfo{Version:"v3.10.1", GitCommit:"9f88ccb6aee40b9a0535fcc7efea6055e1ef72c9", GitTreeState:"clean", GoVersion:"go1.18.7"}
root@kmaster1:~#
Step 1: Create a new chart by using the native kubernetes manifest. Run the following command to generate the deployment.yaml file. You can redirect the command output to the file.
root@kmaster1:~/nginx-app/templates# kubectl create deploy myapp1 --image nginx --dry-run=client -o yaml
apiVersion: apps/v1
kind: Deployment
metadata:
  creationTimestamp: null
  labels:
    app: myapp1
  name: myapp1
spec:
  replicas: 1
  selector:
    matchLabels:
      app: myapp1
  strategy: {}
  template:
    metadata:
      creationTimestamp: null
      labels:
        app: myapp1
    spec:
      containers:
      - image: nginx
        name: nginx
        resources: {}
status: {}
root@kmaster1:~/nginx-app/templates#
We need to create a directory structure for “Helm” and redirect the file to the “templates” directory.
root@kmaster1:~# mkdir -p nginx-app/templates
root@kmaster1:~# kubectl create deploy myapp1 --image nginx --dry-run=client -o yaml > nginx-app/templates/deployment.yaml
root@kmaster1:~# tree nginx-app
nginx-app
└── templates
  └── deployment.yaml
1 directory, 1 file
root@kmaster1:~#
Step 2: Create “Chart.yaml” to maintain the chart name and version. Basically, it contains metadata about the chart, such as the name, version, and description
root@kmaster1:~# cd nginx-app/
root@kmaster1:~/nginx-app# ls -lrt
total 4
drwxr-xr-x 2 root root 4096 Nov 3 15:36 templates
root@kmaster1:~/nginx-app#
root@kmaster1:~/nginx-app# cat Chart.yaml
version: 0.1.0
type: application
name: myapp1
description: My first helm chart
appVersion: "0.1.0"
apiVersion: v2
root@kmaster1:~/nginx-app#
Step 3: Let’s deploy the application in the “helm” way. List the existing helm charts in the current namespace.
root@kmaster1:~# helm ls   [To list the existing helm charts in current namespace ]
NAME NAMESPACE REVISION UPDATED STATUS CHART APP VERSION
root@kmaster1:~#

root@kmaster1:~# kubectl get all  [To list the existing resources in the current namespace ]
NAME                 TYPE        CLUSTER-IP   EXTERNAL-IP   PORT(S)   AGE
service/kubernetes   ClusterIP   10.96.0.1    <none>        443/TCP   383d
root@kmaster1:~#
Use the “helm install” command to install the first helm chart prepared without any values.yaml [ Yet to be variablized ]
root@kmaster1:~# helm install nginx-app nginx-app
NAME: nginx-app
LAST DEPLOYED: Fri Nov 3 15:49:19 2023
NAMESPACE: default
STATUS: deployed
REVISION: 1
TEST SUITE: None
root@kmaster1:~#

If you are inside the chart directroy , you need to the following command.
# helm install nginx-app .


root@kmaster1:~# helm ls    [To list the existing helm charts in current namespace ]
NAME            NAMESPACE       REVISION        UPDATED                                 STATUS          CHART           APP VERSION
nginx-app       default         1               2023-11-03 15:49:19.825676256 +0000 UTC deployed        myapp1-0.1.0    0.1.0
root@kmaster1:~#

root@kmaster1:~# kubectl get all  [To list the existing resources in the current namespace ]
NAME                          READY   STATUS    RESTARTS   AGE
pod/myapp1-788854f97b-jbtcb   1/1     Running   0          70s

NAME                 TYPE        CLUSTER-IP   EXTERNAL-IP   PORT(S)   AGE
service/kubernetes   ClusterIP   10.96.0.1    <none>        443/TCP   383d

NAME                     READY   UP-TO-DATE   AVAILABLE   AGE
deployment.apps/myapp1   1/1     1            1           70s

NAME                                DESIRED   CURRENT   READY   AGE
replicaset.apps/myapp1-788854f97b   1         1         1       70s
root@kmaster1:~#
We have successfully deployed the nginx application using a hardcoded values helm chart. Ideally, template directories will not hold any service-specific variables in it.
Step 4: Let’s variablize the chart. Replace the actual values with placeholders like below. Navigate to the chart directory and edit the deployment.yaml file.
root@kmaster1:~# cd nginx-app/
root@kmaster1:~/nginx-app# ls -lrt
total 8
drwxr-xr-x 2 root root 4096 Nov 3 15:36 templates
-rw-r--r-- 1 root root 115 Nov 3 15:40 Chart.yaml
root@kmaster1:~/nginx-app# cd templates/
root@kmaster1:~/nginx-app/templates# vi deployment.yaml
root@kmaster1:~/nginx-app/templates#
Here is what the updated file looks like. Just replaced the actual values with placeholder variables in the double curly braces.
root@kmaster1:~/nginx-app/templates# cat deployment.yaml
apiVersion: apps/v1
kind: Deployment
metadata:
  creationTimestamp: null
  labels:
    app: {{ .Values.appname }}
  name: {{ .Values.appname }}
spec:
  replicas: {{ .Values.ReplicaCount }}
  selector:
    matchLabels:
      app: {{ .Values.appname }}
  strategy: {}
  template:
    metadata:
      creationTimestamp: null
      labels:
        app: {{ .Values.appname }}
    spec:
      containers:
      - image: "{{ .Values.imagename }}: {{ .Values.imageversion }}"
        name: {{ .Values.imagename }}
        resources: {}
status: {}
root@kmaster1:~/nginx-app/templates#
Step 5: To pass the values for the placeholder, we need to create a new file in the name of “values.yaml” inside the chart directory like below.
root@kmaster1:~/nginx-app# cat values.yaml
appname: nginx-app
ReplicaCount: 2
imagename: nginx
imageversion: latest

For all the variables, we have added the key value pair in the values.yaml file.

root@kmaster1:~/nginx-app# ls -lrt
total 12
-rw-r--r-- 1 root root  115 Nov  3 15:40 Chart.yaml
drwxr-xr-x 2 root root 4096 Nov  3 16:37 templates
-rw-r--r-- 1 root root   73 Nov  3 16:44 values.yaml
root@kmaster1:~/nginx-app#
Let’s test the parameterized helm chart by installing it.
root@kmaster1:~/nginx-app# helm install nginx-app .
NAME: nginx-app
LAST DEPLOYED: Fri Nov 3 17:11:24 2023
NAMESPACE: default
STATUS: deployed
REVISION: 1
TEST SUITE: None
root@kmaster1:~/nginx-app#


root@kmaster1:~/nginx-app# kubectl get all
NAME                            READY   STATUS    RESTARTS   AGE
pod/nginx-app-d6ff45774-wztzk   1/1     Running   0          8s
pod/nginx-app-d6ff45774-x7fbn   1/1     Running   0          8s

NAME                 TYPE        CLUSTER-IP   EXTERNAL-IP   PORT(S)   AGE
service/kubernetes   ClusterIP   10.96.0.1    <none>        443/TCP   384d

NAME                        READY   UP-TO-DATE   AVAILABLE   AGE
deployment.apps/nginx-app   2/2     2            2           8s

NAME                                  DESIRED   CURRENT   READY   AGE
replicaset.apps/nginx-app-d6ff45774   2         2         2       8s
root@kmaster1:~/nginx-app#
We have successfully deployed the application using the typical helm chart way. We could also test how to bump the version and upgrade the chart.
Helm upgrade :
If you wish to modify some values on the chart, you can update and bump the version in the Chart.yaml file.
In this example, I have updated the Replicacount to 1 and bumped the version to 0.1.1
root@kmaster1:~/nginx-app# vi values.yaml
root@kmaster1:~/nginx-app# cat Chart.yaml
version: 0.1.1
type: application
name: myapp1
description: My first helm chart
appVersion: "0.1.1"
apiVersion: v2
root@kmaster1:~/nginx-app#
Let’s upgrade the helm chart to the next version.
root@kmaster1:~/nginx-app# helm upgrade nginx-app .
Release "nginx-app" has been upgraded. Happy Helming!
NAME: nginx-app
LAST DEPLOYED: Fri Nov  3 17:19:58 2023
NAMESPACE: default
STATUS: deployed
REVISION: 3
TEST SUITE: None
root@kmaster1:~/nginx-app# kubectl get all
NAME                            READY   STATUS    RESTARTS   AGE
pod/nginx-app-d6b6d5d8f-hfh26   1/1     Running   0          6m55s

NAME                 TYPE        CLUSTER-IP   EXTERNAL-IP   PORT(S)   AGE
service/kubernetes   ClusterIP   10.96.0.1    <none>        443/TCP   384d

NAME                        READY   UP-TO-DATE   AVAILABLE   AGE
deployment.apps/nginx-app   1/1     1            1           8m38s

NAME                                  DESIRED   CURRENT   READY   AGE
replicaset.apps/nginx-app-d6b6d5d8f   1         1         1       6m58s
replicaset.apps/nginx-app-d6ff45774   0         0         0       8m38s
root@kmaster1:~/nginx-app#
helm rollback :
If you wish to roll back the deployment to the previous state, it is very simple when you use helm charts. Use the “helm rollback” command to revert to the previous revision.
1. Identify the current revision.
root@kmaster1:~/nginx-app# helm ls
NAME            NAMESPACE       REVISION        UPDATED                                 STATUS          CHART           APP VERSION
nginx-app       default         3               2023-11-03 17:19:58.846978466 +0000 UTC deployed        myapp1-0.1.1    0.1.1
root@kmaster1:~/nginx-app#
2. Note down the revision number. If you wish to revert to the previous revision, use number N-1. In my case, it’s 2.
root@kmaster1:~/nginx-app# helm rollback nginx-app 2
Rollback was a success! Happy Helming!
root@kmaster1:~/nginx-app#
3. Here we can see that the replica has been reverted to 2 and the revision has been bumped to the next number. [4]
root@kmaster1:~/nginx-app# kubectl get all
NAME                            READY   STATUS    RESTARTS   AGE
pod/nginx-app-d6b6d5d8f-hbnp2   1/1     Running   0          3s
pod/nginx-app-d6b6d5d8f-hfh26   1/1     Running   0          8m59s

NAME                 TYPE        CLUSTER-IP   EXTERNAL-IP   PORT(S)   AGE
service/kubernetes   ClusterIP   10.96.0.1    <none>        443/TCP   384d

NAME                        READY   UP-TO-DATE   AVAILABLE   AGE
deployment.apps/nginx-app   2/2     2            2           10m

NAME                                  DESIRED   CURRENT   READY   AGE
replicaset.apps/nginx-app-d6b6d5d8f   2         2         2       9m2s
replicaset.apps/nginx-app-d6ff45774   0         0         0       10m
root@kmaster1:~/nginx-app# helm ls
NAME            NAMESPACE       REVISION        UPDATED                                 STATUS          CHART           APP VERSION
nginx-app       default         4               2023-11-03 17:22:04.263465823 +0000 UTC deployed        myapp1-0.1.1    0.1.1
root@kmaster1:~/nginx-app#
Create a Chart using helm commands :

Step 1: Create a new chart Run the following command to create a new Helm chart:
$ helm create <chart-name>
This command will create a new directory with the specified chart name and a basic chart structure.
Example:
root@kmaster1:~# helm create myapp1
Creating myapp1
root@kmaster1:~#
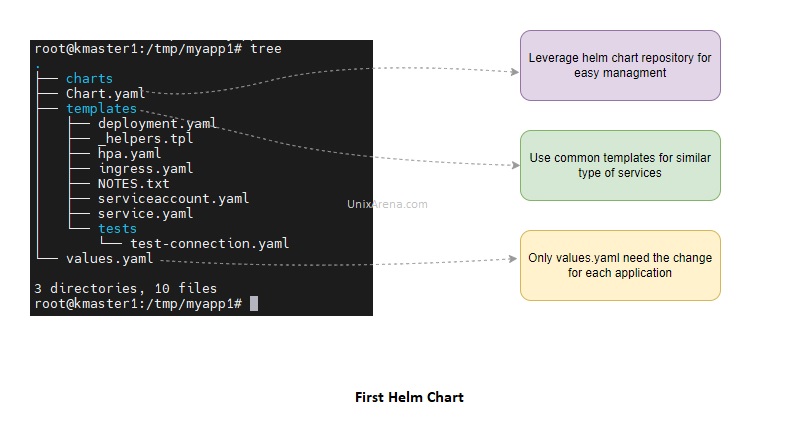
root@kmaster1:~# tree myapp1
myapp1
├── charts
├── Chart.yaml
├── templates
│   ├── deployment.yaml
│   ├── _helpers.tpl
│   ├── hpa.yaml
│   ├── ingress.yaml
│   ├── NOTES.txt
│   ├── serviceaccount.yaml
│   ├── service.yaml
│   └── tests
│   └── test-connection.yaml
└── values.yaml
3 directories, 10 files
root@kmaster1:~#
Step 2: Customize the chart, Navigate to the directory created in the previous step and modify the files to suit your application’s needs. The most important files are:
- Chart.yaml: Contains metadata about the chart, such as the name, version, and description.
- values.yaml: Includes the default configuration values for the chart.
- templates/*: Contains the Kubernetes manifest files that define the resources to be deployed, such as deployments, services, and ingresses.
Step 3: (Optional) Publish the chart If you want to share the chart with others, you can publish it to a chart repository. You can either set up your own repository or use an existing one.
Step 4: Install the chart You can install the chart on your Kubernetes cluster using the following command:
# helm install <release-name> <chart-name>
Replace <release-name> with a name of your choice for the release.
You have created and deployed your first Helm chart. You can now manage your Kubernetes applications more efficiently using Helm. Helm has a robust ecosystem of publicly available charts in the Helm Hub and various other repositories, making it easier to find and share pre-configured Kubernetes applications.