


In this article, I will walk you through the various methods of building docker images and updating the existing image. Docker has played a major role in the microservice revolution. In today’s world, all the new application development targets the container environment to speed up the release cycle. In the containerized environment, changes are frequently shipped to production. It means, docker images will be updated with new code and get tested in Dev, QA, and move to production in a short cycle.
What is a docker image?
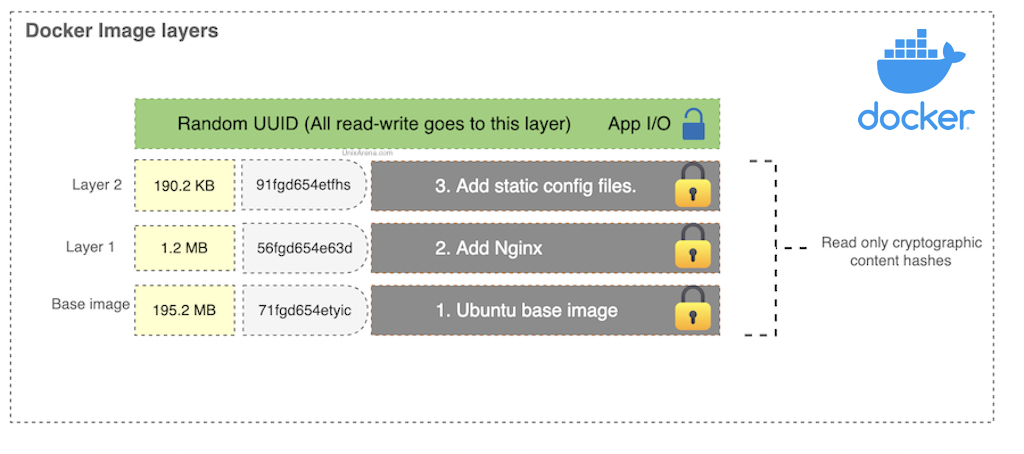
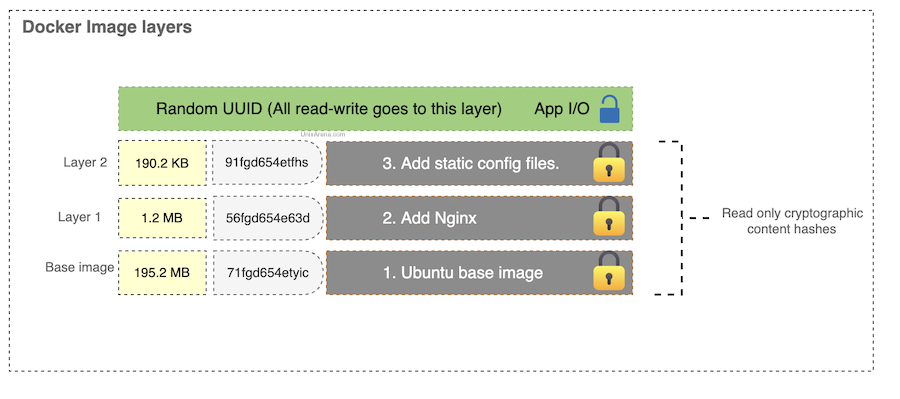
A Docker image is nothing but a template for the execution of a container. The image consists of the required base operating system, libraries, files and folders, environment variables, volume mount points, and your application binaries. It’s a complete package that contains applications and the required dependencies. You can have multiple containers running from the same image which share the same behavior and promote the scaling and distribution of the application. The following diagram explains the layers of the docker image. The new content cryptographic hashes will be added for every change you make above your base container image.

How do I create the docker image?
In this article, we will be looking at the following two methods to create a new Docker image.
- Create the docker image using the existing container.
- Create the docker image using dockerfile.
Create a Docker image from an existing container:
In this method, you start with an existing image. You make the required changes in the container including installing the packages, making the configuration changes, then building a new image from it.
1. For an example, I have the following docker image. We will use this image to build a new image with some changes.
uxpro-$docker images |grep nginx
nginx                         latest               1029bf52dfc8   8 weeks ago    134MB
uxpro-$
2. Let’s inspect the docker image.
uxpro-$docker inspect  1029bf52dfc8
[
    {
        "Id": "sha256:1029bf52dfc8d2039f1c5bc036f7a23e700914385cf2be90d1e1670b28e54a08",
        "RepoTags": [
            "nginx:latest"
        ],
        "RepoDigests": [],
        "Parent": "sha256:8f05d73835934b8220e1abd2f157ea4e2260b9c26f6f63a8e3975e7affa46724",
        "Comment": "",
        "Created": "2022-07-19T13:41:52.066665304Z",
        "Container": "ed2a854f5b5299c42ec5246d86252b55d296df60c174951c20cea9506f9086f8",
        "ContainerConfig": {
            "Hostname": "ed2a854f5b52",
            "Domainname": "",
            "User": "",
            "AttachStdin": false,
            "AttachStdout": false,
            "AttachStderr": false,
            "ExposedPorts": {
                "80/tcp": {}
            },
            "Tty": false,
            "OpenStdin": false,
            "StdinOnce": false,
            "Env": [
                "PATH=/usr/local/sbin:/usr/local/bin:/usr/sbin:/usr/bin:/sbin:/bin",
                "NGINX_VERSION=1.21.6",
                "NJS_VERSION=0.7.3",
                "PKG_RELEASE=1~bullseye"
            ],
            "Cmd": [
                "nginx",
                "-g",
                "daemon off;"
            ],
            "Image": "nginx",
            "Volumes": null,
            "WorkingDir": "",
            "Entrypoint": [
                "/docker-entrypoint.sh"
            ],
            "OnBuild": null,
            "Labels": {
                "maintainer": "NGINX Docker Maintainers <docker-maint@nginx.com>"
            },
            "StopSignal": "SIGQUIT"
        },
        "DockerVersion": "20.10.14",
        "Author": "",
        "Config": {
            "Hostname": "ed2a854f5b52",
            "Domainname": "",
            "User": "",
            "AttachStdin": false,
            "AttachStdout": false,
            "AttachStderr": false,
            "ExposedPorts": {
                "80/tcp": {}
            },
            "Tty": false,
            "OpenStdin": false,
            "StdinOnce": false,
            "Env": [
                "PATH=/usr/local/sbin:/usr/local/bin:/usr/sbin:/usr/bin:/sbin:/bin",
                "NGINX_VERSION=1.21.6",
                "NJS_VERSION=0.7.3",
                "PKG_RELEASE=1~bullseye"
            ],
            "Cmd": [
                "nginx",
                "-g",
                "daemon off;"
            ],
            "Image": "nginx",
            "Volumes": null,
            "WorkingDir": "",
            "Entrypoint": [
                "/docker-entrypoint.sh"
            ],
            "OnBuild": null,
            "Labels": {
                "maintainer": "NGINX Docker Maintainers <docker-maint@nginx.com>"
            },
            "StopSignal": "SIGQUIT"
        },
        "Architecture": "arm64",
        "Variant": "v8",
        "Os": "linux",
        "Size": 134471522,
        "VirtualSize": 134471522,
        "GraphDriver": {
            "Data": {
                "LowerDir": "/var/lib/docker/overlay2/a571594155cfb96993461af7ee3c7b0bfcfb82ade270b42cd9495ed9e101cece/diff:/var/lib/docker/overlay2/aabff4f58d706d4b2d905e183b301146da43ba38efc321347825b32b9a88cc4e/diff:/var/lib/docker/overlay2/ade6f081f8e4ef996918edc7002b3cc9c15752c3421f6f5820116f4492089938/diff:/var/lib/docker/overlay2/57632d95b43d62f7283338e3fdf2c1ba04e7ac26b29e2eb3ad9d9b05cae09c16/diff:/var/lib/docker/overlay2/18a9557e5440c872f65afd55f78dd5d40afd61f3e3802f73672f80d691c04166/diff:/var/lib/docker/overlay2/d605abb7deaaa4ea2297ee1798f560ac177b5315db40377f5f081ea8a1799824/diff",
                "MergedDir": "/var/lib/docker/overlay2/0f9c743323c813dc84f3b4c702bc9579bafa172d7364d4b49062a787a76fdc44/merged",
                "UpperDir": "/var/lib/docker/overlay2/0f9c743323c813dc84f3b4c702bc9579bafa172d7364d4b49062a787a76fdc44/diff",
                "WorkDir": "/var/lib/docker/overlay2/0f9c743323c813dc84f3b4c702bc9579bafa172d7364d4b49062a787a76fdc44/work"
            },
            "Name": "overlay2"
        },
        "RootFS": {
            "Type": "layers",
            "Layers": [
                "sha256:4d31756873fb88bc09589701cc12e7ed0082d5963278db3cb8640691052f107a",
                "sha256:b4f221ab2cefea363eda86f65cf9eb01bc9d5797c4607f7c6a66d30e12ab55f4",
                "sha256:8b47b4b0c1c8d59d0195a060fec5190afb546058ea2481d4dc06178f2a0eba40",
                "sha256:bd7a2c2a8fcc9c6bf3fae1f9b59f23b297ff092d882afff75b5b5631b9b0ae87",
                "sha256:f2ad8f5c9e0d7bb844dae61e45857938b6fbc13671d7c68986c13d55bb3d8c94",
                "sha256:f617c13b24b92c2a6c2a4079be2d4a2f63c780c06cfe1f6666e365fba1add810",
                "sha256:e479105493f818be82911ca2d2a539629a55b38291ba0047d042ecffced898c1"
            ]
        },
        "Metadata": {
            "LastTagTime": "2022-07-19T13:41:52.070710929Z"
        }
    }
]
3. Start the container to access the container to make the changes. I have exposed the container port 80 to localhost.
uxpro-$docker run --name nginx_ua -d -p 127.0.0.1:80:80 nginx
b45e9bea08640c370b8b4724f6418c246d143f8975f3f3f0a2866de58bb9bb79
uxpro-$docker ps
CONTAINER ID   IMAGE                   COMMAND                  CREATED         STATUS         PORTS                       NAMES
b45e9bea0864   nginx                   "/docker-entrypoint.…"   2 seconds ago   Up 2 seconds   80/tcp                      nginx_ua
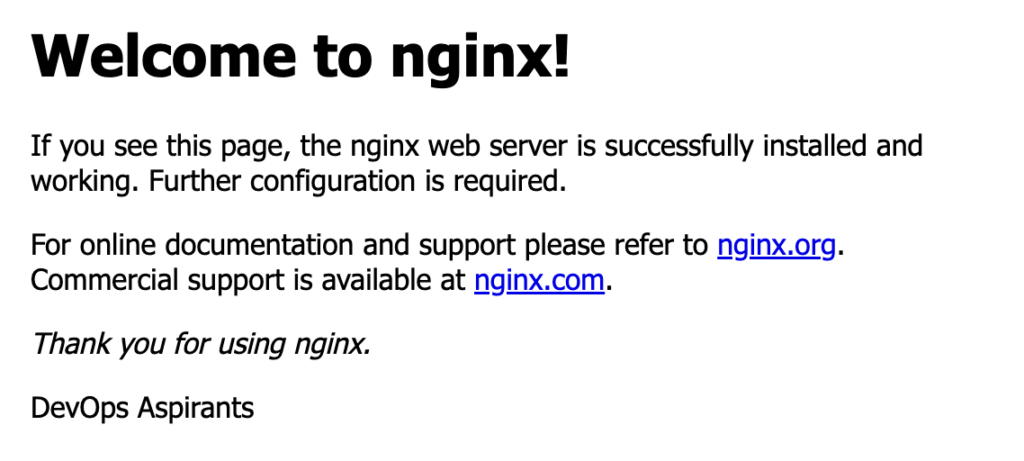
4. Access the webpage from your host. (http://localhost:80). Here is the current nginx webpage from the container.

6. Let’s update the webpage. You can copy the updated nginx file to the container.
<!DOCTYPE html>
<html>
<head>
<title>Welcome to UxPro!</title>
<style>
html { color-scheme: light dark; }
body { width: 35em; margin: 0 auto;
font-family: Tahoma, Verdana, Arial, sans-serif; }
</style>
</head>
<body>
<h1>Welcome to UnixArena</h1>
<p>If you see this page, the nginx web server is successfully installed and
working. Further configuration is required.</p>

<p>For online documentation and support please refer to
<a href="http://nginx.org/">nginx.org</a>.<br/>
Commercial support is available at
<a href="http://nginx.com/">nginx.com</a>.</p>

<p><em>Thank you for using nginx.</em></p>
</body>
</html>
UnixArena
DevOps Aspirants
7. Copying the file to the docker container.
uxpro-$docker cp index.html nginx_ua:/usr/share/nginx/html/
uxpro-$docker exec -it nginx_ua bash
root@1becb1f2d1f3:/# ls -lrt /usr/share/nginx/html/index.html
-rw-r--r-- 1 501 dialout 645 Sep 17 14:16 /usr/share/nginx/html/index.html
root@1becb1f2d1f3:/#
8. Let’s access the same webpage again using http://localhost:80
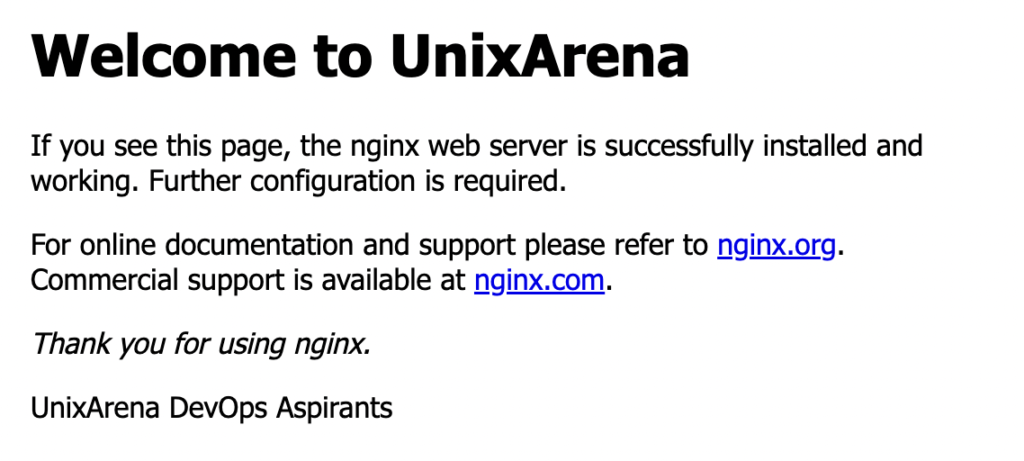
9. We have made some changes to the container. But this change is only on the container level. If you launch a new container using the nginx image, you will not have the changes that we have made. Let’s create a new image to have this change persistent.
uxpro-$docker commit -m "Message" -a "Author Name" [containername] [imagename]

uxpro-$docker commit -m "Updated index page" -a "Lingeswaran" nginx_ua nginx_ua:v1
sha256:123d56ab4650de94caa2fe5feddc77dbc3fb001afb6da083fe92482f7eb99fc0
uxpro-$docker images |grep nginx_ua
nginx_ua                      v1                   123d56ab4650   7 seconds ago   134MB
uxpro-$
10. We have successfully created a new image from the existing container. Let’s validate the image. First, let’s clean up the existing container.
uxpro-$docker stop nginx_ua
nginx_ua
uxpro-$docker rm nginx_ua
nginx_ua
uxpro-$docker ps
11. Let’s start the new container from the newly created image.
uxpro-$docker run --name nginx_ua -d -p 127.0.0.1:80:80 nginx_ua:v1
036d95497860ee27904abd624c18140b71b86f00cc797f21d4bf3de7251f483e
uxpro-$docker ps
CONTAINER ID   IMAGE                   COMMAND                  CREATED         STATUS         PORTS                       NAMES
036d95497860   nginx_ua:v1             "/docker-entrypoint.…"   3 seconds ago   Up 3 seconds   127.0.0.1:80->80/tcp        nginx_ua
12. Verify the webpage. You can see that our changes are made permanent on the image.
uxpro-$curl -L http://localhost:80
<!DOCTYPE html>
<html>
<head>
<title>Welcome to UxPro!</title>
<style>
html { color-scheme: light dark; }
body { width: 35em; margin: 0 auto;
font-family: Tahoma, Verdana, Arial, sans-serif; }
</style>
</head>
<body>
<h1>Welcome to UnixArena</h1>
<p>If you see this page, the nginx web server is successfully installed and
working. Further configuration is required.</p>

<p>For online documentation and support please refer to
<a href="http://nginx.org/">nginx.org</a>.<br/>
Commercial support is available at
<a href="http://nginx.com/">nginx.com</a>.</p>

<p><em>Thank you for using nginx.</em></p>
</body>
</html>
UnixArena
DevOps Aspirants
uxpro-$
You can refer post that talks about exporting the docker image as tarball if you want to transfer the image from one system to another without the help of the docker hub or artifactory.
Using Dockerfile.
Creating the docker image using Dockerfile is largely used in pipelines and standard method of updating/creating the container image. This method fully eliminates manual commands and helps to reproduce consistent images, unlike the manual method. In the manual method, you will have full control of the image update. But in the Dockerfile method, you need to give imperative instructions in the docker file.
One of the main advantages of using Dockerfile is that it always pulls the latest base image for the new images. Creating an image from an existing container will not have the latest base image. An updated base is required to get the security patches and fixes for the vulnerabilities. Check out the docker best practice here
Create the docker image using Dockerfile
Let’s create a new image from nginx latest image with our own HTML index file.
1. Created a new Dockerfile and kept the updated index.html to create a new image. In the Dockerfile, you can add all the changes which need to have in the new image. (Ex: installing packages, updating configs etc.. )
uxpro-$cat Dockerfile
FROM nginx:latest
COPY index.html ./usr/share/nginx/html/
uxpro-$ls -lrt
total 16
-rw-r--r--  1 lingeswaran  staff  645 Sep 17 19:46 index.html
-rw-r--r--  1 lingeswaran  staff   59 Sep 17 22:59 Dockerfile
uxpro-$
2. Run the docker build command to create a new docker image with the name “nginx_uaf:latest” .
uxpro-$docker build -t nginx_uaf:latest -f Dockerfile .
[+] Building 0.2s (7/7) FINISHED
 => [internal] load build definition from Dockerfile                                                                                                 0.0s
 => => transferring dockerfile: 101B                                                                                                                 0.0s
 => [internal] load .dockerignore                                                                                                                    0.0s
 => => transferring context: 2B                                                                                                                      0.0s
 => [internal] load metadata for docker.io/library/nginx:latest                                                                                      0.0s
 => [internal] load build context                                                                                                                    0.0s
 => => transferring context: 684B                                                                                                                    0.0s
 => [1/2] FROM docker.io/library/nginx:latest                                                                                                        0.1s
 => [2/2] COPY index.html ./usr/share/nginx/html/                                                                                                    0.0s
 => exporting to image                                                                                                                               0.0s
 => => exporting layers                                                                                                                              0.0s
 => => writing image sha256:36630cc31331daaade01a07cb7bdbd336ec3260c75acfd9110bc50d50ff0ffc0                                                         0.0s
 => => naming to docker.io/library/nginx_uaf:latest                                                                                                  0.0s

Use 'docker scan' to run Snyk tests against images to find vulnerabilities and learn how to fix them

uxpro-$docker images
REPOSITORY                    TAG                  IMAGE ID       CREATED             SIZE
nginx_uaf                     latest               36630cc31331   12 seconds ago      134MB
3. Let’s test the new image by starting a new container from it.
uxpro-$docker run --name nginx_uaf -d -p 127.0.0.1:80:80 nginx_uaf:latest
444fde652349b961fd815dc5bf1796c8f1c1934912cc83b5c368178fe3c06357
uxpro-$docker ps |grep uaf
444fde652349   nginx_uaf:latest        "/docker-entrypoint.…"   6 seconds ago   Up 5 seconds   127.0.0.1:80->80/tcp        nginx_uaf
uxpro-$
4. Access the localhost:80 webpage to see our updated index file.
uxpro-$curl localhost:80
<!DOCTYPE html>
<html>
<head>
<title>Welcome to UxPro!</title>
<style>
html { color-scheme: light dark; }
body { width: 35em; margin: 0 auto;
font-family: Tahoma, Verdana, Arial, sans-serif; }
</style>
</head>
<body>
<h1>Welcome to UnixArena</h1>
<p>If you see this page, the nginx web server is successfully installed and
working. Further configuration is required.</p>

<p>For online documentation and support please refer to
<a href="http://nginx.org/">nginx.org</a>.<br/>
Commercial support is available at
<a href="http://nginx.com/">nginx.com</a>.</p>

<p><em>Thank you for using nginx.</em></p>
</body>
</html>
UnixArena
DevOps Aspirants
uxpro-$
Updating the docker image is straightforward and simple. Once you have the base image, you can customize it by updating the image manually and committing it to create an image from it. Using Dockerfile, you even do better and pull the latest base image for every build you do. It’s a recommended method and the easiest one too.
Once you have the docker image, you can push the image to the artifactory. Orchestrate the containers using kubernetes for large-scale deployments and dynamic environments.
Hope this article is informative to you.