


NFS subdir external provisioner is an automatic provisioner that uses your existing and already configured NFS server to support dynamic provisioning of Kubernetes Persistent Volumes via Persistent Volume Claims. This article will walk you through how to deploy NFS Subdir External Provisioner to the k8s cluster and create the PV using the NFS backend storage. We just need to ensure that the K8s cluster is having connectivity with the NFS server that you are going to use in the configuration. NFS uses port 2049 and ensures that necessary ports are open to the target.
NFS storage can be any server, storage appliances or NAS devices. For testing purpose, i have exported the Linux filesystem as NFS share.

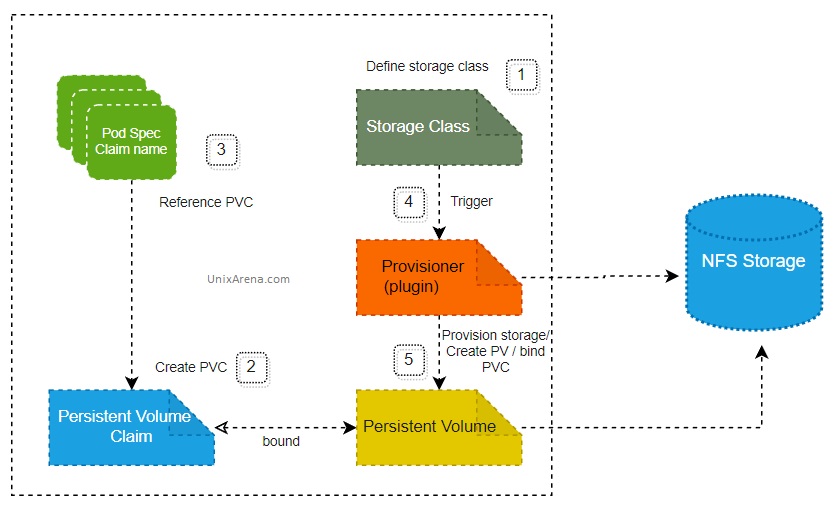
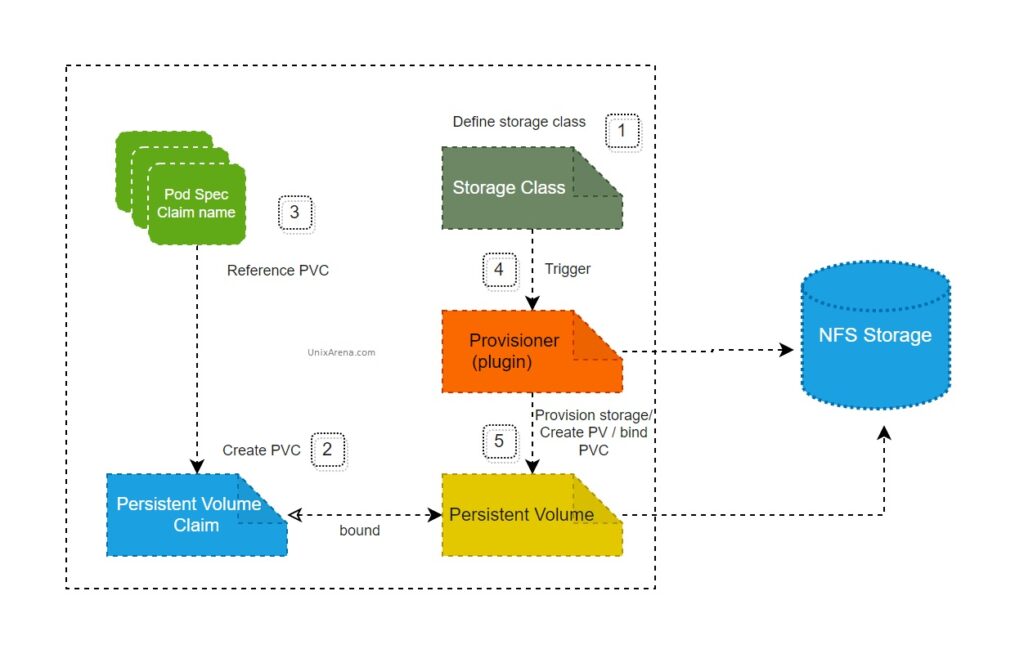
Deploy NFS Subdir External Provisioner
1. Let’s create a service account with the name “nfs-client-provisioner”. Create a new file with the following content (ex: service_rbac.yaml).
apiVersion: v1
kind: ServiceAccount
metadata:
  name: nfs-client-provisioner
  # replace with namespace where provisioner is deployed
  namespace: default
---
kind: ClusterRole
apiVersion: rbac.authorization.k8s.io/v1
metadata:
  name: nfs-client-provisioner-runner
rules:
  - apiGroups: [""]
    resources: ["nodes"]
    verbs: ["get", "list", "watch"]
  - apiGroups: [""]
    resources: ["persistentvolumes"]
    verbs: ["get", "list", "watch", "create", "delete"]
  - apiGroups: [""]
    resources: ["persistentvolumeclaims"]
    verbs: ["get", "list", "watch", "update"]
  - apiGroups: ["storage.k8s.io"]
    resources: ["storageclasses"]
    verbs: ["get", "list", "watch"]
  - apiGroups: [""]
    resources: ["events"]
    verbs: ["create", "update", "patch"]
---
kind: ClusterRoleBinding
apiVersion: rbac.authorization.k8s.io/v1
metadata:
  name: run-nfs-client-provisioner
subjects:
  - kind: ServiceAccount
    name: nfs-client-provisioner
    # replace with namespace where provisioner is deployed
    namespace: default
roleRef:
  kind: ClusterRole
  name: nfs-client-provisioner-runner
  apiGroup: rbac.authorization.k8s.io
---
kind: Role
apiVersion: rbac.authorization.k8s.io/v1
metadata:
  name: leader-locking-nfs-client-provisioner
  # replace with namespace where provisioner is deployed
  namespace: default
rules:
  - apiGroups: [""]
    resources: ["endpoints"]
    verbs: ["get", "list", "watch", "create", "update", "patch"]
---
kind: RoleBinding
apiVersion: rbac.authorization.k8s.io/v1
metadata:
  name: leader-locking-nfs-client-provisioner
  # replace with namespace where provisioner is deployed
  namespace: default
subjects:
  - kind: ServiceAccount
    name: nfs-client-provisioner
    # replace with namespace where provisioner is deployed
    namespace: default
roleRef:
  kind: Role
  name: leader-locking-nfs-client-provisioner
  apiGroup: rbac.authorization.k8s.io
2. Create the service account.
lingesh@uamaster1:~/nfs/subdir-nfs$ kubectl apply -f service_rbac.yaml
rolebinding.rbac.authorization.k8s.io/leader-locking-nfs-client-provisioner configured
lingesh@uamaster1:~/nfs/subdir-nfs$
3. Verify the newly created service account.
lingesh@uamaster1:~/nfs/subdir-nfs$ kubectl get sa nfs-client-provisioner
NAME                     SECRETS   AGE
nfs-client-provisioner   1         5d21h
lingesh@uamaster1:~/nfs/subdir-nfs$
4. Create a new storage class using the following file. (ex: class.yaml)
apiVersion: storage.k8s.io/v1
kind: StorageClass
metadata:
  name: nfs-client
  annotations:
    storageclass.kubernetes.io/is-default-class: "true"
provisioner: k8s-sigs.io/nfs-subdir-external-provisioner # or choose another name, must match deployment's env PROVISIONER_NAME'
parameters:
  archiveOnDelete: "false"

lingesh@uamaster1:~/nfs/subdir-nfs$ kubectl apply -f class.yaml
storageclass.storage.k8s.io/nfs-client configured
lingesh@uamaster1:~/nfs/subdir-nfs$
4. Verify the newly created storage class.
lingesh@uamaster1:~/nfs/subdir-nfs$ kubectl get sa nfs-client-provisioner
NAME                     SECRETS   AGE
nfs-client-provisioner   1         5d21h
lingesh@uamaster1:~/nfs/subdir-nfs$
5. Let’s create the deployment file. Update your NFS server IP and share path. My NFS server IP is “192.168.23.132” and path is “/mnt/nfs_share”
apiVersion: apps/v1
kind: Deployment
metadata:
  name: nfs-client-provisioner
  labels:
    app: nfs-client-provisioner
  # replace with namespace where provisioner is deployed
  namespace: default
spec:
  replicas: 1
  strategy:
    type: Recreate
  selector:
    matchLabels:
      app: nfs-client-provisioner
  template:
    metadata:
      labels:
        app: nfs-client-provisioner
    spec:
      serviceAccountName: nfs-client-provisioner
      containers:
        - name: nfs-client-provisioner
          image: k8s.gcr.io/sig-storage/nfs-subdir-external-provisioner:v4.0.2
          volumeMounts:
            - name: nfs-client-root
              mountPath: /persistentvolumes
          env:
            - name: PROVISIONER_NAME
              value: k8s-sigs.io/nfs-subdir-external-provisioner
            - name: NFS_SERVER
              value: 192.168.23.132
            - name: NFS_PATH
              value: /mnt/nfs_share
      volumes:
        - name: nfs-client-root
          nfs:
            server: 192.168.23.132
            path: /mnt/nfs_share
6. Create the deployment for “nfs-subdir-external-provisioner” .
lingesh@uamaster1:~/nfs/subdir-nfs$ kubectl apply -f deployment.yaml
deployment.apps/nfs-client-provisioner configured
lingesh@uamaster1:~/nfs/subdir-nfs$
7. Verify the nfs-subdir-external-provisioner by listing all the objects from the default namespace. (Note: I have used the default namespace for the deployment)
lingesh@uamaster1:~/nfs/subdir-nfs$ kubectl get all
NAME                                          READY   STATUS    RESTARTS       AGE
pod/nfs-client-provisioner-6c9675b6bb-82ggc   1/1     Running   17 (23m ago)   5d21h

NAME                 TYPE        CLUSTER-IP   EXTERNAL-IP   PORT(S)   AGE
service/kubernetes   ClusterIP   10.233.0.1   <none>        443/TCP   8d

NAME                                     READY   UP-TO-DATE   AVAILABLE   AGE
deployment.apps/nfs-client-provisioner   1/1     1            1           5d21h

NAME                                                DESIRED   CURRENT   READY   AGE
replicaset.apps/nfs-client-provisioner-6c9675b6bb   1         1         1       5d21h
lingesh@uamaster1:~/nfs/subdir-nfs$
Here we could see that nfs-client-provisioner is up and running.
Test the NFS client provisioner
8. Let’s test the dynamic nfs client provisioned. Create the following manifest to provision volume with a size of 512MB.
apiVersion: v1
kind: PersistentVolumeClaim
metadata:
  name: pvc-nfs-pv2
spec:
  storageClassName: nfs-client
  accessModes:
    - ReadWriteMany
  resources:
    requests:
      storage: 500Mi
9. Create the pv & pvc using the manifest.
lingesh@uamaster1:~/nfs/kubernetes/yamls$ kubectl create -f 4-pvc-nfs.yaml
persistentvolumeclaim/pvc-nfs-pv2 created
lingesh@uamaster1:~/nfs/kubernetes/yamls$ kubectl get pv,pvc
NAME                                                        CAPACITY   ACCESS MODES   RECLAIM POLICY   STATUS   CLAIM                 STORAGECLASS   REASON   AGE
persistentvolume/pvc-9c7a80a1-9da9-4e3e-be0e-969f41ad437e   500Mi      RWX            Delete           Bound    default/pvc-nfs-pv2   nfs-client              11s

NAME                                STATUS   VOLUME                                     CAPACITY   ACCESS MODES   STORAGECLASS   AGE
persistentvolumeclaim/pvc-nfs-pv2   Bound    pvc-9c7a80a1-9da9-4e3e-be0e-969f41ad437e   500Mi      RWX            nfs-client     11s
lingesh@uamaster1:~/nfs/kubernetes/yamls$
We have successfully create pv and pvc using the nfs backend storage. Let’s try to attach pv to one of the deployment pod.
10. Create the deployment file for nginx using below manifest to test the pvc to attach the volume to the pod.
apiVersion: apps/v1
kind: Deployment
metadata:
  name: nginx-deployment
  labels:
    app: nginx
spec:
  replicas: 1
  selector:
    matchLabels:
      app: nginx
  template:
    metadata:
      labels:
        app: nginx
    spec:
      volumes:
      - name: task-pv-storage
        persistentVolumeClaim:
          claimName: pvc-nfs-pv2
      containers:
      - name: nginx
        image: nginx:1.14.2
        ports:
        - containerPort: 80
        volumeMounts:
        - mountPath: "/test"
          name: task-pv-storage
The above manifest will create new nginx deployment and attach the pvc “pvc-nfs-pv2” . This volume will be mounted under “/test” in the pod.
11. Deploy nginx using kubectl command.
lingesh@uamaster1:~$ kubectl create -f test_nginx.yaml
deployment.apps/nginx-deployment created
lingesh@uamaster1:~$ kubectl get all
NAME                                          READY   STATUS    RESTARTS       AGE
pod/nginx-deployment-6b5b759665-m49d4         1/1     Running   0              5s


NAME                                     READY   UP-TO-DATE   AVAILABLE   AGE

deployment.apps/nginx-deployment         1/1     1            1           5s

NAME                                                DESIRED   CURRENT   READY   AGE
replicaset.apps/nginx-deployment-6b5b759665         1         1         1       5s
lingesh@uamaster1:~$
12. Let’s verify the mount points in pod.
lingesh@uamaster1:~$ kubectl exec nginx-deployment-6b5b759665-m49d4 -- df /test
Filesystem                                                                                 1K-blocks     Used Available Use% Mounted on
192.168.23.132:/mnt/nfs_share/default-pvc-nfs-pv2-pvc-0c87433b-61ad-4b48-97a0-b8c62ab56517  30898176 12501504  16995840  43% /test
lingesh@uamaster1:~$
We have successfully mounted the NFS storage backend pv to pod. Hope this article is informative to you. In upcoming article, we will see how can we use the cloud natvie storage plugins for the kubernetes cluster.