


How to set up a Kubernetes cluster in an automated fashion on our LAB environment? This article will walk you through kubernetes installation on Ubuntu on my windows 10 workstation. Getting hands-on on kubernetes is not a big task nowadays. There are hundreds of kubernetes variants available in the market including managed kubernetes environments like EKS, AKS, GKE, etc …
Minikube is a lightweight Kubernetes implementation that creates a VM on your local machine and deploys a simple cluster containing only one node. This is the perfect platform for developers and beginners to get hands-on with kubernetes. In my environment, I have set up a mainstream kubernetes environment.
In My LAB, I have set up the Kubernetes environment with 1 Master and 2 worker nodes using Kubespray.
Infrastructure:
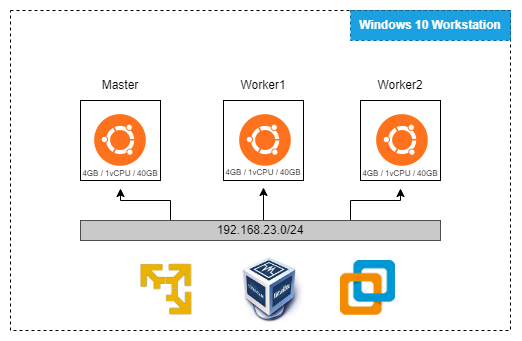
In Windows 10, I have installed VMware Player which is free for non-commercial purposes. VMware workstation offers more features compared to the player and VirtualBox is a very popular open-source hypervisor. You can use any one of the virtualization technology to set up a home LAB.
I have created 3 Ubuntu virtual machines on a VMware player. The plan is to create 1 master and 2 worker nodes. All three VMs will have internet connectivity to download the images from the internet for various deployments.

Setting up k8s Cluster:
There are multiple automation methods available in the market to get a production-grade Kubernetes cluster up and running. kOps is one of the popular methods to set up a k8s cluster but it’s tightly integrated with unique features. For people with familiarity with Ansible, existing Ansible deployments, or the desire to run a Kubernetes cluster across multiple platforms, Kubespray is a good choice. I have used kubespary to bootstrap the cluster.

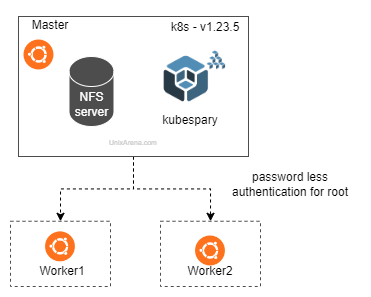
I do not have a dedicated node for an ansible host to set up kubespary. I have used the master node to perform the cluster setup. Password-less authentication has been configured between both worker nodes.
root@uamaster1:~# ssh uaworker1 uname -n
uaworker1
root@uamaster1:~# ssh uaworker2 uname -n
uaworker2
root@uamaster1:~#
1. Clone the kubespary git repo.
# git clone https://github.com/kubernetes-sigs/kubespray.git
2. Create the inventory file to reflect the master and worker node details.
root@uamaster1:~/# cd kubespray/inventory/sample
root@uamaster1:~/kubespray/inventory/sample# cat uak8s.ini  |grep -v "#"
[all]
uamaster1 ansible_host=192.168.23.132  ip=192.168.23.132
uaworker1 ansible_host=192.168.23.133  ip=192.168.23.133
uaworker2 ansible_host=192.168.23.134  ip=192.168.23.134


[kube_control_plane]
uamaster1

[etcd]
uamaster1

[kube_node]
uaworker1
uaworker2

[calico_rr]

[k8s_cluster:children]
kube_control_plane
kube_node
calico_rr
root@uamaster1:~/kubespray/inventory/sample#
3. Start the cluster installation using the following command.
root@uamaster1:~/kubespray/inventory/sample# ansible-playbook -i uak8s.ini ../../cluster.yml -b -v
TASK [network_plugin/calico : Check if inventory match current cluster configuration] ****************************
ok: [uamaster1] => {
    "changed": false,
    "msg": "All assertions passed"
}

TASK [network_plugin/calico : Check kdd calico_datastore if calico_apiserver_enabled] *****************************
skipping: [uamaster1] => {"changed": false, "skip_reason": "Conditional result was False"}

TASK [network_plugin/calico : Check kdd calico_datastore if typha_enabled] ****************************************
skipping: [uamaster1] => {"changed": false, "skip_reason": "Conditional result was False"}

PLAY RECAP *******************************************************************************************************
localhost                  : ok=4    changed=0    unreachable=0    failed=0    skipped=0    rescued=0    ignored=0
uamaster1                  : ok=743  changed=113  unreachable=0    failed=0    skipped=1298 rescued=0    ignored=5
uaworker1                  : ok=503  changed=67   unreachable=0    failed=0    skipped=770  rescued=0    ignored=1
uaworker2                  : ok=503  changed=67   unreachable=0    failed=0    skipped=769  rescued=0    ignored=1
4. Once the playbook is completed successfully, you can able to list the nodes using the “kubectl” command.
root@uamaster1:~/kubespray/inventory/sample# kubectl get nodes
NAME        STATUS   ROLES                  AGE   VERSION
uamaster1   Ready    control-plane,master   16m   v1.23.5
uaworker1   Ready    <none>                 14m   v1.23.5
uaworker2   Ready    <none>                 14m   v1.23.5
root@uamaster1:~/kubespray/inventory/sample#
5. Let’s list all the kubernetes objects.
root@uamaster1:~/kubespray/inventory/sample# kubectl get all -A
NAMESPACE     NAME                                           READY   STATUS    RESTARTS      AGE
kube-system   pod/calico-kube-controllers-75fcdd655b-rb24b   1/1     Running   0             13m
kube-system   pod/calico-node-9mktm                          1/1     Running   0             14m
kube-system   pod/calico-node-kjc2b                          1/1     Running   0             14m
kube-system   pod/calico-node-vdf2b                          1/1     Running   0             14m
kube-system   pod/coredns-76b4fb4578-khfkn                   1/1     Running   0             12m
kube-system   pod/coredns-76b4fb4578-zjmhz                   1/1     Running   0             12m
kube-system   pod/dns-autoscaler-7979fb6659-j6md2            1/1     Running   0             12m
kube-system   pod/kube-apiserver-uamaster1                   1/1     Running   1             16m
kube-system   pod/kube-controller-manager-uamaster1          1/1     Running   2 (11m ago)   16m
kube-system   pod/kube-proxy-826q6                           1/1     Running   0             14m
kube-system   pod/kube-proxy-rfknc                           1/1     Running   0             15m
kube-system   pod/kube-proxy-zzn5x                           1/1     Running   0             15m
kube-system   pod/kube-scheduler-uamaster1                   1/1     Running   2 (11m ago)   16m
kube-system   pod/nginx-proxy-uaworker1                      1/1     Running   0             15m
kube-system   pod/nginx-proxy-uaworker2                      1/1     Running   0             15m
kube-system   pod/nodelocaldns-l5zkd                         1/1     Running   0             12m
kube-system   pod/nodelocaldns-qpd6r                         1/1     Running   0             12m
kube-system   pod/nodelocaldns-wn6qm                         1/1     Running   0             12m

NAMESPACE     NAME                 TYPE        CLUSTER-IP   EXTERNAL-IP   PORT(S)                  AGE
default       service/kubernetes   ClusterIP   10.233.0.1   <none>        443/TCP                  16m
kube-system   service/coredns      ClusterIP   10.233.0.3   <none>        53/UDP,53/TCP,9153/TCP   12m

NAMESPACE     NAME                          DESIRED   CURRENT   READY   UP-TO-DATE   AVAILABLE   NODE SELECTOR            AGE
kube-system   daemonset.apps/calico-node    3         3         3       3            3           kubernetes.io/os=linux   14m
kube-system   daemonset.apps/kube-proxy     3         3         3       3            3           kubernetes.io/os=linux   16m
kube-system   daemonset.apps/nodelocaldns   3         3         3       3            3           kubernetes.io/os=linux   12m

NAMESPACE     NAME                                      READY   UP-TO-DATE   AVAILABLE   AGE
kube-system   deployment.apps/calico-kube-controllers   1/1     1            1           13m
kube-system   deployment.apps/coredns                   2/2     2            2           12m
kube-system   deployment.apps/dns-autoscaler            1/1     1            1           12m

NAMESPACE     NAME                                                 DESIRED   CURRENT   READY   AGE
kube-system   replicaset.apps/calico-kube-controllers-75fcdd655b   1         1         1       13m
kube-system   replicaset.apps/coredns-76b4fb4578                   2         2         2       12m
kube-system   replicaset.apps/dns-autoscaler-7979fb6659            1         1         1       12m
root@uamaster1:~/kubespray/inventory/sample#
Deploy a new application:
Let’s deploy a new application to test the cluster environment.
1. Create a new deployment file like the one below.
apiVersion: apps/v1
kind: Deployment
metadata:
  name: nginx-deployment
  namespace: nginx-test
  labels:
    app: nginx
spec:
  replicas: 3
  selector:
    matchLabels:
      app: nginx
  template:
    metadata:
      labels:
        app: nginx
    spec:
      containers:
      - name: nginx
        image: nginx:1.14.2
        ports:
        - containerPort: 80
2. Create a new namespace
lingesh@uamaster1:~$ kubectl create namespace nginx-test
namespace/nginx-test created
lingesh@uamaster1:~$
3. Create the deployment.
lingesh@uamaster1:~$ kubectl create -f test_ngnix.yaml
deployment.apps/nginx-deployment created
lingesh@uamaster1:~$
4. Check the deployed resources on the newly created namespace.
lingesh@uamaster1:~$ kubectl get all -n nginx-test
NAME                                   READY   STATUS              RESTARTS   AGE
pod/nginx-deployment-9456bbbf9-k92b4   0/1     ContainerCreating   0          7s
pod/nginx-deployment-9456bbbf9-vnm9d   0/1     ContainerCreating   0          7s
pod/nginx-deployment-9456bbbf9-z7qcn   0/1     ContainerCreating   0          7s

NAME                               READY   UP-TO-DATE   AVAILABLE   AGE
deployment.apps/nginx-deployment   0/3     3            0           7s

NAME                                         DESIRED   CURRENT   READY   AGE
replicaset.apps/nginx-deployment-9456bbbf9   3         3         0       7s
lingesh@uamaster1:~$
Here we can see that container is creating. If you check after a few seconds container should be up and running like below.
lingesh@uamaster1:~$ kubectl get all -n nginx-test
NAME                                   READY   STATUS    RESTARTS   AGE
pod/nginx-deployment-9456bbbf9-k92b4   1/1     Running   0          26s
pod/nginx-deployment-9456bbbf9-vnm9d   1/1     Running   0          26s
pod/nginx-deployment-9456bbbf9-z7qcn   1/1     Running   0          26s

NAME                               READY   UP-TO-DATE   AVAILABLE   AGE
deployment.apps/nginx-deployment   3/3     3            3           26s

NAME                                         DESIRED   CURRENT   READY   AGE
replicaset.apps/nginx-deployment-9456bbbf9   3         3         3       26s
lingesh@uamaster1:~$
We have successfully set up the Kubernetes environment using kubespary. In the upcoming article, we will see how to expose the service outside of the cluster using node port and ingress controllers. There will be a few more components like an ingress controller, certificate manager, and Load balancer that need to be deployed in an order to simulate the real kubernetes production environment.