


Terraform is an open-source infrastructure as a code software tool that provides a consistent CLI workflow to manage hundreds of cloud services. Terraform codifies cloud APIs into declarative configuration files. Terraform is a tool for building, changing, and versioning infrastructure safely and efficiently. Terraform can manage existing and popular service providers as well as custom in-house solutions. Configuration files describe to Terraform the components needed to run a single application or your entire data center. Terraform generates an execution plan describing what it will do to reach the desired state, and then executes it to build the described infrastructure.
Download Terraform Binary
- Terraform CLI is free to download and use. If you are using a Linux machine, use the following command to download Terraform.
[root@terra terraform_demo]# wget --no-check-certificate https://releases.hashicorp.com/terraform/1.0.0/terraform_1.0.0_linux_amd64.zip -O /usr/sbin/terraform.zip
2021-06-12 13:53:46 (5.58 MB/s) - ‘/usr/sbin/terraform.zip’ saved [33043000/33043000]
2. Unzip the binary
[root@terra terraform_demo]# unzip /usr/sbin/terraform.zip
[root@terra terraform_demo]# terraform version
 Terraform v1.0.0
 on linux_amd64
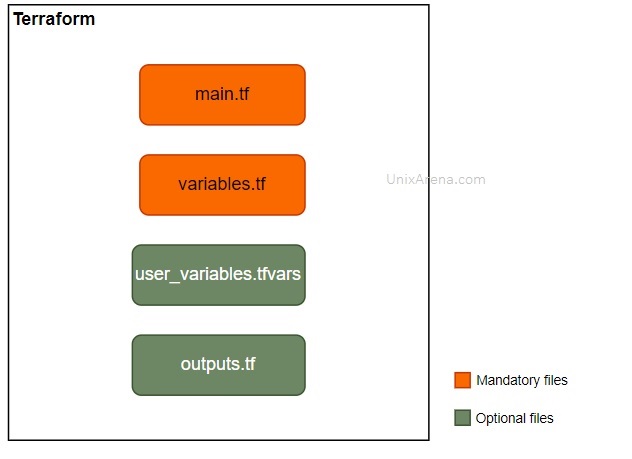
Terraform File Structure:
Terraform recognizes file extensions .tf and .tf.json. These files are called configuration files. Terraform code will be always written in the plain text file. “main.tf” & “variables.tf” are the important files to build the code. The filenames don’t need to be the same as specified below but always good to name it with meaning full ones.

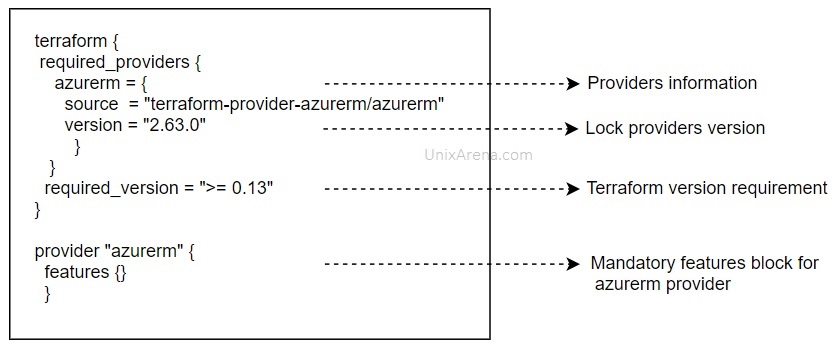
Terraform code structure – AzureRM
The following image explains that how terraform code has been constructed. Here is the snippet of the main.tf file.

Let’s create a one of the most simple and basic object in Azure using terraform.
Azure Resource group – Prepare Terraform code:
Method: 1
Here is the main.tf file which contains the three user variables.
- Subscription id
- Location
- Resource group name
main.tf
terraform {
  required_providers {
     azurerm = {
       source  = "terraform-provider-azurerm/azurerm"
       version = "2.63.0"
    }
   }
  required_version = ">= 0.14"
 }

 provider "azurerm" {
   features {}
   subscription_id = var.subscription_id
 }

 resource "azurerm_resource_group" "main" {
     name     = var.rg_name
     location = var.region
     }
Here is the variables.tf. “default” key shows the variable’s value.
variables.tf
 variable "rg_name" {
   type    = string
   default = "testrg"
 }
 variable "region"  {
   type    = string
   default = "westus2"
 }
 variable "subscription_id" {
   type    = string
   default = "xxxxx7-xxxxx-xxxx-xxxxx-xxxxxxxxx"
 }
Terraform Code Execution:
- I have created new directory and placed both main.tf & variables.tf on that.
[root@terra terraform_demo]# ls -lrt
 -rw-r--r--. 1 root root 389 Jun 12 18:11 main.tf
 -rw-r--r--. 1 root root 232 Jun 12 18:56 variables.tf
 [root@terra terraform_demo]#
2. Initialize terraform. This step will download the required providers from Terraform registry.
[root@terra terraform_demo]# terraform init
 Initializing the backend…
 Initializing provider plugins…
 Reusing previous version of terraform-provider-azurerm/azurerm from the dependency lock file
 Using previously-installed terraform-provider-azurerm/azurerm v2.63.0
 Terraform has been successfully initialized!
 You may now begin working with Terraform. Try running "terraform plan" to see
 any changes that are required for your infrastructure. All Terraform commands
 should now work.
 If you ever set or change modules or backend configuration for Terraform,
 rerun this command to reinitialize your working directory. If you forget, other
 commands will detect it and remind you to do so if necessary.

 [root@terra terraform_demo]# ls -lrt
 drwxr-xr-x. 3 root root  21 Jun 12 14:25 terraform.d
 -rw-r--r--. 1 root root 389 Jun 12 18:11 main.tf
 -rw-r--r--. 1 root root 232 Jun 12 18:56 variables.tf
 [root@terra terraform_demo]#
3. Authentication – You could use the azure service principle or log on using the az login command. As a beginner, get started with az login. If you do not have az command , install it.
[root@terra terraform_demo]# az login
 To sign in, use a web browser to open the page https://microsoft.com/devicelogin and enter the code S9WNWML8E to authenticate.
3. Create the terraform plan.
[root@terra terraform_demo]# terraform plan
 Terraform used the selected providers to generate the following execution plan. Resource actions are indicated with the following symbols:
 create
 Terraform will perform the following actions:
 # azurerm_resource_group.main will be created
 resource "azurerm_resource_group" "main" { id       = (known after apply)
 location = "westus2"
 name     = "testrg"
 }
 Plan: 1 to add, 0 to change, 0 to destroy.
 ───────────────────────────────────────────────────────────────────────────
 Note: You didn't use the -out option to save this plan, so Terraform can't guarantee to take exactly these actions if you run "terraform apply" now.
 [root@terra terraform_demo]#
4. It’s always recommended to save the plan using “-out” option to use it with “terraform apply” command.
[root@terra terraform_demo]# terraform plan -out rg_create_plan
 Terraform used the selected providers to generate the following execution plan. Resource actions are indicated with the following symbols:
 create
 Terraform will perform the following actions:
 # azurerm_resource_group.main will be created
 resource "azurerm_resource_group" "main" { id       = (known after apply)
 location = "westus2"
 name     = "testrg"
 }
 Plan: 1 to add, 0 to change, 0 to destroy.
 ───────────────────────────────────────────────────────────────────────
 Saved the plan to: rg_create_plan
 To perform exactly these actions, run the following command to apply:
     terraform apply "rg_create_plan"
 [root@terra terraform_demo]#
5. Here is the actual execution happens. Let’s apply the changes.
[root@terra terraform_demo]# terraform apply "rg_create_plan"
azurerm_resource_group.main: Creating…
azurerm_resource_group.main: Creation complete after 6s [id=/subscriptions/xxxxxxx-xxxx-xxxxx-xxx-xxxxxxxxxx/resourceGroups/testrg]
Apply complete! Resources: 1 added, 0 changed, 0 destroyed.
[root@terra terraform_demo]#
[root@terra terraform_demo]# ls -lrt
 drwxr-xr-x. 3 root root   21 Jun 12 14:25 terraform.d
 -rw-r--r--. 1 root root  389 Jun 12 18:11 main.tf
 -rw-r--r--. 1 root root  232 Jun 12 18:56 variables.tf
 -rw-r--r--. 1 root root 1828 Jun 12 19:14 rg_create_plan
 -rw-r--r--. 1 root root  921 Jun 12 19:28 terraform.tfstate
 [root@terra terraform_demo]#
Post execution, you can see that “terraform.tfstate” has been created. This file is responsible to maintain the infrastructure state for managing the resources.
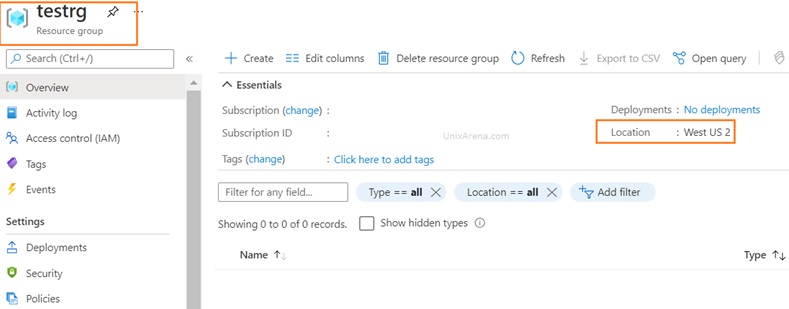
Validate:
Login to azure portal and verify if the resource group is created or not. Here we can see that resource group has been successfully created.

Let’s improvise the code further. Let’s pass the variable using file.
Method: 2
- Here is the variable.tf file contents. I have removed the default key value pairs from this file.
 variable "rg_name" {}
 variable "region"  {}
 variable "subscription_id" {}
2. Create a new file with variables and values alone. (File name – user_vars.tfvars)
 rg_name         = "testrg"
 region          = "westus2"
 subscription_id = "xxxxxx-xxxx-xxxx-xxxx-xxxxxxxxxxx"
3. Create terraform plan using newly created variable file.
[root@terra terraform_demo]#terraform plan -var-file=user_vars.tfvars -out rg_create_plan
4. Go ahead and apply the plan using terraform command.
[root@terra terraform_demo]# terraform apply "rg_create_plan"
Hope you are now familiar with terraform and able to create your first resource on Azure using different methods.