This article will help you to setup High Availability NFS server using Pacemaker on Redhat Enterprise Linux 7. From the scratch ,we will build the pacemaker blocks which includes package installation , configuring the HA resources, fencing etc. NFS shares are used for setting up the home directories and sharing the same content across multiple servers. NFS HA will suit for customers who can’t afford NAS storage. You might have followed Pacemaker articles on UnixArena where we have setup Failover KVM VM and GFS earlier. If not , please go through it to understand the various component of pacemaker and how it works. This article is not going to cover in-depth.
Assumptions:
- Two servers installed with RHEL 7.x (Hosts- UA-HA1 / UA-HA2)
- Access to Redhat Repository or Local Repository to install packages.
- SELINUX & Firewalld can be turned off.
1. Login to the each node as root user and install the package .
# yum install pcs fence-agents-all
2. Disable SELINUX on both the nodes.
# setenforce 0
setenforce: SELinux is disabled
# cat /etc/selinux/config |grep SELINUX |grep -v "#"
SELINUX=disabled
SELINUXTYPE=targeted
3. Disable firewalld on both the hosts
UA-HA# systemctl stop firewalld.service
UA-HA# systemctl disable firewalld.service
UA-HA# iptables --flush
UA-HA#
4. Enable and Start the Services on both the Nodes.
# systemctl start pcsd.service
# systemctl enable pcsd.service
# systemctl status pcsd.service
5. On each nodes, set the password for hauser.
# passwd hacluster
Changing password for user hacluster.
New password:
Retype new password:
passwd: all authentication tokens updated successfully.
6.Login to any of the cluster node and authenticate “hacluster” user.
# pcs cluster auth UA-HA1 UA-HA2
7. Create a new cluster using pcs command. The cluster name is “UACLS”.
# pcs cluster setup --name UACLS UA-HA1 UA-HA2
8. Start the cluster using pcs command. “–all” will start the cluster on all the configured nodes.
# pcs cluster start –all
9. Check the corosync communication status.This command output should show that which IP has been used for heartbeat. Refer configure-redundant-corosync
# corosync-cfgtool –s
10. Disable STONITH to avoid issues while configuring the resources. Once we complete the cluster setup, we will enable the fencing back.
#pcs property set stonith-enabled=false
#pcs property show stonith-enabled
10. Configure the fencing (STONITH) using ipmilan.
# pcs stonith create UA-HA1_fen fence_ipmilan pcmk_host_list="UA-HA1" ipaddr=192.168.10.24 login=root  passwd=test123 lanplus=1 cipher=1 op monitor interval=60s
#pcs stonith create UA-HA2_fen fence_ipmilan pcmk_host_list="UA-HA2" ipaddr=192.168.10.25 login=root  passwd=test123 lanplus=1 cipher=1 op monitor interval=60s
These IP’s are IDRAC console IP used for fencing.
11. Verify the cluster configuration.
# crm_verify -L –V
12. Configure the volume group and Logical volume.
# vgcreate UAVG1 /dev/disk_name1
# vgcreate UAVG2 /dev/disk_#name2

# lvcreate -L sizeM -n /dev/UAVG1/UAVOL1
# lvcreate -L sizeM -n /dev/UAVG2/UAVOL2
12. Create a filesystem. (Let’s go with XFS)
#mkfs.xfs /dev/UAVG1/UAVOL1
#mkfs.xfs /dev/UAVG2/UAVOL2
13. Modify LVM configuration similar to below. Assuming that all the volume groups are used in cluster. If you have root vg , you need to specify in lvm.conf for automatic import.
# grep use_lvmetad /etc/lvm/lvm.conf |grep -v "#"
use_lvmetad = 0
14.Configure symmetric cluster property and check the status.
# pcs property set symmetric-cluster=true
[root@UA-HA1 tmp]# pcs status
Cluster name: UACLS
Stack: corosync
Current DC: UA-HA2 (2) - partition with quorum
2 Nodes configured
2 Resources configured

Online: [ UA-HA1 UA-HA2 ]

Full list of resources:

 UA-HA1_fen   (stonith:fence_ipmilan):        Started UA-HA2
 UA-HA2_fen   (stonith:fence_ipmilan):        Started UA-HA1

PCSD Status:
  UA-HA1: Online
  UA-HA2: Online

Daemon Status:
  corosync: active/enabled
  pacemaker: active/enabled
  pcsd: active/enabled
[root@UA-HA1 tmp]# pcs stonith show
 UA-HA1_fen   (stonith:fence_ipmilan):        Started
 UA-HA2_fen   (stonith:fence_ipmilan):        Started
[root@UA-HA1 tmp]#
15.Configure VG & Mount resources .
#pcs resource create UAVG1_res LVM volgrpname="UAVG1" exclusive=true  --group UANFSHA
#pcs resource create UAVOL1_res Filesystem  device="/dev/UAVG1/UAVOL1" directory="/cm/shared" fstype="xfs" --group UANFSHA


#pcs resource create UAVG2_res LVM volgrpname="UAVG2" exclusive=true --group  UANFSHA
#pcs resource create UAVOL2_res Filesystem  device="/dev/UAVG2/UAVOL2" directory="/global/home" fstype="xfs" --group UANFSHA
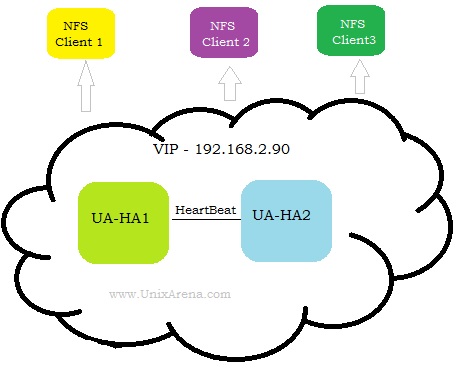
16.Configure VIP for NFS share. This IP will be used on NFS client to mount the shares.
# pcs resource create ClusterIP ocf:heartbeat:IPaddr2 ip=192.168.2.90 nic="eth0" cidr_netmask=24 op monitor interval=30s --group UANFSHA
17. Configure NFS server resources.
[root@UA-HA1 ~]# pcs resource create NFS-D nfsserver nfs_shared_infodir=/global/nfsinfo nfs_ip=192.168.2.90 --group UANFSHA
18.Check the cluster status.
[root@UA-HA1 ~]# pcs status
Cluster name: UACLS
Last updated: Tue Aug 16 12:39:22 2016
Last change: Tue Aug 16 12:39:19 2016 via cibadmin on UA-HA1
Stack: corosync
Current DC: UA-HA1 (1) - partition with quorum
Version: 1.1.10-29.el7-368c726
2 Nodes configured
8 Resources configured

Online: [ UA-HA1 UA-HA2 ]

Full list of resources:

 UA-HA1_fen   (stonith:fence_ipmilan):        Started UA-HA1
 UA-HA2_fen   (stonith:fence_ipmilan):        Started UA-HA1
 Resource Group: UANFSHA
     UAVG1_res  (ocf::heartbeat:LVM):   Started UA-HA1
     UAVG2_res  (ocf::heartbeat:LVM):   Started UA-HA1
     UAVOL1_res  (ocf::heartbeat:Filesystem):    Started UA-HA1
     UAVOL2_res  (ocf::heartbeat:Filesystem):    Started UA-HA1
     ClusterIP  (ocf::heartbeat:IPaddr2):       Started UA-HA1
     NFS-D      (ocf::heartbeat:nfsserver):     Started UA-HA1
19. Configure the HA NFS shares.
[root@UA-HA1 ~]# pcs resource create nfs-cm-shared exportfs clientspec=192.168.2.0/255.255.255.0 options=rw,sync,no_root_squash directory=/SAP_SOFT fsid=0 --group UANFSHA
[root@UA-HA1 ~]# pcs resource create nfs-global-home  exportfs clientspec=10.248.102.0/255.255.255.0 options=rw,sync,no_root_squash directory=/users1/home fsid=1 --group UANFSHA
20.Final cluster status will looks like similar to the following.
[root@UA-HA1 ~]# pcs status
Cluster name: UACLS
Last updated: Tue Aug 16 12:52:43 2016
Last change: Tue Aug 16 12:51:56 2016 via cibadmin on UA-HA1
Stack: corosync
Current DC: UA-HA1 (1) - partition with quorum
Version: 1.1.10-29.el7-368c726
2 Nodes configured
10 Resources configured


Online: [ UA-HA1 UA-HA2 ]

Full list of resources:

 UA-HA1_fen   (stonith:fence_ipmilan):        Started UA-HA1
 UA-HA2_fen   (stonith:fence_ipmilan):        Started UA-HA1
 Resource Group: UANFSHA
     UAVG1_res  (ocf::heartbeat:LVM):   Started UA-HA1
     UAVG2_res  (ocf::heartbeat:LVM):   Started UA-HA1
     UAVOL1_res  (ocf::heartbeat:Filesystem):    Started UA-HA1
     UAVOL2_res  (ocf::heartbeat:Filesystem):    Started UA-HA1
     ClusterIP  (ocf::heartbeat:IPaddr2):       Started UA-HA1
     NFS-D      (ocf::heartbeat:nfsserver):     Started UA-HA1
     nfs-cm-shared      (ocf::heartbeat:exportfs):      Started UA-HA1
     nfs-global-home    (ocf::heartbeat:exportfs):      Started UA-HA1
21. Configure resource dependencies.
[root@UA-HA1 ~]# pcs constraint order start UAVG1_res then UAVOL1_res
[root@UA-HA1 ~]# pcs constraint order start UAVG2_res then UAVOL2_res
[root@UA-HA1 ~]# pcs constraint order start UAVOL1_res then ClusterIP
[root@UA-HA1 ~]# pcs constraint order start UAVOL2_res then ClusterIP
[root@UA-HA1 ~]# pcs constraint order start ClusterIP then NFS-D
[root@UA-HA1 ~]# pcs  constraint order start NFS-D then nfs-cm-shared
[root@UA-HA1 ~]# pcs  constraint order start NFS-D then nfs-global-home
[root@UA-HA1 ~]# pcs constraint
Location Constraints:
  Resource: UANFSHA
    Enabled on: UA-HA1 (role: Started)
Ordering Constraints:
  start UAVG1_res then start UAVOL1_res
  start UAVG2_res then start UAVOL2_res
  start UAVOL1_res then start ClusterIP
  start UAVOL2_res then start ClusterIP
  start ClusterIP then start NFS-D
  start NFS-D then start nfs-cm-shared
  start NFS-D then start nfs-global-home
Colocation Constraints:
[root@UA-HA1 ~]#
22. You can also verify the NFS shares using the following command. (Have to execute where the resources are running currently)
[root@UA-HA1 ~]# showmount -e 192.168.2.90
Export list for 192.168.2.90:
/SAP_SOFT   192.168.2.0/255.255.255.0
/users1/home 192.168.2.0/255.255.255.0
[root@UA-HA1 ~]#

[root@UA-HA1 ~]# ifconfig eth0
ib0: flags=4163<UP,BROADCAST,RUNNING,MULTICAST>  mtu 2044
        inet 192.168.2.90  netmask 255.255.255.0  broadcast 0.0.0.0
        inet6 fe80::7efe:9003:a7:851  prefixlen 64  scopeid 0x20
23. Enable the STONITH.
#pcs property set stonith-enabled=true
#pcs property show stonith-enabled
24. Login to NFS clients and mount the shares .
# mkdir /users1/home
# mkdir /SAP_SOFT
# mount -t nfs -o vers=4 192.168.2.90:/SAP_SOFT  /SAP_SOFT
# mount -t nfs -o vers=4 192.168.2.90:/users1/home  /users1/home
We have successfully setup high availability NFS server v4 using pacemaker cluster suite on Redhat Enterprise Linux 7.x.
If you have any trouble with resources , use the following command to clear the state. Resource might be automatically banned if its faulted more than one twice.
[root@UA-HA1 init.d]# pcs resource clear UANFSHA
Hope this article is informative to you. Share it ! Comment it ! Be Sociable !!!
Denis says
On Step 6 “# pcs cluster auth node02 node03”
I got the follow error:
Error: node02 Unable to connect do pcsd: Error connecting to node02 – HTTP error: 500
Error: node03 Unable to connect do pcsd: Error connecting to node03 – HTTP error: 500
The service is running on both and tested with:
curl -k https://node03:2224/remote/status
{“notauthorized”:”true”}
Any ideas?
Lingeswaran R says
Check the pcsd status on both cluster node.
Lingesh
Atchuth.k says
Is it recommend to upgrade from RHEL 6 to RHEL 7 ?? If not please suggest me.
George says
Hi,
really nice article. I follow these procedures and I’m facing this issue:
In the beginning, having one export, everything works fine. I cold reset the nodes one after another and the services are migrated each time successfuly to the other node. But when I add another export directory (with different fsid than the first one), after the first reboot of the active node, the NFS server does not start on one node or the other. The error that I get is that “rpcbind is not running”. While tailing /var/log/messages I see a repeating message of:
nfsserver: INFO: Start: rpcbind i:1
nfsserver: INFO: Start: rpcbind i:2
nfsserver: INFO: Start: rpcbind i:3
nfsserver: INFO: Start: rpcbind i:4
and so one.
After this, the nfs service never starts again on neither node.
Thanks
George says
To add to the above issue, after a fresh restart of both nodes, when I try to add an nfs server resource again. the error that I get is:
“Failed to start NFS server: /proc/fs/nfsd/threads”. In the /var/log/messages folder I get: ERROR: nfs-mountd is not running.
Thanks
Phil Rigby says
Hi,
I found this article when searching about problems with using NFS with Pacemaker in RHEL 7.2.
I just wanted to point out that I believe you have missed out the nfsnotify resource in the NFS setup. my understanding is that this is definitely required for a properly functioning HA NFS set up.
The article is well written and will, I’m sure, be of use to many people but it needs to be correct so please can you update it taking my comments into account.
Thanks,
Phil.