


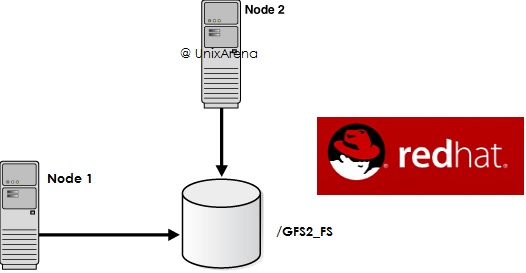
This article will briefly explains about configuring the GFS2 filesystem between two cluster nodes. As you know that GFS2 is cluster filesystem and it can be mounted on more than one server at a time . Since multiple servers can mount the same filesystem, it uses the DLM (Dynamic Lock Manager) to prevent the data corruption. GFS2 requires a cluster suite to configure & manage. In RHEL 7 , Pacemaker/corosync provides the cluster infrastructure. GFS2 is a native file system that interfaces directly with the Linux kernel file system interface (VFS layer). For your information, Red Hat supports the use of GFS2 file systems only as implemented in the High Availability Add-On (Cluster).
Here is the list of activity in an order to configure the GFS2 between two node cluster (Pacemaker).
- Install GFS2 and lvm2-cluster packages.
- Enable clustered locking for LVM
- Create DLM and CLVMD resources on Pacemaker
- Set the resource ordering and colocation.
- Configure the LVM objects & Create the GFS2 filesystem
- Add logical volume & filesystem in to the pacemaker control. (gfs2 doesn’t use /etc/fstab).
Environment:
- RHEL 7.1
- Node Names : Node1 & Node2.
- Fencing/STONITH: Mandatory for GFS2.
- Shared LUN “/dev/sda”
- Cluster status:
[root@Node2-LAB ~]# pcs status
Cluster name: GFSCLUS
Last updated: Thu Jan 21 18:00:25 2016
Last change: Wed Jan 20 16:12:24 2016 via cibadmin on Node1
Stack: corosync
Current DC: Node1 (1) - partition with quorum
Version: 1.1.10-29.el7-368c726
2 Nodes configured
5 Resources configured

Online: [ Node1 Node2 ]

Full list of resources:

 xvmfence       (stonith:fence_xvm):    Started Node1

PCSD Status:
  Node1: Online
  Node2: Online

Daemon Status:
  corosync: active/enabled
  pacemaker: active/enabled
  pcsd: active/enabled
[root@Node2-LAB ~]#
Package Installation:
1. Login to the both cluster nodes and install gfs2 and lvm2 cluster packages.
[root@Node2-LAB ~]# yum -y install gfs2-utils  lvm2-cluster
Loaded plugins: product-id, subscription-manager
This system is not registered to Red Hat Subscription Management. You can use subscription-manager to register.
Package gfs2-utils-3.1.6-13.el7.x86_64 already installed and latest version
Package 7:lvm2-cluster-2.02.105-14.el7.x86_64 already installed and latest version
Nothing to do
[root@Node2-LAB ~]# ssh Node1 yum -y install gfs2-utils  lvm2-cluster
Loaded plugins: product-id, subscription-manager
Package gfs2-utils-3.1.6-13.el7.x86_64 already installed and latest version
Package 7:lvm2-cluster-2.02.105-14.el7.x86_64 already installed and latest version
Nothing to do
[root@Node2-LAB ~]#
Enable clustered locking for LVM:
1. Enable clustered locking for LVM on both the cluster ndoes
[root@Node2-LAB ~]# lvmconf --enable-cluster
[root@Node2-LAB ~]# ssh Node1 lvmconf --enable-cluster
[root@Node2-LAB ~]# cat /etc/lvm/lvm.conf |grep locking_type |grep -v "#"
    locking_type = 3
[root@Node2-LAB ~]#
2. Reboot the cluster nodes.
Create DLM and CLVMD cluster Resources:
1.Login to one of the cluster node.
2.Create clone resources for DLM and CLVMD. Clone options allows resource to can run on both nodes.
[root@Node1-LAB ~]# pcs resource create dlm ocf:pacemaker:controld op monitor interval=30s on-fail=fence clone interleave=true ordered=true
[root@Node1-LAB ~]# pcs resource create clvmd ocf:heartbeat:clvm op monitor interval=30s on-fail=fence clone interleave=true ordered=true
3.Check the cluster status.
[root@Node1-LAB ~]# pcs status
Cluster name: GFSCLUS
Last updated: Thu Jan 21 18:15:48 2016
Last change: Thu Jan 21 18:15:38 2016 via cibadmin on Node1
Stack: corosync
Current DC: Node2 (2) - partition with quorum
Version: 1.1.10-29.el7-368c726
2 Nodes configured
5 Resources configured


Online: [ Node1 Node2 ]

Full list of resources:

 xvmfence       (stonith:fence_xvm):    Started Node1
 Clone Set: dlm-clone [dlm]
     Started: [ Node1 Node2 ]
 Clone Set: clvmd-clone [clvmd]
     Started: [ Node1 Node2 ]

PCSD Status:
  Node1: Online
  Node2: Online

Daemon Status:
  corosync: active/enabled
  pacemaker: active/enabled
  pcsd: active/enabled
[root@Node1-LAB ~]#
You could see that resource is on-line on both the nodes.
Resource ordering and co-location:
1.Configure the resource order.
[root@Node1-LAB ~]# pcs constraint order start dlm-clone then clvmd-clone
Adding dlm-clone clvmd-clone (kind: Mandatory) (Options: first-action=start then-action=start)
[root@Node1-LAB ~]#
2. configure the co-location for resources.
[root@Node1-LAB ~]# pcs constraint colocation add clvmd-clone with dlm-clone
[root@Node1-LAB ~]#
3. Verify the constraint.
[root@Node1-LAB ~]# pcs constraint
Location Constraints:
Ordering Constraints:
start dlm-clone then start clvmd-clone
Colocation Constraints:
clvmd-clone with dlm-clone
[root@Node1-LAB ~]#
Configure the LVM objects:
1.Login to one of the cluster node and create the required LVM objects.
2. In this setup , /dev/sda is shared LUN between two nodes.
3. Create the new volume group .
[root@Node1-LAB ~]#  vgcreate -Ay -cy gfsvg /dev/sda
  Physical volume "/dev/sda" successfully created
  Clustered volume group "gfsvg" successfully created
[root@Node1-LAB ~]#
[root@Node1-LAB kvmpool]# vgs
  VG    #PV #LV #SN Attr   VSize   VFree
  gfsvg   1   1   0 wz--nc 996.00m 96.00m
  rhel    1   2   0 wz--n-   7.51g     0
[root@Node1-LAB kvmpool]#
4. Create the logical volume.
[root@Node1-LAB ~]# lvcreate -L 900M -n gfsvol1 gfsvg
  Logical volume "gfsvol1" created
[root@Node1-LAB ~]#
[root@Node1-LAB kvmpool]# lvs -o +devices gfsvg
  LV      VG    Attr       LSize   Pool Origin Data%  Move Log Cpy%Sync Convert Devices
  gfsvol1 gfsvg -wi-ao---- 900.00m                                              /dev/sda(0)
[root@Node1-LAB kvmpool]#
5. Create the filesystem on the new volume.
[root@Node1-LAB ~]#  mkfs.gfs2 -p lock_dlm -t GFSCLUS:gfsvolfs -j 2 /dev/gfsvg/gfsvol1
/dev/gfsvg/gfsvol1 is a symbolic link to /dev/dm-2
This will destroy any data on /dev/dm-2
Are you sure you want to proceed? [y/n]y

Device:                    /dev/gfsvg/gfsvol1
Block size:                4096
Device size:               0.88 GB (230400 blocks)
Filesystem size:           0.88 GB (230400 blocks)
Journals:                  2
Resource groups:           4
Locking protocol:          "lock_dlm"
Lock table:                "GFSCLUS:gfsvolfs"
UUID:                      8dff8868-3815-d43c-dfa0-f2a9047d97a2
[root@Node1-LAB ~]#
[root@Node1-LAB ~]#
- GFSCLUS – CLUSTER NAME
- gfsvolfs – FILESYSTEM NAME
- “-j 2” = Journal- Since two node is going to access it.
Configure the Mount-point on Pacemaker:
1. Login to one of the cluster node.
2. Create the new cluster resource for GFS2 filesystem.
[root@Node1-LAB ~]# pcs resource create gfsvolfs_res Filesystem device="/dev/gfsvg/gfsvol1" directory="/kvmpool" fstype="gfs2" options="noatime,nodiratime" op monitor interval=10s on-fail=fence clone interleave=true
[root@Node1-LAB ~]#
3. Verify the volume status. It should be mounted on both the cluster nodes.
[root@Node1-LAB ~]# df -h /kvmpool
Filesystem                 Size  Used Avail Use% Mounted on
/dev/mapper/gfsvg-gfsvol1  900M  259M  642M  29% /kvmpool
[root@Node1-LAB ~]# ssh Node2 df -h /kvmpool
Filesystem                 Size  Used Avail Use% Mounted on
/dev/mapper/gfsvg-gfsvol1  900M  259M  642M  29% /kvmpool
[root@Node1-LAB ~]#
4. Configure the resources ordering and colocaiton .
[root@Node1-LAB ~]# pcs constraint order start clvmd-clone then gfsvolfs_res-clone
Adding clvmd-clone gfsvolfs_res-clone (kind: Mandatory) (Options: first-action=start then-action=start)
[root@Node1-LAB ~]# pcs constraint order
Ordering Constraints:
  start clvmd-clone then start gfsvolfs_res-clone
  start dlm-clone then start clvmd-clone
[root@Node1-LAB ~]# pcs constraint colocation add gfsvolfs_res-clone  with clvmd-clone
[root@Node1-LAB ~]# pcs constraint colocation
Colocation Constraints:
  clvmd-clone with dlm-clone
  gfsvolfs_res-clone with clvmd-clone
[root@Node1-LAB ~]#
5. You could see that both the nodes able to see same filesystem in read/write mode.
[root@Node1-LAB ~]# cd /kvmpool/
[root@Node1-LAB kvmpool]# ls -lrt
total 0
[root@Node1-LAB kvmpool]# touch test1 test2 test3
[root@Node1-LAB kvmpool]# ls -lrt
total 12
-rw-r--r-- 1 root root 0 Jan 21 18:38 test1
-rw-r--r-- 1 root root 0 Jan 21 18:38 test3
-rw-r--r-- 1 root root 0 Jan 21 18:38 test2
[root@Node1-LAB kvmpool]# ssh Node2 ls -lrt /kvmpool/
total 12
-rw-r--r-- 1 root root 0 Jan 21 18:38 test1
-rw-r--r-- 1 root root 0 Jan 21 18:38 test3
-rw-r--r-- 1 root root 0 Jan 21 18:38 test2
[root@Node1-LAB kvmpool]#
We have successfully configured GFS2 on RHEL 7 clustered nodes.
Set the No Quorum Policy:
When you use GFS2 , you must configure the no-quorum-policy . If you set it to freeze and system lost the quorum, systems will not anything until quorum is regained.
[root@Node1-LAB ~]# pcs property set no-quorum-policy=freeze
[root@Node1-LAB ~]#
[box type=”info” align=”” class=”” width=””]Although OCFS2 (Oracle Cluster File System 2) can run on Red Hat Enterprise Linux, it is not shipped, maintained, or supported by Red Hat.[/box]
Hope this article is informative to you.
Share it ! Comment it !! Be Sociable !!!