

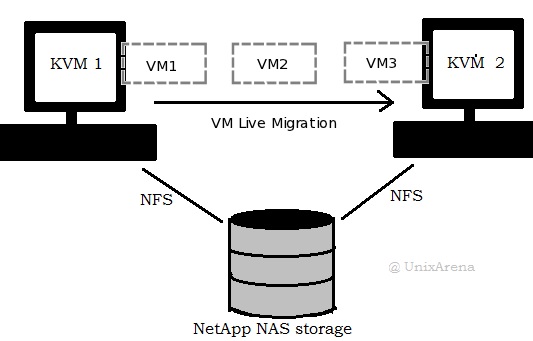
In KVM , you can migrate the running virtual machines from one KVM host to another without any downtime. Live migration works well if both the KVM hosts have access to the same storage pool. To make the storage pool accessible on both the KVM hosts, you need to use NFS or GFS2 filesystem(cluster filesystem). In this example, I am using NFS filesystem to store VM images. During the migration, VM ‘s “In-Memory” content will be copied over to the destination KVM host and cut-over will happen at some point of time to migrate the VM. Note that, when you have shared filesystem on KVM hosts, VM’s disk image will not be copied over network since both KVM hosts have access to same storage pool.
Environment:
- KVM Hosts – UA-HA & UA-HA2
- VM Name – UAKVM2
Storage pool:
[root@UA-HA ~]# df -h /kvmpool/
Filesystem                 Size  Used Avail Use% Mounted on
192.168.203.134:/kvmstore  1.8G  1.7G   88M  96% /kvmpool
[root@UA-HA ~]# ssh UA-HA2 df -h /kvmpool/
Filesystem                 Size  Used Avail Use% Mounted on
192.168.203.134:/kvmstore  1.8G  1.7G   88M  96% /kvmpool
[root@UA-HA ~]# ls -lrt /kvmpool
total 1710924
-rw------- 1 root root 4295884800 Dec 22 18:07 UAKVM2.qcow2
[root@UA-HA ~]#
[box type=”info” align=”” class=”” width=””]You must have configured “ssh password less root login” between KVM hosts to start the migration immediately to avoid root password prompt.[/box]
1.Login to the KVM host where the VM is presently running.
[root@UA-HA ~]# virsh list
 Id    Name                           State
----------------------------------------------------
 10    UAKVM2                         running

[root@UA-HA ~]#
2. Login to the virtual guest and ping some remote IP to check if any packet drops during the Live migration. Do not stop the ping until the migration completes.
[root@UA-KVM1 ~]# uptime
 23:55:25 up 0 min,  1 user,  load average: 0.94, 0.27, 0.09
[root@UA-KVM1 ~]# ping 192.168.203.134
PING 192.168.203.134 (192.168.203.134) 56(84) bytes of data.
64 bytes from 192.168.203.134: icmp_seq=1 ttl=64 time=1.72 ms
64 bytes from 192.168.203.134: icmp_seq=2 ttl=64 time=5.09 ms
64 bytes from 192.168.203.134: icmp_seq=3 ttl=64 time=0.950 ms
64 bytes from 192.168.203.134: icmp_seq=4 ttl=64 time=0.970 ms
3. From the KVM host, initiate the Live migration from UA-HA host to UA-HA2.
[root@UA-HA ~]# virsh migrate UAKVM2 qemu+ssh://root@UA-HA2/system

[root@UA-HA ~]#
4.You will not notice any packet drops or session disconnect during the VM migration. (It like VMware vMotion)
[root@UA-KVM1 ~]# uptime
 23:55:25 up 0 min,  1 user,  load average: 0.94, 0.27, 0.09
[root@UA-KVM1 ~]# ping 192.168.203.134
PING 192.168.203.134 (192.168.203.134) 56(84) bytes of data.
64 bytes from 192.168.203.134: icmp_seq=1 ttl=64 time=1.72 ms
64 bytes from 192.168.203.134: icmp_seq=2 ttl=64 time=5.09 ms
64 bytes from 192.168.203.134: icmp_seq=3 ttl=64 time=0.950 ms
64 bytes from 192.168.203.134: icmp_seq=4 ttl=64 time=0.970 ms
64 bytes from 192.168.203.134: icmp_seq=5 ttl=64 time=0.439 ms
64 bytes from 192.168.203.134: icmp_seq=6 ttl=64 time=2.67 ms   ----------> Migration completed Here.
64 bytes from 192.168.203.134: icmp_seq=7 ttl=64 time=2.22 ms
64 bytes from 192.168.203.134: icmp_seq=8 ttl=64 time=2.50 ms
64 bytes from 192.168.203.134: icmp_seq=9 ttl=64 time=2.86 ms
64 bytes from 192.168.203.134: icmp_seq=10 ttl=64 time=2.22 ms
64 bytes from 192.168.203.134: icmp_seq=11 ttl=64 time=3.10 ms
64 bytes from 192.168.203.134: icmp_seq=12 ttl=64 time=1.84 ms
64 bytes from 192.168.203.134: icmp_seq=13 ttl=64 time=2.05 ms
64 bytes from 192.168.203.134: icmp_seq=14 ttl=64 time=2.37 ms
64 bytes from 192.168.203.134: icmp_seq=15 ttl=64 time=0.893 ms
64 bytes from 192.168.203.134: icmp_seq=16 ttl=64 time=1.85 ms
64 bytes from 192.168.203.134: icmp_seq=17 ttl=64 time=0.593 ms
^C
--- 192.168.203.134 ping statistics ---
17 packets transmitted, 17 received, 0% packet loss, time 16032ms
rtt min/avg/max/mdev = 0.439/2.022/5.098/1.096 ms
[root@UA-KVM1 ~]#
5.Login to the second KVM host and check the VM status.
[root@UA-HA2 ~]# virsh list
 Id    Name                           State
----------------------------------------------------
 3     UAKVM2                         running

[root@UA-HA2 ~]#
You can also connect to the KVM hypervisor from UA-HA like below.
[root@UA-HA ~]# virsh --connect qemu+ssh://root@UA-HA2/system list
 Id    Name                           State
----------------------------------------------------
 3     UAKVM2                         running

[root@UA-HA ~]#
We have successfully migrated KVM guest from UA-HA to UA-HA2.
If the live migration fails with following message, then you might need to disable the disk I/O cache for each VM disk.
” error: Unsafe migration: Migration may lead to data corruption if disks use cache != none “
[root@UA-HA ~]# virsh migrate UAKVM2 qemu+ssh://root@192.168.203.131/system
error: Unsafe migration: Migration may lead to data corruption if disks use cache != none

[root@UA-HA ~]#
To disable the Disk I/O cache,
1. Stop the VM
# virsh shutdown UAKVM2
2. Edit the VM’s XML file using virsh edit . Update “cache=none” for all the VM disks & save the configuration.
# virsh edit UAKVM2

3.start the KVM guest.
# virsh start UAKVM2
4. Let’s try for Live migration. This trick should work.
[root@UA-HA ~]# virsh migrate UAKVM2 qemu+ssh://root@192.168.203.131/system
You can also disable the disk cache using virt-manager GUI.
1. Halt the virtual Machine.
2. Launch virt-Manager.
3. Open the KVM guest which you want to migrate. Go to “show virtual hardware details” > IDE DISK * > Expand the Advanced options > Expand performance options > set the cache mode to none > Click on apply.
4. Power on the virtual machine.
Once the VM is up , you can try for the Live migration.
Hope this article is informative to you . Share it ! Comment it !! Be Sociable !!!