


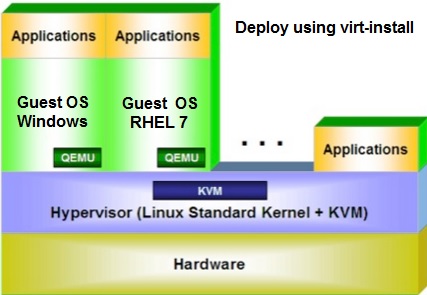
Provisioning new VM’s (guests) using “virt-install” binary is straight forward. virt-install can be run in interactive or non-interactive mode. This command have more options but easy to remember since those are very meaningful. This article is going to demonstrate the VM creation using virt-install tool in non-interactive mode. You can also use GUI (VMM – Virtual Machine Manager ) to provision the VM.
Let’s prepare the VM details before kick of the virt-install.
| VM Name | UAKVM1 |
| Network | bridge:br0 |
| RAM | 1024 |
| CPU | 1 |
| DISK | 4GB |
| CD-ROM | /var/tmp/rhel-server-7.2-x86_64-dvd.iso |
1. Login to the KVM host as root user with X11 forwarding enabled. I am using MobaXterm 8.2 Personal Edition to connect the KVM host with ssh session.
     ┌────────────────────────────────────────────────────────────────────┐
     │                         • MobaXterm 8.2 •                          │
     │            (SSH client, X-server and networking tools)             │
     │                                                                    │
     │ ➤ SSH session to root@192.168.203.134                              │
     │   • SSH compression : ✔                                            │
     │   • SFTP Browser    : ✔                                            │
     │   • X11-forwarding  : ✔  (remote display is forwarded through SSH) │
     │   • DISPLAY         : ✔  (automatically set on remote server)      │
     │                                                                    │
     │ ➤ For more info, ctrl+click on help or visit our website           │
     └────────────────────────────────────────────────────────────────────┘

Last login: Mon Dec 14 17:04:24 2015 from 192.168.203.1
[root@UA-HA ~]#
2. Here is the supported OS variant on KVM hypervisors. (Most recent list)
win7                 : Microsoft Windows 7
vista                : Microsoft Windows Vista
winxp64              : Microsoft Windows XP (x86_64)
winxp                : Microsoft Windows XP
win2k                : Microsoft Windows 2000
win2k8               : Microsoft Windows Server 2008
win2k3               : Microsoft Windows Server 2003
openbsd4             : OpenBSD 4.x
freebsd8             : FreeBSD 8.x
freebsd7             : FreeBSD 7.x
freebsd6             : FreeBSD 6.x
solaris9             : Sun Solaris 9
solaris10            : Sun Solaris 10
opensolaris          : Sun OpenSolaris
netware6             : Novell Netware 6
netware5             : Novell Netware 5
netware4             : Novell Netware 4
msdos                : MS-DOS
generic              : Generic
debianwheezy         : Debian Wheezy
debiansqueeze        : Debian Squeeze
debianlenny          : Debian Lenny
debianetch           : Debian Etch
fedora18             : Fedora 18
fedora17             : Fedora 17
fedora16             : Fedora 16
fedora15             : Fedora 15
fedora14             : Fedora 14
fedora13             : Fedora 13
fedora12             : Fedora 12
fedora11             : Fedora 11
fedora10             : Fedora 10
fedora9              : Fedora 9
fedora8              : Fedora 8
fedora7              : Fedora 7
fedora6              : Fedora Core 6
fedora5              : Fedora Core 5
mageia1              : Mageia 1 and later
mes5.1               : Mandriva Enterprise Server 5.1 and later
mes5                 : Mandriva Enterprise Server 5.0
mandriva2010         : Mandriva Linux 2010 and later
mandriva2009         : Mandriva Linux 2009 and earlier
rhel7                : Red Hat Enterprise Linux 7
rhel6                : Red Hat Enterprise Linux 6
rhel5.4              : Red Hat Enterprise Linux 5.4 or later
rhel5                : Red Hat Enterprise Linux 5
rhel4                : Red Hat Enterprise Linux 4
rhel3                : Red Hat Enterprise Linux 3
rhel2.1              : Red Hat Enterprise Linux 2.1
sles11               : Suse Linux Enterprise Server 11
sles10               : Suse Linux Enterprise Server
opensuse12           : openSuse 12
opensuse11           : openSuse 11
ubuntutrusty         : Ubuntu 14.04 LTS (Trusty Tahr)
ubuntusaucy          : Ubuntu 13.10 (Saucy Salamander)
ubunturaring         : Ubuntu 13.04 (Raring Ringtail)
ubuntuquantal        : Ubuntu 12.10 (Quantal Quetzal)
ubuntuprecise        : Ubuntu 12.04 LTS (Precise Pangolin)
ubuntuoneiric        : Ubuntu 11.10 (Oneiric Ocelot)
ubuntunatty          : Ubuntu 11.04 (Natty Narwhal)
ubuntumaverick       : Ubuntu 10.10 (Maverick Meerkat)
ubuntulucid          : Ubuntu 10.04 LTS (Lucid Lynx)
ubuntukarmic         : Ubuntu 9.10 (Karmic Koala)
ubuntujaunty         : Ubuntu 9.04 (Jaunty Jackalope)
ubuntuintrepid       : Ubuntu 8.10 (Intrepid Ibex)
ubuntuhardy          : Ubuntu 8.04 LTS (Hardy Heron)
virtio26             : Generic 2.6.25 or later kernel with virtio
generic26            : Generic 2.6.x kernel
generic24            : Generic 2.4.x kernel
Note: In this setup , I have installed the virt-install & virt-manager packages on KVM hypervisor node itself.
3. Create the new KVM virtual machine using the following command.
[root@UA-HA ~]#  virt-install --connect qemu:///system --virt-type kvm --network bridge:br0 --name UAKVM2 --description "First RHEL7 KVM Guest" --os-variant rhel7 --ram=1024 --vcpus=1 --disk size=4 --os-type=linux --graphics vnc,password=123456 --cdrom /var/www/html/rhel-server-7.2-x86_64-dvd.iso

Starting install...
Allocating 'UAKVM2-3.qcow2'                                                                                                                   | 4.0 GB  00:00:00
Creating domain...                                                                                                                            |    0 B  00:00:00
Are you confused with many options ? It’s very simple.
  Options     | Values                | Description
====================================================================================
--connect     |qemu:///system         | Connect to the localhost KVM
--virt-type   |kvm                    | Specify the virtualization type as kvm or Xen
--network     |bridge:br0             | Specify the bridge for network connectivity
-name         |UAKVM2                 | Virtual Machine Name
--description |First RHEL7 KVM Guest  | Provide the VM description
--os-variant  |rhel7                  | Provide the OS-variant name
--ram         |1024                   | Set the VM memory to 1GB
--vcpus       |1	              | Set the No.of.CPU cores
-disk         |4		      | Specify the virtual disk size in GB
--os-type     |linux		      | Specify the OS type
--graphics    |vnc,password=123456    | Specify the graphics type & VNC password
--cdrom       |/path_to_iso           | Specify the RHEL 7 ISO image path
If you do not have the ISO image locally, you can specify the http link using -location option.
4. The above command will automatically open a graphical VNC window for the guest.
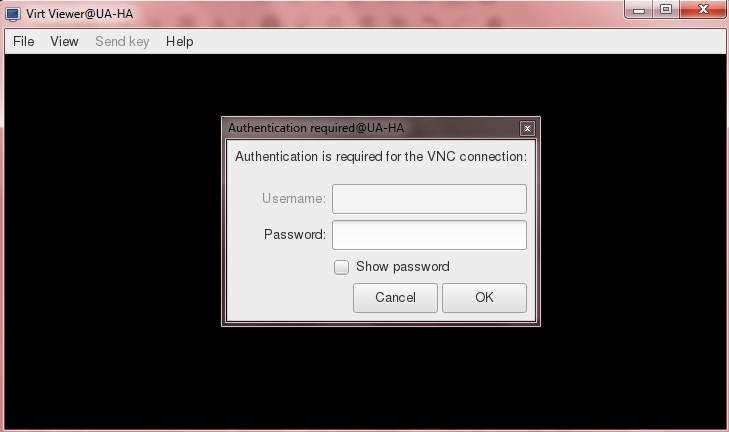
5. Enter the password what you have given in the virt-install command.

6. Complete the guest Machine installation.
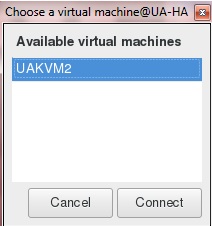
7. If you didn’t get the VNC session pop-up automatically, just execute the “virt-viewer” command. This should bring up the running machines list to connect the VM’s console.
[root@UA-HA ~]# virt-viewer
8. In the KVM hypervisor, you can list the VM’s using “virsh list” command.
[root@UA-HA images]# virsh list
 Id    Name                           State
----------------------------------------------------
 15    UAKVM2                         running

[root@UA-HA images]#
9. To see the VM’s resource utilization from the KVM host view , use virt-top command.
virt-top 00:23:28 - x86_64 2/2CPU 2594MHz 3784MB
2 domains, 1 active, 1 running, 0 sleeping, 0 paused, 1 inactive D:0 O:0 X:0
CPU: 1.3%  Mem: 1024 MB (1024 MB by guests)

   ID S RDRQ WRRQ RXBY TXBY %CPU %MEM    TIME   NAME
   15 R    0    1    0    0  1.3 27.0   1:20.30 UAKVM2
    -                                           (UAKVM1)
10. If you want to halt the VM, use the “virsh destroy” command to stop the VM.
[root@UA-HA images]# virsh destroy UAKVM2
Domain UAKVM2 destroyed
[root@UA-HA images]#
11.List the VM’s again. The halted VM’s are not listed in “virsh list” command. You must use the “–all” option to see the stopped VM’s.
[root@UA-HA images]# virsh list
 Id    Name                           State
----------------------------------------------------

[root@UA-HA images]# virsh list  --all
 Id    Name                           State
----------------------------------------------------
 -     UAKVM2                         shut off

[root@UA-HA images]#
12. To power on/start the VM , use the following command.
[root@UA-HA images]# virsh start UAKVM2
Domain UAKVM2 started

[root@UA-HA images]# virsh list
 Id    Name                           State
----------------------------------------------------
 16    UAKVM2                         running

[root@UA-HA images]#
Explorer VM files:
1. The KVM guest’s configuration file will be created in the following path.
[root@UA-HA libvirt]# cd /etc/libvirt/qemu/
[root@UA-HA qemu]# ls -lrt
total 8
drwx------. 3 root root   40 Dec 14 09:13 networks
-rw-------. 1 root root 3854 Dec 15 00:19 UAKVM2.xml
[root@UA-HA qemu]#
2. Use the following command to view the XML configuration file for the Guest VM.
[root@UA-HA qemu]# cat  UAKVM2.xml
[root@UA-HA qemu]#
3. You can also use “virsh” command to view the VM’s configuration.
[root@UA-HA ~]# virsh dumpxml UAKVM2
4. How to identify the VM’s storage path ?
[root@UA-HA qemu]# virsh dumpxml UAKVM2 |grep -i "source file"

[root@UA-HA qemu]#
5. The disk qcow2 image file will be created on “/var/lib/libvirt/images” . (which is default path unless you specify during the VM creation).
[root@UA-HA images]# ls -lrt /var/lib/libvirt/images
total 1121856
-rw-------. 1 root root 4295884800 Dec 15 00:29 UAKVM2-3.qcow2
[root@UA-HA images]#
If you want to trigger the installation from the other linux host, use the following command.
[root@UA-HA ~]#  virt-install --connect qemu+ssh://root@192.168.203.134/system --virt-type kvm --network bridge:br0 --name UAKVM2 --description "First RHEL7 KVM Guest" --os-variant rhel7 --ram=1024 --vcpus=1 --disk size=4 --os-type=linux --graphics vnc,password=123456 --cdrom /var/www/html/rhel-server-7.2-x86_64-dvd.iso

Starting install...
Allocating 'UAKVM2-3.qcow2'                                                                                                                   | 4.0 GB  00:00:00
Creating domain...                                                                                                                            |    0 B  00:00:00
How to use the virt-install command from other Linux node ? (Non-Hypervisor node = Management Node)
1. Login to the Linux host . (This is not your KVM hosts. Just assume that this node will act like management node)
2. Install the following packages.
[root@UA-KVM1 ~]# yum install virt-viewer virt-install virt-manager vnc*
3. Enable the X11 forwarding.
[root@UA-KVM1 ~]# grep X11 /etc/ssh/sshd_config
X11Forwarding yes
[root@UA-KVM1 ~]#
4. Install “openssh-askpass” to connect the KVM host .
[root@UA-KVM1 ~]# yum install openssh-askpass
Loaded plugins: product-id, search-disabled-repos, subscription-manager
This system is not registered to Red Hat Subscription Management. You can use subscription-manager to register.
Resolving Dependencies
--> Running transaction check
---> Package openssh-askpass.x86_64 0:6.6.1p1-22.el7 will be installed
--> Processing Dependency: libgdk-x11-2.0.so.0()(64bit) for package: openssh-askpass-6.6.1p1-22.el7.x86_64
--> Processing Dependency: libgtk-x11-2.0.so.0()(64bit) for package: openssh-askpass-6.6.1p1-22.el7.x86_64
--> Running transaction check
---> Package gtk2.x86_64 0:2.24.28-8.el7 will be installed
--> Finished Dependency Resolution

Dependencies Resolved

=====================================================================================================================================================================
 Package                                    Arch                              Version                                   Repository                              Size
=====================================================================================================================================================================
Installing:
 openssh-askpass                            x86_64                            6.6.1p1-22.el7                            repo-update                             72 k
Installing for dependencies:
 gtk2                                       x86_64                            2.24.28-8.el7                             repo-update                            3.4 M

Transaction Summary
=====================================================================================================================================================================
Install  1 Package (+1 Dependent package)

Total download size: 3.5 M
Installed size: 13 M
Is this ok [y/d/N]: y
Downloading packages:
(1/2): openssh-askpass-6.6.1p1-22.el7.x86_64.rpm                                                                                              |  72 kB  00:00:00
(2/2): gtk2-2.24.28-8.el7.x86_64.rpm                                                                                                          | 3.4 MB  00:00:00
---------------------------------------------------------------------------------------------------------------------------------------------------------------------
Total                                                                                                                                 11 MB/s | 3.5 MB  00:00:00
Running transaction check
Running transaction test
Transaction test succeeded
Running transaction
  Installing : gtk2-2.24.28-8.el7.x86_64                                                                                                                         1/2
  Installing : openssh-askpass-6.6.1p1-22.el7.x86_64                                                                                                             2/2
  Verifying  : openssh-askpass-6.6.1p1-22.el7.x86_64                                                                                                             1/2
  Verifying  : gtk2-2.24.28-8.el7.x86_64                                                                                                                         2/2

Installed:
  openssh-askpass.x86_64 0:6.6.1p1-22.el7

Dependency Installed:
  gtk2.x86_64 0:2.24.28-8.el7

Complete!
[root@UA-KVM1 ~]#
5. Configure the SSH password less authentication for root from KVM hosts to Management host.
[root@UA-KVM1 .ssh]# scp id_rsa.pub root@192.168.203.134:/root/.ssh/authorized_keys
root@192.168.203.134's password:
id_rsa.pub                                                                                                                         100%  394     0.4KB/s   00:00
[root@UA-KVM1 .ssh]#
6. You should be able to login as root from management system to KVM host.
[root@UA-KVM1 ~]# ssh 192.168.203.134
Last login: Tue Dec 15 08:44:35 2015 from 192.168.203.137
[root@UA-HA ~]#
7. Create the new VM using virt-install
[root@UA-KVM1 ~]# virt-install --connect qemu+ssh://root@192.168.203.134/system --virt-type kvm --network bridge:br0 --name UAKVM3 --description "First RHEL7 KVM Guest" --os-variant rhel7 --ram=1024 --vcpus=1 --disk size=4 --os-type=linux --graphics vnc,password=123456 --cdrom /var/www/html/rhel-server-7.2-x86_64-dvd.iso
root@192.168.203.134's password:

Starting install...
Allocating 'UAKVM3.qcow2'                                                                                                                     | 4.0 GB  00:00:00
Creating domain...                                                                                                                            |    0 B  00:00:00

** (virt-viewer:11764): WARNING **: Couldn't connect to accessibility bus: Failed to connect to socket /tmp/dbus-
8. You can also launch the KVM guest console from Management node.
[root@UA-KVM1 ~]# virt-viewer --connect qemu+ssh://root@192.168.203.134/system

** (virt-viewer:11929): WARNING **: Couldn't connect to accessibility bus: Failed to connect to socket /tmp/dbus-6XZ1eVgijP: Connection refused
Hope this article is informative to you. Share it ! Comment it !! Be Sociable !!!