


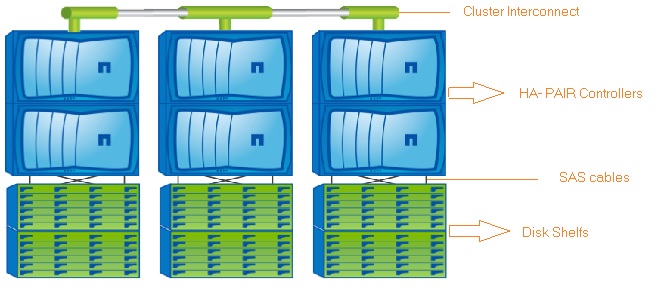
This article will demonstrates that how to configure the NetApp (Clustered ONTAP) two node cluster. Since I am going to use the simulator for this demonstration, we can’t virtualize the HA pair controllers. I will use two separate nodes to form the cluster with switch-less configuration(Assuming that direct cluster inter-connect cabling is done between nodes). In an order to form the cluster , we need to create the cluster on first node and join the remaining nodes. We have to make sure that all the systems are in sync with NTP source to prevents CIFS and Kerberos failures.
Note: Both the controllers are booted in C-Mode.
Creating the cluster on the first node:
1.Login to the first controller using serial console or IP address if you have already configure the Node IP. In this case, I have connected the first node using serial port.
2. Login as admin with no password.
3. Once you have reached the node shell , execute command “cluster setup” .
::> cluster setup
4. You will get wizard like below. Enter “create” to create a new cluster.
Welcome to the cluster setup wizard.

You can enter the following commands at any time:
  "help" or "?" - if you want to have a question clarified,
  "back" - if you want to change previously answered questions, and
  "exit" or "quit" - if you want to quit the cluster setup wizard.
     Any changes you made before quitting will be saved.

You can return to cluster setup at any time by typing "cluster setup".
To accept a default or omit a question, do not enter a value.


Do you want to create a new cluster or join an existing cluster? {create, join}: create
5.When prompted about using the node as a single node cluster, reply no because this will be a
multi-node cluster.
Do you intend for this node to be used as a single node cluster? {yes, no} [no]:
no
6.Since its a simulator,We are going to accept the default. Enter yes to accept the default values for cluster network configuration.
System Defaults:
Private cluster network ports [e0a,e0b].
Cluster port MTU values will be set to 1500.
Cluster interface IP addresses will be automatically generated.
Do you want to use these defaults? {yes, no} [yes]: yes
7.Enter the cluster Name .
Step 1 of 5: Create a Cluster
You can type "back", "exit", or "help" at any question.

Enter the cluster name: NetUA
8. Enter the license key for the node.
Enter the cluster base license key: XXXXXXXXXXXXXXXXXXXXXXXXX

Creating cluster NetUA

Network set up .....
9. Just press “Enter” to continue if you don;t want to add additional license keys at this moment.
Step 2 of 5: Add Feature License Keys
You can type "back", "exit", or "help" at any question.

Enter an additional license key []:
10. Set the Cluster vServer admin password.
Step 3 of 5: Set Up a Vserver for Cluster Administration
You can type "back", "exit", or "help" at any question.

Enter the cluster administrator's (username "admin") password:

Retype the password:

New password must be at least 8 characters long.

You can type "back", "exit", or "help" at any question.

Enter the cluster administrator's (username "admin") password:

Retype the password:
11.Enter the port and IP details for the cluster LIF.
Enter the cluster management interface port [e0c]:
Enter the cluster management interface IP address: 192.168.0.101
Enter the cluster management interface netmask: 255.255.255.0
Enter the cluster management interface default gateway: 192.168.0.1

A cluster management interface on port e0c with IP address 192.168.0.101 has been created.  You can use this address to connect to and manage the cluster.
12. Enter the DNS details and Name server IP.
Enter the DNS domain names: learn.netapp.local
Enter the name server IP addresses: 192.168.0.11
DNS lookup for the admin Vserver will use the learn.netapp.local domain.
13. We will skip the SFO since simulator will not support this feature.
Step 4 of 5: Configure Storage Failover (SFO)
You can type "back", "exit", or "help" at any question.


SFO will not be enabled on a non-HA system.
14. Set the Node location.
Step 5 of 5: Set Up the Node
You can type "back", "exit", or "help" at any question.

Where is the controller located []: BLR
15. Configure the node Management LIF.
Enter the node management interface port [e0f]:
Enter the node management interface IP address: 192.168.0.91
Enter the node management interface netmask: 255.255.255.0
Enter the node management interface default gateway: 192.168.0.1
A node management interface on port e0f with IP address 192.168.0.91 has been created.
16. After configuring the node management LIF, it will automatically logoff.
Cluster setup is now complete.

To begin storing and serving data on this cluster, log in to the command-line
interface (for example, ssh admin@192.168.0.101) and complete the following
additional tasks if they have not already been completed:

- Join additional nodes to the cluster by running "cluster setup" on
  those nodes.
- For HA configurations, verify that storage failover is enabled by
  running the "storage failover show" command.
- Create a Vserver by running the "vserver setup" command.


In addition to using the CLI to perform cluster management tasks, you can manage
your cluster using OnCommand System Manager, which features a graphical user
interface that simplifies many cluster management tasks. This software is
available from the NetApp Support Site.

Exiting the cluster setup wizard.

Fri Nov 27 21:35:23 UTC 2015
17. Login back as admin with newly created password and check the cluster status.
login: admin
Password:
NetUA::>
NetUA::> cluster show
Node                  Health  Eligibility
--------------------- ------- ------------
NetUA-01              true    true

NetUA::>
We have successfully created new cluster using first controller .
Joining the second node on Cluster:
1.Login to the second controller using serial console or IP address if you have already configure the Node IP. In this case, I have connected the second node using serial port.
2. Login as admin with no password.
3. Once you have reached the node shell , execute command “cluster setup” .
::> cluster setup
4. You will wizard like below. Enter “join” to join with newly created cluster.
Welcome to the cluster setup wizard.

You can enter the following commands at any time:
  "help" or "?" - if you want to have a question clarified,
  "back" - if you want to change previously answered questions, and
  "exit" or "quit" - if you want to quit the cluster setup wizard.
     Any changes you made before quitting will be saved.

You can return to cluster setup at any time by typing "cluster setup".
To accept a default or omit a question, do not enter a value.


Do you want to create a new cluster or join an existing cluster? {create, join}: join
5. Accept the defaults and continue.
System Defaults:
Private cluster network ports [e0a,e0b].
Cluster port MTU values will be set to 1500.
Cluster interface IP addresses will be automatically generated.

Do you want to use these defaults? {yes, no} [yes]: yes

It can take several minutes to create cluster interfaces...
6.System will automatically scan using the cluster interconnect and it will provide the cluster name to join.
Step 1 of 3: Join an Existing Cluster
You can type "back", "exit", or "help" at any question.

Enter the name of the cluster you would like to join [NetUA]:
NetUA

Joining cluster NetUA

Starting cluster support services ....

This node has joined the cluster NetUA.
7. System will automatically skips the SFO.
Step 2 of 3: Configure Storage Failover (SFO)
You can type "back", "exit", or "help" at any question.


SFO will not be enabled on a non-HA system.
8. Configure the node management LIF.
Step 3 of 3: Set Up the Node
You can type "back", "exit", or "help" at any question.

Enter the node management interface port [e0f]:
Enter the node management interface IP address: 192.168.0.92
Enter the node management interface netmask [255.255.255.0]:
Enter the node management interface default gateway [192.168.0.1]:

A node management interface on port e0f with IP address 192.168.0.92 has been created.
9. Once you have completed the node management LIF configuration, system will automatically logoff.
Cluster setup is now complete.

To begin storing and serving data on this cluster, log in to the command-line
interface (for example, ssh admin@192.168.0.101) and complete the following
additional tasks if they have not already been completed:

- Join additional nodes to the cluster by running "cluster setup" on
  those nodes.
- For HA configurations, verify that storage failover is enabled by
  running the "storage failover show" command.
- Create a Vserver by running the "vserver setup" command.


In addition to using the CLI to perform cluster management tasks, you can manage
your cluster using OnCommand System Manager, which features a graphical user
interface that simplifies many cluster management tasks. This software is
available from the NetApp Support Site.

Exiting the cluster setup wizard.

Fri Nov 27 21:43:52 UTC 2015
login:
10. Login to the node 2 using user “admin” and check the cluster status.
login: admin
Password:
NetUA::> cluster show
Node                  Health  Eligibility
--------------------- ------- ------------
NetUA-01              true    true
NetUA-02              true    true
2 entries were displayed.

NetUA::>
11. Check the network configuration on Node2.
NetUA::> network interface show
            Logical    Status     Network            Current       Current Is
Vserver     Interface  Admin/Oper Address/Mask       Node          Port    Home
----------- ---------- ---------- ------------------ ------------- ------- ----
NetUA
            cluster_mgmt up/up    192.168.0.101/24   NetUA-01      e0c     true
NetUA-01
            clus1        up/up    169.254.81.224/16  NetUA-01      e0a     true
            clus2        up/up    169.254.220.127/16 NetUA-01      e0b     true
            mgmt1        up/up    192.168.0.91/24    NetUA-01      e0f     true
NetUA-02
            clus1        up/up    169.254.124.94/16  NetUA-02      e0a     true
            clus2        up/up    169.254.244.74/16  NetUA-02      e0b     true
            mgmt1        up/up    192.168.0.92/24    NetUA-02      e0f     true
7 entries were displayed.

NetUA::>
12. Check the network configuration on Node1.
NetUA::> network interface show
            Logical    Status     Network            Current       Current Is
Vserver     Interface  Admin/Oper Address/Mask       Node          Port    Home
----------- ---------- ---------- ------------------ ------------- ------- ----
NetUA
            cluster_mgmt up/up    192.168.0.101/24   NetUA-01      e0c     true
NetUA-01
            clus1        up/up    169.254.81.224/16  NetUA-01      e0a     true
            clus2        up/up    169.254.220.127/16 NetUA-01      e0b     true
            mgmt1        up/up    192.168.0.91/24    NetUA-01      e0f     true
NetUA-02
            clus1        up/up    169.254.124.94/16  NetUA-02      e0a     true
            clus2        up/up    169.254.244.74/16  NetUA-02      e0b     true
            mgmt1        up/up    192.168.0.92/24    NetUA-02      e0f     true
7 entries were displayed.

NetUA::>
We have successfully setup the two node NetApp cluster.
Quorum/ Epsilon:
When it comes to cluster ,voting plays a key role. Each node in the cluster participates in a voting protocol that elects one node master; each remaining node is a secondary. The master node is responsible for synchronizing information across the cluster. When quorum is formed, it is maintained by continual voting; if the master node goes offline, a new master is elected by the nodes that remains online. There is the possibility of a tie in a cluster that has an even number of nodes, one node has an extra fractional voting weight called epsilon. When the connectivity between two equal portions of a large cluster fails, the group of nodes containing epsilon maintains quorum, assuming that all of the nodes are healthy.
To check the master node, use the following commands.
1.Login to the cluster LIF using admin user and check cluster status.
NetUA::> cluster show
Node                  Health  Eligibility
--------------------- ------- ------------
NetUA-01              true    true
NetUA-02              true    true
2 entries were displayed.

NetUA::>
2.Set the privileges to advanced.
NetUA::> set advanced

Warning: These advanced commands are potentially dangerous; use them only when directed to do so by NetApp personnel.
Do you want to continue? {y|n}: y


NetUA::*>
3.Check the cluster status to know the current Elision node.
NetUA::*> cluster show
Node                 Health  Eligibility   Epsilon
-------------------- ------- ------------  ------------
NetUA-01             true    true          true
NetUA-02             true    true          false
2 entries were displayed.

NetUA::*>
Cluster Start-up Process:
- RDB applications startup and read the databases in /mroot/etc/cluster_config/rdb.
- Start talking to other nodes in the cluster using RPC with info contained in /var/rdb/_sitelist.
- Determine master for each RDB ring
- Update /replicate RDB as needed.
- All RDB apps enter quorum and begin running.
- Setup CSM connections to all reachable nodes in the cluster
- All LIFs and d-blades become available on all nodes.
The Normal Boot Sequence of the Nodes:
- The firmware loads the kernel from the boot device
- The kernel mounts the “/” root image from rootfs.img on the boot device.
- Init is loaded, and start-up scripts run.
- NVRAM kernel modules are loaded.
- The /var partition on NVRAM is created and mounted
- The Management daemon is started (mgwd)
- The data module, the network module, and other components are loaded.
- The vol0 root volume is mounted from the local data module.
- The CLI is ready for use.
Hope this article is informative to you. Share it ! Comment it !! Be Sociable !!!