

In openstack , We need to create the necessary virtual network infrastructure for Neutron Networking. This network infrastructure will be used to connect the instances including external network (internet) and tenant network. Before creating the instance , we need to validate the network connectivity. This article will demonstrate that how to create the required virtual infrastructure , configure the external network and configure the tenant network. At the end of the article ,we will see that how to verify the network connectivity.
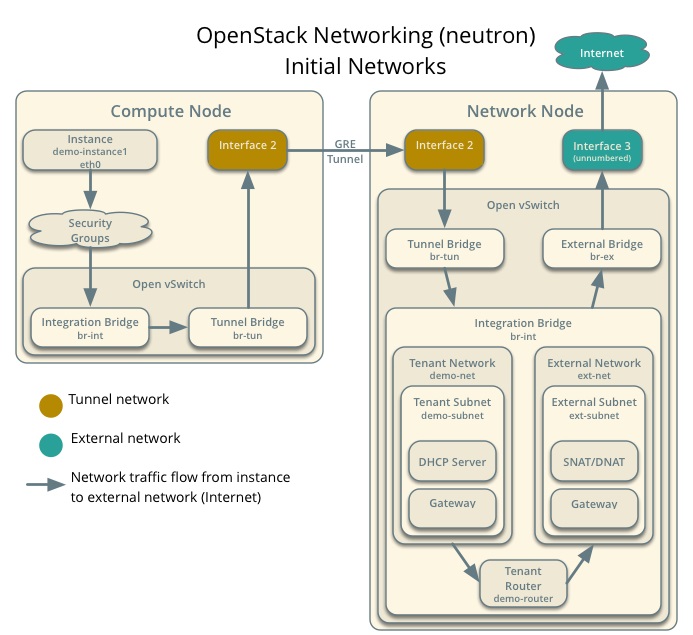
The diagram below provides basic architectural overview of the networking components. It also shows that how the network implements for the initial networks and shows how network traffic flows from the instance to the external network or Internet. Refer Openstack.org for more information.
Create the External Network for Neutron:
To provide the internet access to the instances , you must have external network functionality. Internet access can be enabled by assigning the floating IP’s and specific security group profiles for each instances. Instance will not get the public IP address but internet access will be provided using NAT. (Network address Translation).
Let’s create the external Network.
1. Login to the Openstack Controller Node.
2. Source the admin credentials.
root@OSCTRL-UA:~# cat admin.rc
export OS_USERNAME=admin
export OS_PASSWORD=admin123
export OS_TENANT_NAME=admin
export OS_AUTH_URL=http://OSCTRL-UA:35357/v2.0
root@OSCTRL-UA:~# source admin.rc
root@OSCTRL-UA:~#
3. Create the external network .
root@OSCTRL-UA:~# neutron net-create ext-net --router:external --provider:physical_network external --provider:network_type flat
Created a new network:
+---------------------------+--------------------------------------+
| Field                     | Value                                |
+---------------------------+--------------------------------------+
| admin_state_up            | True                                 |
| id                        | f39aef8a-4f98-4338-b0f0-0755818d9341 |
| name                      | ext-net                              |
| provider:network_type     | flat                                 |
| provider:physical_network | external                             |
| provider:segmentation_id  |                                      |
| router:external           | True                                 |
| shared                    | False                                |
| status                    | ACTIVE                               |
| subnets                   |                                      |
| tenant_id                 | d14d6a07f862482398b3e3e4e8d581c6     |
+---------------------------+--------------------------------------+
root@OSCTRL-UA:~#
4. We should specify an exclusive part of this subnet for router and floating IP addresses to prevent interference with other devices on the external network. In our case , External floating IP will start from 192.168.203.192 to 192.168.203.254 . The default gateway is 192.168.203.2.
root@OSCTRL-UA:~# neutron subnet-create ext-net --name ext-subnet --allocation-pool start=192.168.203.192,end=192.168.203.254 --disable-dhcp --gateway 192.168.203.2 192.168.203.0/24
Created a new subnet:
+-------------------+--------------------------------------------------------+
| Field             | Value                                                  |
+-------------------+--------------------------------------------------------+
| allocation_pools  | {"start": "192.168.203.192", "end": "192.168.203.254"} |
| cidr              | 192.168.203.0/24                                       |
| dns_nameservers   |                                                        |
| enable_dhcp       | False                                                  |
| gateway_ip        | 192.168.203.2                                          |
| host_routes       |                                                        |
| id                | dc639c5d-c21a-41df-bfc2-bffcbce11151                   |
| ip_version        | 4                                                      |
| ipv6_address_mode |                                                        |
| ipv6_ra_mode      |                                                        |
| name              | ext-subnet                                             |
| network_id        | 1c233704-4067-44ce-bc8c-eb1964c4a74a                   |
| tenant_id         | d14d6a07f862482398b3e3e4e8d581c6                       |
+-------------------+--------------------------------------------------------+
root@OSCTRL-UA:~#
Create the Tenant Network:
Tenant Network provides the IP address for internal network access for openstack instance. Let’s assume , we have tenant called “lingesh” . You can verify the tenant availability using command below.
root@OSCTRL-UA:~# keystone user-list |grep lingesh
| 3f01d4f7aa9e477cb885334ab9c5929d | lingesh |   True  | lingeshwaran.rangasamy@gmail.com |
root@OSCTRL-UA:~#
1. Source the “lingesh” tenant credentials .
root@OSCTRL-UA:~# cat lingesh.rc
export OS_USERNAME=lingesh
export OS_PASSWORD=ling123
export OS_TENANT_NAME=lingesh
export OS_AUTH_URL=http://OSCTRL-UA:35357/v2.0
root@OSCTRL-UA:~#
root@OSCTRL-UA:~# source lingesh.rc
2. Create the tenant network for “lingesh”.
root@OSCTRL-UA:~# neutron net-create lingesh-net
Created a new network:
+-----------------+--------------------------------------+
| Field           | Value                                |
+-----------------+--------------------------------------+
| admin_state_up  | True                                 |
| id              | 1c0cb789-7cd3-4d9c-869c-7d0a36bb6cca |
| name            | lingesh-net                          |
| router:external | False                                |
| shared          | False                                |
| status          | ACTIVE                               |
| subnets         |                                      |
| tenant_id       | abe3af30f46b446fbae35a102457890c     |
+-----------------+--------------------------------------+
root@OSCTRL-UA:~#
3. Create the subnet for tenant (lingesh) .
root@OSCTRL-UA:~# neutron subnet-create lingesh-net --name lingesh-subnet --gateway 192.168.4.1 192.168.4.0/24
Created a new subnet:
+-------------------+--------------------------------------------------+
| Field             | Value                                            |
+-------------------+--------------------------------------------------+
| allocation_pools  | {"start": "192.168.4.2", "end": "192.168.4.254"} |
| cidr              | 192.168.4.0/24                                   |
| dns_nameservers   |                                                  |
| enable_dhcp       | True                                             |
| gateway_ip        | 192.168.4.1                                      |
| host_routes       |                                                  |
| id                | ac05bc74-eade-4811-8e7b-8de021abe0c1             |
| ip_version        | 4                                                |
| ipv6_address_mode |                                                  |
| ipv6_ra_mode      |                                                  |
| name              | lingesh-subnet                                   |
| network_id        | 1c0cb789-7cd3-4d9c-869c-7d0a36bb6cca             |
| tenant_id         | abe3af30f46b446fbae35a102457890c                 |
+-------------------+--------------------------------------------------+
root@OSCTRL-UA:~#
Note: Tenant “lingesh” can use the ip address from 192.168.4.1 to 192.168.4.254.
4. Create the virtual router to pass the instance network. Router can attach to more than one virtual network. In our case , we will create the router and attach the external & tenant network to it.
root@OSCTRL-UA:~# neutron router-create lingesh-router
Created a new router:
+-----------------------+--------------------------------------+
| Field                 | Value                                |
+-----------------------+--------------------------------------+
| admin_state_up        | True                                 |
| external_gateway_info |                                      |
| id                    | 1d5f48e4-b8e0-4789-8e1d-10bd9b92155a |
| name                  | lingesh-router                       |
| routes                |                                      |
| status                | ACTIVE                               |
| tenant_id             | abe3af30f46b446fbae35a102457890c     |
+-----------------------+--------------------------------------+
root@OSCTRL-UA:~#
5. Attach the tenant network to the router.
root@OSCTRL-UA:~# neutron router-interface-add lingesh-router lingesh-subnet
Added interface 885f79ab-1ace-4e98-963a-ab054a7ad757 to router lingesh-router.
root@OSCTRL-UA:~#
6. Attach the external network to the router.
root@OSCTRL-UA:~# neutron router-gateway-set lingesh-router ext-net
Set gateway for router lingesh-router
root@OSCTRL-UA:~#
7.List the newly created router’s port list. One subnet will be used for tenant network & other one will be used for external network.
root@OSCTRL-UA:~# neutron router-port-list lingesh-router
+--------------------------------------+------+-------------------+------------------------------------------------------------------------------------+
| id                                   | name | mac_address       | fixed_ips                                                                          |
+--------------------------------------+------+-------------------+------------------------------------------------------------------------------------+
| b691fe06-87de-43fe-9cb1-919134beed84 |      | fa:16:3e:14:24:33 | {"subnet_id": "f6523637-7162-449d-b12c-e1f0eda6196d", "ip_address": "192.168.4.1"} |
+--------------------------------------+------+-------------------+------------------------------------------------------------------------------------+
root@OSCTRL-UA:~#
Verify our work:
1.Login to the Openstack network node.
2. List the router which we have created for “lingesh” tenant.
root@OSNWT-UA:/var/log/neutron# ip netns
qdhcp-58ee8851-06c3-40f3-91ca-b6d7cff609a5
qrouter-89681830-f698-4d1a-aa05-8d5682822791
root@OSNWT-UA:/var/log/neutron#
3. Ping the external router IP using command below.
root@OSNWT-UA:~# ip netns exec qrouter-89681830-f698-4d1a-aa05-8d5682822791 ping 192.168.203.192
PING 192.168.203.192 (192.168.203.192) 56(84) bytes of data.
64 bytes from 192.168.203.192: icmp_seq=1 ttl=64 time=0.165 ms
64 bytes from 192.168.203.192: icmp_seq=2 ttl=64 time=0.126 ms
64 bytes from 192.168.203.192: icmp_seq=3 ttl=64 time=0.082 ms
^C
--- 203.168.205.101 ping statistics ---
3 packets transmitted, 3 received, 0% packet loss, time 2002ms
rtt min/avg/max/mdev = 0.082/0.124/0.165/0.035 ms
root@OSNWT-UA:~#
4. You should be able to ping the tenant network as well.
root@OSNWT-UA:~# ip netns exec qrouter-89681830-f698-4d1a-aa05-8d5682822791 ping 192.168.4.1
PING 192.168.4.1 (192.168.4.1) 56(84) bytes of data.
64 bytes from 192.168.4.1: icmp_seq=1 ttl=64 time=0.147 ms
64 bytes from 192.168.4.1: icmp_seq=2 ttl=64 time=0.083 ms
^C
--- 192.168.4.1 ping statistics ---
2 packets transmitted, 2 received, 0% packet loss, time 1001ms
rtt min/avg/max/mdev = 0.083/0.115/0.147/0.032 ms
root@OSNWT-UA:~#
5. You can also ping the external IP pool’s first IP address from controller , network & compute nodes.
root@OSCTRL-UA:~# ping 192.168.203.192
PING 192.168.203.192 (192.168.203.192) 56(84) bytes of data.
64 bytes from 192.168.203.192: icmp_seq=1 ttl=64 time=3.32 ms
64 bytes from 192.168.203.192: icmp_seq=2 ttl=64 time=0.764 ms
^C
--- 192.168.203.192 ping statistics ---
2 packets transmitted, 2 received, 0% packet loss, time 1002ms
rtt min/avg/max/mdev = 0.764/2.045/3.326/1.281 ms
root@OSCTRL-UA:~#
The above results shows that we have successfully configured Openstack neutron service .
What’s Next ? We have configured all the basic service to launch Openstack instance. In the next article ,we will see that how we can create the instance using command line.