


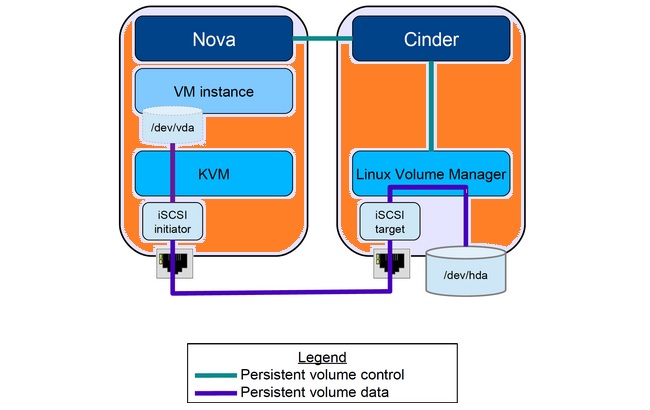
This article will demonstrates that how to install and configure Openstack Storage nodes for the Block Storage service (cinder). For the tutorial simplicity , we will use the local disk in LVM as back-end storage. In the upcoming articles ,we will replace the LVM with CEPH storage, once we familiar with cinder services and functionalities. In our setup, Cinder service use LVM driver to create the new volumes and provides to the instance using ISCSI transport. You can scale the storage node horizontally based on the requirement.
Make sure that storage node consists the blank disk for back-end storage.
Configure the Storage Node for Cinder:
1.Login to the Openstack Storage node.
2.Install the LVM packages on storage node.
root@OSSTG-UA:~# apt-get install lvm2
Reading package lists... Done
Building dependency tree
Reading state information... Done
The following extra packages will be installed:
  libdevmapper-event1.02.1 watershed
Suggested packages:
  thin-provisioning-tools
The following NEW packages will be installed:
  libdevmapper-event1.02.1 lvm2 watershed
0 upgraded, 3 newly installed, 0 to remove and 31 not upgraded.
Need to get 492 kB of archives.
After this operation, 1,427 kB of additional disk space will be used.
Do you want to continue? [Y/n] Y
Get:1 http://in.archive.ubuntu.com/ubuntu/ trusty/main libdevmapper-event1.02.1 amd64 2:1.02.77-6ubuntu2 [10.8 kB]
Get:2 http://in.archive.ubuntu.com/ubuntu/ trusty/main watershed amd64 7 [11.4 kB]
Get:3 http://in.archive.ubuntu.com/ubuntu/ trusty/main lvm2 amd64 2.02.98-6ubuntu2 [470 kB]
Fetched 492 kB in 5s (84.4 kB/s)
Selecting previously unselected package libdevmapper-event1.02.1:amd64.
(Reading database ... 88165 files and directories currently installed.)
Preparing to unpack .../libdevmapper-event1.02.1_2%3a1.02.77-6ubuntu2_amd64.deb ...
Unpacking libdevmapper-event1.02.1:amd64 (2:1.02.77-6ubuntu2) ...
Selecting previously unselected package watershed.
Preparing to unpack .../archives/watershed_7_amd64.deb ...
Unpacking watershed (7) ...
Selecting previously unselected package lvm2.
Preparing to unpack .../lvm2_2.02.98-6ubuntu2_amd64.deb ...
Unpacking lvm2 (2.02.98-6ubuntu2) ...
Processing triggers for man-db (2.6.7.1-1ubuntu1) ...
Setting up libdevmapper-event1.02.1:amd64 (2:1.02.77-6ubuntu2) ...
Setting up watershed (7) ...
update-initramfs: deferring update (trigger activated)
Setting up lvm2 (2.02.98-6ubuntu2) ...
update-initramfs: deferring update (trigger activated)
Processing triggers for libc-bin (2.19-0ubuntu6.6) ...
Processing triggers for initramfs-tools (0.103ubuntu4.2) ...
3. List the available free disk. In my case, I have /dev/sdb.
root@OSSTG-UA:~# fdisk -l /dev/sdb

Disk /dev/sdb: 10.7 GB, 10737418240 bytes
255 heads, 63 sectors/track, 1305 cylinders, total 20971520 sectors
Units = sectors of 1 * 512 = 512 bytes
Sector size (logical/physical): 512 bytes / 512 bytes
I/O size (minimum/optimal): 512 bytes / 512 bytes
Disk identifier: 0x00000000

Disk /dev/sdb doesn't contain a valid partition table
root@OSSTG-UA:~#
4.Create the physical volume on the disk.
root@OSSTG-UA:~# pvcreate /dev/sdb
  Physical volume "/dev/sdb" successfully created
root@OSSTG-UA:~#
5. Create the new volume group using /dev/sdb. This volume group will be used by the storage service (cinder) to create the volumes.
root@OSSTG-UA:~# vgcreate cinder-volumes /dev/sdb
  Volume group "cinder-volumes" successfully created
root@OSSTG-UA:~# vgs cinder-volumes
  VG             #PV #LV #SN Attr   VSize  VFree
  cinder-volumes   1   0   0 wz--n- 10.00g 10.00g
root@OSSTG-UA:~#
6.Re-configure LVM to scan only the devices that contain the cinder-volume volume group. Add the filter to scan only /dev/sdb and reject all other devices. Edit the /etc/lvm/lvm.conf file like below. If you root disk is part of LVM group, make sure that you have added the disk in the filter to avoid other potential issues. In my case, root filesystem is not using LVM.
devices {
...
filter = [ "a/sdb/", "r/.*/"]
After the modification, file should provide the below results.
root@OSSTG-UA:~# grep filter /etc/lvm/lvm.conf |grep -v "#"
    filter = [ "a/sdb/", "r/.*/"]
root@OSSTG-UA:~#
7. Install the block storage components .
root@OSSTG-UA:~#  apt-get install cinder-volume python-mysqldb
Reading package lists... Done
Building dependency tree
Reading state information... Done
python-mysqldb is already the newest version.
The following extra packages will be installed:
  alembic cinder-common ieee-data libconfig-general-perl libgmp10 libibverbs1
  libjs-jquery libjs-sphinxdoc libjs-underscore librabbitmq1 librdmacm1
  libsgutils2-2 libyaml-0-2 python-alembic python-amqp python-amqplib
  python-anyjson python-babel python-babel-localedata python-barbicanclient
  python-cinder python-concurrent.futures python-crypto python-decorator
  python-dns python-ecdsa python-eventlet python-formencode
  python-glanceclient python-greenlet python-httplib2 python-iso8601
  python-json-patch python-json-pointer python-jsonpatch python-jsonschema
  python-keystoneclient python-keystonemiddleware python-kombu
  python-librabbitmq python-lockfile python-lxml python-mako python-markupsafe
  python-migrate python-mock python-netaddr python-networkx python-novaclient
  python-openid python-oslo.config python-oslo.db python-oslo.i18n
8.Edit the /etc/cinder/cinder.conf file and update the following details. Update the database section.
[database]
connection = mysql://cinder:cinderdb123@OSCTRL-UA/cinder
9. configure RabbitMQ message broker access .
[DEFAULT]
....
rpc_backend = rabbit
rabbit_host = OSCTRL-UA
rabbit_password = rabbit123
10.Configure the identity service.
[DEFAULT]
....
auth_strategy = keystone


[keystone_authtoken]
auth_uri = http://OSCTRL-UA:5000/v2.0
identity_uri = http://OSCTRL-UA:35357
admin_tenant_name = service
admin_user = cinder
admin_password = cinder123
11. Configure the my_ip. Update the storage node IP address.
[DEFAULT]
....
my_ip = 192.168.203.133
12. Configure the image service .
[DEFAULT]
....
glance_host = OSCTRL-UA
13.Enable the verbose for troubleshooting.
[DEFAULT]
...
verbose = True
14.Restart the Block Storage volume service and ISCSI target service.
root@OSSTG-UA:~# service tgt restart
tgt stop/waiting
tgt start/running, process 13308
root@OSSTG-UA:~# service cinder-volume restart
cinder-volume stop/waiting
cinder-volume start/running, process 13329
root@OSSTG-UA:~#
15. Remove the default SQLlite database.
root@OSSTG-UA:~# rm -f /var/lib/cinder/cinder.sqlite
root@OSSTG-UA:~#
Verify the Cinder Service Configuration:
1.Login to the Openstack Controller Node.
2. Source the admin credentials for CLI commands.
root@OSCTRL-UA:~# cat admin.rc
export OS_USERNAME=admin
export OS_PASSWORD=admin123
export OS_TENANT_NAME=admin
export OS_AUTH_URL=http://OSCTRL-UA:35357/v2.0
root@OSCTRL-UA:~# source admin.rc
root@OSCTRL-UA:~#
3.Verify the cinder services.
root@OSCTRL-UA:~# cinder service-list
+------------------+-----------+------+---------+-------+----------------------------+-----------------+
|      Binary      |    Host   | Zone |  Status | State |         Updated_at         | Disabled Reason |
+------------------+-----------+------+---------+-------+----------------------------+-----------------+
| cinder-scheduler | OSCTRL-UA | nova | enabled |   up  | 2015-10-20T18:34:12.000000 |       None      |
|  cinder-volume   |  OSSTG-UA | nova | enabled |   up  | 2015-10-20T18:34:17.000000 |       None      |
+------------------+-----------+------+---------+-------+----------------------------+-----------------+
root@OSCTRL-UA:~#
4. Gain the tenant access to create the test volume. Here the tenant is “lingesh”.
root@OSCTRL-UA:~# cat lingesh.rc
export OS_USERNAME=lingesh
export OS_PASSWORD=ling123
export OS_TENANT_NAME=lingesh
export OS_AUTH_URL=http://OSCTRL-UA:35357/v2.0
root@OSCTRL-UA:~# source lingesh.rc
root@OSCTRL-UA:~#
5. Create the 1GB volume in the name of ling-vol1.
root@OSCTRL-UA:~# cinder create --display-name ling-vol1 1
+---------------------+--------------------------------------+
|       Property      |                Value                 |
+---------------------+--------------------------------------+
|     attachments     |                  []                  |
|  availability_zone  |                 nova                 |
|       bootable      |                false                 |
|      created_at     |      2015-10-20T18:36:16.155518      |
| display_description |                 None                 |
|     display_name    |              ling-vol1               |
|      encrypted      |                False                 |
|          id         | 502f66c2-c5b3-426a-94ed-6bbee259bc96 |
|       metadata      |                  {}                  |
|         size        |                  1                   |
|     snapshot_id     |                 None                 |
|     source_volid    |                 None                 |
|        status       |               creating               |
|     volume_type     |                 None                 |
+---------------------+--------------------------------------+
root@OSCTRL-UA:~#
6. List the newly created volume.
root@OSCTRL-UA:~# cinder list
+--------------------------------------+-----------+--------------+------+-------------+----------+-------------+
|                  ID                  |   Status  | Display Name | Size | Volume Type | Bootable | Attached to |
+--------------------------------------+-----------+--------------+------+-------------+----------+-------------+
| 502f66c2-c5b3-426a-94ed-6bbee259bc96 | available |  ling-vol1   |  1   |     None    |  false   |             |
+--------------------------------------+-----------+--------------+------+-------------+----------+-------------+
root@OSCTRL-UA:~#
7.Go back to storage node and list the LVM volumes using lvs command.
root@OSSTG-UA:~# lvs
  LV                                          VG             Attr      LSize Pool Origin Data%  Move Log Copy%  Convert
  volume-502f66c2-c5b3-426a-94ed-6bbee259bc96 cinder-volumes -wi-a---- 1.00g
root@OSSTG-UA:~#
We can see that new volume is created on “cinder-volumes” volume group. This proves that cinder service is working fine. Refer this article to launch the instance using the volume .(Follow step 10 to step 14.)
Hope this article is informative to you. Share it ! Be Sociable !!!