


Openstack instances can be launched using command line without using the horizon dashboard service. In this tutorial series, we yet configure horizon. I would like to create the new openstack instance without horizon using command line. To launch an instance, we must at least specify the OS flavour, image name, network, security group, key, and instance name. So we have to create the customized security groups , security rules and key pair prior to launching the instances.
Create the key pair for tenant “lingesh”
1.Login to the Openstack controller node.
2.source the “lingesh” tenant credentials.
root@OSCTRL-UA:~# cat lingesh.rc
export OS_USERNAME=lingesh
export OS_PASSWORD=ling123
export OS_TENANT_NAME=lingesh
export OS_AUTH_URL=http://OSCTRL-UA:35357/v2.0
root@OSCTRL-UA:~# source lingesh.rc
root@OSCTRL-UA:~#
3.create the key pair for tenant “lingesh”.
root@OSCTRL-UA:~# nova keypair-add lingesh-key > lingesh.pem
root@OSCTRL-UA:~#
4.Modify the file permission.
root@OSCTRL-UA:~# more lingesh.pem
-----BEGIN RSA PRIVATE KEY-----
MIIEpAIBAAKCAQEAr/3DeUb7BQ+wQ47gBhrglw+LHL9rvyAXjt55gmaqfCEOTFXo
PYAmLg+aWbJvvnEXWbKkGaTiHajmLawd/sSym9Z6pU0tQTov9khQiSi2nBPbDXRQ
KWFibYbDMf0CkoRO3UzRADY+n5jHE5eaAt0sNekhbCBlTKVhosJXod+IpVPvuJoe
HdGVndTNgOV770Uiu343Lu3coATK3V3kW5agF0Pvw+eZ3RQYkeueLD1pRq+YUjxg
l6xIYKE5gGuCtztcFPEZpBtVf30X3gotaIIY4jnadeYjrSeJZmCdoNihEFlBu9Q9
iAp2jt6plRes7+HiZyJjbr6ogYeBVnpiAfx7GwIDAQABAoIBAFm+Ek6mllxHWr+o
fK5ASGRfhbWcGwp0B+9PnTCUv7zaclsUt3+c+Fsmk7PHnNnE+34+7RUykidDuFRz
3zvJ+7Yh0Zq3Vytay5hP2dmHTE8chOhAdpwTT8jAHotAFG64Tyrj//OWtapWkrV3
6g4p0GCRR/zGLEHAV6BSb7NYtGpxITADr21hm+sxlJHFBlMDD2VGjAvXXMQAPqLH
HzD3EaCkhrh8oPewZr07r9ZReLJIlCerXaj74A5pamtJKDanBDq3QRGbSgi/YDBK
1h7N7w+b996Qt7OFGAzhbZojhuBE+PzEsAyFtRlBF2AaUW1Pss/l18S4UwLB/zKP
OzFwEWECgYEA3aeTVTZaatvMUPJnNdNItay3jmwhSvSxhAxhHtr1g4wZTvdSmBXX
AxzHMWHG0rflxugH6eInMP6ftjQ4fVJnYOv3Cm2TcR82KoBDmhWW57Pn0kQtaC0d
qkYYEsMGYjb3BTC+9Yv14CwnjPDZ3kzaCR21u/p4zUoLamODVXUvXysCgYEAy0LZ
o6Dp6oz7ThI3J6DvfA/Llwom20JTR4dR7HwxKL21RPOvbnnGUpzXqRHgwouPrjiz
M3jI6lpzAHBWFBhwCbOOScMIlo3/kmcTOqSpWFgNuKkoHnZAEF3mNgJEnxw2pbis
EXT8KV86d1KnXrEd9JtJAW2L4ZzK1JF2Fuyy29ECgYEAy4lZzWG/3WhAUgSFqfN+
TPVxCKNaXw4bA/qqJD9EO6umgdCyU12atwzyDPKQNGcR5Hik66vz+RWXayTAyrOk
omeLzlOYlMPoZVaqvQ8eJ14YfgiE+aiUGQuMh432irGWW3nLoIcJHPTuzIlORsej
X8OcYiU6UKixmtwOeabF/UkCgYBE7Is+aB9J0Lqas6SORI1QxU5lDiU07l2tAJ7w
EQDebs3b7sILNTHh65tZkl1jus1i54kkqA2BImCiwnT95XeAYqmaK49q9gW20Er9
9L4T3e/xMTMQeUqqAh1BLS21wmxpb6CxXrjvEoKR2a41dtvQiSONX2cyfudsg1LG
3UadMQKBgQDOy0sRg9WLviEUXPwq55kJ2cKjSGNyleaLsrAwPkLb516FI0wxqkfR
kagG0aQCb+s3YnzowV6I8u9ammVMVUPUDW84td2GTwvr4GIyPLM6c3cgID5qlFmo
GZXmwIpeZLMt+Qguq5VdmvW0LJ2GpAzLI4ukWwFZJFo4vDAyZ3D6mg==
-----END RSA PRIVATE KEY-----

root@OSCTRL-UA:~# chmod 600 lingesh.pem
root@OSCTRL-UA:~# ls -lrt lingesh.pem
-rw------- 1 root root 1680 Oct 15 08:40 lingesh.pem
root@OSCTRL-UA:~#
root@OSCTRL-UA:~# nova keypair-list
+-------------+-------------------------------------------------+
| Name | Fingerprint |
+-------------+-------------------------------------------------+
| lingesh-key | 45:81:c8:26:3e:2b:d7:af:aa:df:69:31:51:bf:40:1b |
+-------------+-------------------------------------------------+
root@OSCTRL-UA:~#
Create the custom security group & rule using neutron CLI:
1. List the existing security group.
root@OSCTRL-UA:~# neutron security-group-list
+--------------------------------------+---------+-------------+
| id                                   | name    | description |
+--------------------------------------+---------+-------------+
| fd9a2b77-c7be-49bb-bbfa-db67d36333f4 | default | default     |
+--------------------------------------+---------+-------------+
root@OSCTRL-UA:~#
2. Create the new security group in the name of “allow-ssh-icmp”.
root@OSCTRL-UA:~# neutron security-group-create allow-ssh-icmp --description "Allow ssh & ICMP"
Created a new security_group:
+----------------------+-------------------------------------------------------------------------------------------------------------------------------------------------------------------------------------------------------------------------------------------------------------------------------------------------------------------------------+
| Field                | Value                                                                                                                                                                                                                                                                                                                         |
+----------------------+-------------------------------------------------------------------------------------------------------------------------------------------------------------------------------------------------------------------------------------------------------------------------------------------------------------------------------+
| description          | Allow ssh & ICMP                                                                                                                                                                                                                                                                                                              |
| id                   | 04c7430a-a661-40ef-a252-318bcac5b44b                                                                                                                                                                                                                                                                                          |
| name                 | allow-ssh-icmp                                                                                                                                                                                                                                                                                                                |
| security_group_rules | {"remote_group_id": null, "direction": "egress", "remote_ip_prefix": null, "protocol": null, "tenant_id": "abe3af30f46b446fbae35a102457890c", "port_range_max": null, "security_group_id": "04c7430a-a661-40ef-a252-318bcac5b44b", "port_range_min": null, "ethertype": "IPv4", "id": "19ee8f4d-8f7a-48cb-b91f-ef478a753b4c"} |
|                      | {"remote_group_id": null, "direction": "egress", "remote_ip_prefix": null, "protocol": null, "tenant_id": "abe3af30f46b446fbae35a102457890c", "port_range_max": null, "security_group_id": "04c7430a-a661-40ef-a252-318bcac5b44b", "port_range_min": null, "ethertype": "IPv6", "id": "91195dde-de74-4e7f-9144-df1ab7a83e9d"} |
| tenant_id            | abe3af30f46b446fbae35a102457890c                                                                                                                                                                                                                                                                                              |
+----------------------+-------------------------------------------------------------------------------------------------------------------------------------------------------------------------------------------------------------------------------------------------------------------------------------------------------------------------------+
root@OSCTRL-UA:~#
3. Add the rule to “allow-ssh-icmp” to allow port 22 from anywhere.
root@OSCTRL-UA:~# neutron security-group-rule-create --direction ingress --ethertype IPv4 --protocol tcp --port-range-min 22 --port-range-max 22 --remote-ip-prefix 0.0.0.0/0 allow-ssh-icmp
Created a new security_group_rule:
+-------------------+--------------------------------------+
| Field             | Value                                |
+-------------------+--------------------------------------+
| direction         | ingress                              |
| ethertype         | IPv4                                 |
| id                | fe92f280-dca1-47a2-b85c-0a7266315107 |
| port_range_max    | 22                                   |
| port_range_min    | 22                                   |
| protocol          | tcp                                  |
| remote_group_id   |                                      |
| remote_ip_prefix  | 0.0.0.0/0                            |
| security_group_id | 04c7430a-a661-40ef-a252-318bcac5b44b |
| tenant_id         | abe3af30f46b446fbae35a102457890c     |
+-------------------+--------------------------------------+
root@OSCTRL-UA:~#
4. Add the rule to “”allow-ssh-icmp” to allow ICMP (ping) from anywhere.
root@OSCTRL-UA:~# neutron security-group-rule-create --direction ingress --ethertype IPv4 --protocol icmp  --remote-ip-prefix 0.0.0.0/0 allow-ssh-icmp               Created a new security_group_rule:
+-------------------+--------------------------------------+
| Field             | Value                                |
+-------------------+--------------------------------------+
| direction         | ingress                              |
| ethertype         | IPv4                                 |
| id                | 1f3fca0b-7fef-4648-a913-947ed97e254e |
| port_range_max    |                                      |
| port_range_min    |                                      |
| protocol          | icmp                                 |
| remote_group_id   |                                      |
| remote_ip_prefix  | 0.0.0.0/0                            |
| security_group_id | 04c7430a-a661-40ef-a252-318bcac5b44b |
| tenant_id         | abe3af30f46b446fbae35a102457890c     |
+-------------------+--------------------------------------+
root@OSCTRL-UA:~#
5. You can also use the nova command to check the security group rules.
root@OSCTRL-UA:~# nova secgroup-list-rules  allow-ssh-icmp
+-------------+-----------+---------+-----------+--------------+
| IP Protocol | From Port | To Port | IP Range  | Source Group |
+-------------+-----------+---------+-----------+--------------+
| icmp        | -1        | -1      | 0.0.0.0/0 |              |
| tcp         | 22        | 22      | 0.0.0.0/0 |              |
+-------------+-----------+---------+-----------+--------------+
root@OSCTRL-UA:~#
Launch the instance
1. List the preconfigured flavour in openstack. Flavour specifics the virtual resources allocation. (Memory ,CPU , storage )
root@OSCTRL-UA:~# nova flavor-list
+----+-----------+-----------+------+-----------+------+-------+-------------+-----------+
| ID | Name      | Memory_MB | Disk | Ephemeral | Swap | VCPUs | RXTX_Factor | Is_Public |
+----+-----------+-----------+------+-----------+------+-------+-------------+-----------+
| 1  | m1.tiny   | 512       | 1    | 0         |      | 1     | 1.0         | True      |
| 2  | m1.small  | 2048      | 20   | 0         |      | 1     | 1.0         | True      |
| 3  | m1.medium | 4096      | 40   | 0         |      | 2     | 1.0         | True      |
| 4  | m1.large  | 8192      | 80   | 0         |      | 4     | 1.0         | True      |
| 5  | m1.xlarge | 16384     | 160  | 0         |      | 8     | 1.0         | True      |
+----+-----------+-----------+------+-----------+------+-------+-------------+-----------+
root@OSCTRL-UA:~#
We will use flavour “m1.tiny” to launch the instance.
2. List the available OS image . Refer Glance setup.
root@OSCTRL-UA:~# nova image-list
+--------------------------------------+---------------------+--------+--------+
| ID                                   | Name                | Status | Server |
+--------------------------------------+---------------------+--------+--------+
| 7d19b639-6950-42dc-a64d-91c6662e0613 | CirrOS 0.3.0        | ACTIVE |        |
| 95fafce7-ae0f-47e3-b1c9-5d2ebd1af885 | CirrOS-0.3.4-x86_64 | ACTIVE |        |
+--------------------------------------+---------------------+--------+--------+
root@OSCTRL-UA:~#
We will use image “CirrOS-0.3.4-x86_64” to launch the instance.
If you don’t have the Cirros-0.3.4-x86_64 , just download the image from internet & add it in to glance like below.
root@OSCTRL-UA:/home/stack# glance image-create --name="CirrOS-0.3.4-x86_64" --disk-format=qcow2 --container-format=bare --is-public=true < cirros-0.3.4-x86_64-disk.img
+------------------+--------------------------------------+
| Property         | Value                                |
+------------------+--------------------------------------+
| checksum         | ee1eca47dc88f4879d8a229cc70a07c6     |
| container_format | bare                                 |
| created_at       | 2015-10-14T23:15:21                  |
| deleted          | False                                |
| deleted_at       | None                                 |
| disk_format      | qcow2                                |
| id               | 95fafce7-ae0f-47e3-b1c9-5d2ebd1af885 |
| is_public        | True                                 |
| min_disk         | 0                                    |
| min_ram          | 0                                    |
| name             | CirrOS-0.3.4-x86_64                  |
| owner            | d14d6a07f862482398b3e3e4e8d581c6     |
| protected        | False                                |
| size             | 13287936                             |
| status           | active                               |
| updated_at       | 2015-10-14T23:15:21                  |
| virtual_size     | None                                 |
+------------------+--------------------------------------+
root@OSCTRL-UA:/home/stack#
3. List the available networks for tenant “lingesh”.
root@OSCTRL-UA:~# neutron net-list
+--------------------------------------+-------------+-------------------------------------------------------+
| id                                   | name        | subnets                                               |
+--------------------------------------+-------------+-------------------------------------------------------+
| 1c233704-4067-44ce-bc8c-eb1964c4a74a | ext-net     | dc639c5d-c21a-41df-bfc2-bffcbce11151 192.168.203.0/24 |
| 58ee8851-06c3-40f3-91ca-b6d7cff609a5 | lingesh-net | f6523637-7162-449d-b12c-e1f0eda6196d 192.168.4.0/28   |
+--------------------------------------+-------------+-------------------------------------------------------+
root@OSCTRL-UA:~#
We will use ID “58ee8851-06c3-40f3-91ca-b6d7cff609a5” to launch the instance.
4.List the available security groups.
root@OSCTRL-UA:~# nova secgroup-list
+--------------------------------------+----------------+------------------+
| Id                                   | Name           | Description      |
+--------------------------------------+----------------+------------------+
| 04c7430a-a661-40ef-a252-318bcac5b44b | allow-ssh-icmp | Allow ssh & ICMP |
| fd9a2b77-c7be-49bb-bbfa-db67d36333f4 | default        | default          |
+--------------------------------------+----------------+------------------+
root@OSCTRL-UA:~#
We will use “allow-ssh-icmp” to launch the instance.
5. Let’s launch the instance using the security group, image name , net id & security key.
  root@OSCTRL-UA:~# nova boot --flavor m1.tiny --image "CirrOS-0.3.4-x86_64" --nic net-id=58ee8851-06c3-40f3-91ca-b6d7cff609a5 --security-group allow-ssh-icmp --key-name lingesh-key dbcirros1
+--------------------------------------+------------------------------------------------------------+
| Property                             | Value                                                      |
+--------------------------------------+------------------------------------------------------------+
| OS-DCF:diskConfig                    | MANUAL                                                     |
| OS-EXT-AZ:availability_zone          | nova                                                       |
| OS-EXT-STS:power_state               | 0                                                          |
| OS-EXT-STS:task_state                | scheduling                                                 |
| OS-EXT-STS:vm_state                  | building                                                   |
| OS-SRV-USG:launched_at               | -                                                          |
| OS-SRV-USG:terminated_at             | -                                                          |
| accessIPv4                           |                                                            |
| accessIPv6                           |                                                            |
| adminPass                            | MK4TKC4fv9cu                                               |
| config_drive                         |                                                            |
| created                              | 2015-10-15T07:14:23Z                                       |
| flavor                               | m1.tiny (1)                                                |
| hostId                               |                                                            |
| id                                   | 7ae47f2b-1b2a-4562-bca9-6d6c517cdf85                       |
| image                                | CirrOS-0.3.4-x86_64 (95fafce7-ae0f-47e3-b1c9-5d2ebd1af885) |
| key_name                             | lingesh-key                                                |
| metadata                             | {}                                                         |
| name                                 | dbcirros1                                                  |
| os-extended-volumes:volumes_attached | []                                                         |
| progress                             | 0                                                          |
| security_groups                      | allow-ssh-icmp                                             |
| status                               | BUILD                                                      |
| tenant_id                            | abe3af30f46b446fbae35a102457890c                           |
| updated                              | 2015-10-15T07:14:23Z                                       |
| user_id                              | 3f01d4f7aa9e477cb885334ab9c5929d                           |
+--------------------------------------+------------------------------------------------------------+
root@OSCTRL-UA:~#
6.Check the instance build status.
root@OSCTRL-UA:~# nova list
+--------------------------------------+-----------+--------+------------+-------------+----------+
| ID                                   | Name      | Status | Task State | Power State | Networks |
+--------------------------------------+-----------+--------+------------+-------------+----------+
|  7ae47f2b-1b2a-4562-bca9-6d6c517cdf85 | dbcirros1 | BUILD  | spawning   | NOSTATE     |          |
+--------------------------------------+-----------+--------+------------+-------------+----------+
root@OSCTRL-UA:~# nova list
+--------------------------------------+-----------+--------+------------+-------------+-------------------------------------------+
| ID                                   | Name      | Status | Task State | Power State | Networks                                  |
+--------------------------------------+-----------+--------+------------+-------------+-------------------------------------------+
| 7ae47f2b-1b2a-4562-bca9-6d6c517cdf85 | dbcirros1 | ACTIVE | -          | Running     | lingesh-net=192.168.4.13|
+--------------------------------------+-----------+--------+------------+-------------+-------------------------------------------+
root@OSCTRL-UA:~#
We can see that instance is up & running .
Do you want to verify using KVM commands ? Just login to compute node and list the instance using virsh command.
root@OSCMP-UA:~# virsh list
 Id    Name                           State
----------------------------------------------------
 2     instance-00000001              running

root@OSCMP-UA:~#
Access the instance Console:
1.Login to the controller node & source the tenant credentials .
2.List the VNC console URL for instance “dbcirros1” from controller node.
root@OSCTRL-UA:~# nova get-vnc-console dbcirros1 novnc
+-------+--------------------------------------------------------------------------------+
| Type  | Url                                                                            |
+-------+--------------------------------------------------------------------------------+
| novnc | http://OSCTRL-UA:6080/vnc_auto.html?token=aea7366b-3b87-42fc-bea5-e190e481f1b4 |
+-------+--------------------------------------------------------------------------------+
root@OSCTRL-UA:~#
2. Copy the URL and paste in the web-browser to see the instance console. If you do not have DNS , just replace “OSCTRL-UA” with IP adddress.
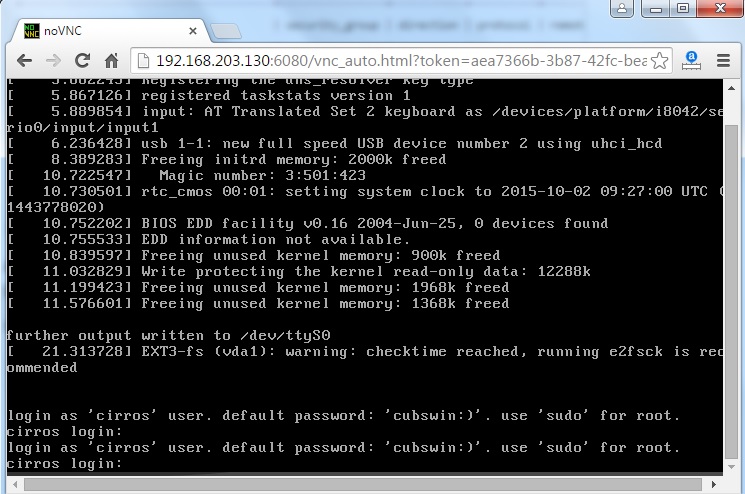
3. You can see that instance has been configured with internal IP address and able to ping gateway .
At this point , you can access the instance within the private cloud . (Can be access within 192.168.4.x network). In an order to access the instance from outside network, you must assign the external IP network.
Configuring External Network for Instance:
1. Create the new external floating IP .
root@OSCTRL-UA:~# neutron floatingip-create ext-net
Created a new floatingip:
+---------------------+--------------------------------------+
| Field               | Value                                |
+---------------------+--------------------------------------+
| fixed_ip_address    |                                      |
| floating_ip_address | 192.168.203.193                      |
| floating_network_id | f39aef8a-4f98-4338-b0f0-0755818d9341 |
| id                  | 574034e0-9d88-487e-828c-d5371ffcfddc |
| port_id             |                                      |
| router_id           |                                      |
| status              | DOWN                                 |
| tenant_id           | abe3af30f46b446fbae35a102457890c     |
+---------------------+--------------------------------------+
root@OSCTRL-UA:~#
2. Associate the floating IP to the instance.
root@OSCTRL-UA:~# nova floating-ip-associate dbcirros1 192.168.203.193
root@OSCTRL-UA:~#
3. List the instance to check the IP assignment.
root@OSCTRL-UA:~# nova list
+--------------------------------------+-----------+--------+------------+-------------+-------------------------------------------+
| ID                                   | Name      | Status | Task State | Power State | Networks                                  |
+--------------------------------------+-----------+--------+------------+-------------+-------------------------------------------+
| 7ae47f2b-1b2a-4562-bca9-6d6c517cdf85 | dbcirros1 | ACTIVE | -          | Running     | lingesh-net=192.168.4.13, 192.168.203.193 |
+--------------------------------------+-----------+--------+------------+-------------+-------------------------------------------+
root@OSCTRL-UA:~#
Once you have configured the external network IP for the instance, you should be able to access the instance from outside network. (Other than 192.168.4.0)
Let me try to access the instance from controller node using the key.pem. (which we have save in the step )
1.Login to the new instance using key pair from controller node. You need to use the external IP to access the instance.
root@OSCTRL-UA:~# ssh -i lingesh.pem 192.168.203.193
Please login as 'cirros' user, not as root

^CConnection to 192.168.203.193 closed.
root@OSCTRL-UA:~#
Cirros will not allow to login as root. So we need to use “cirros” user name.
root@OSCTRL-UA:~# ssh -i lingesh.pem cirros@192.168.203.193
$ sudo su -
#
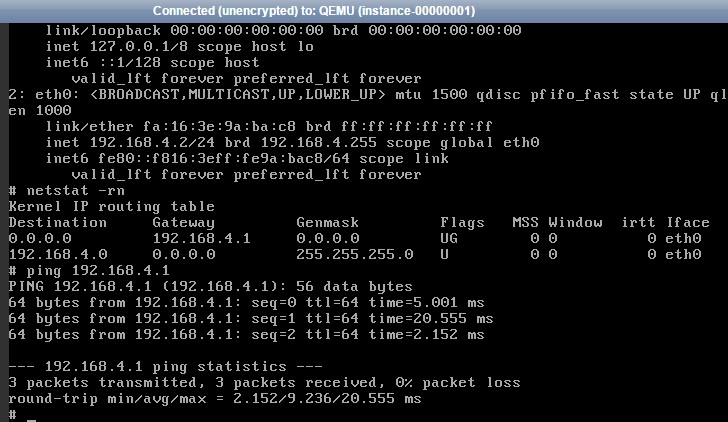
2. Just see the network configuration.
$ sudo su -
# netstat -rn
Kernel IP routing table
Destination     Gateway         Genmask         Flags   MSS Window  irtt Iface
0.0.0.0         192.168.4.1     0.0.0.0         UG        0 0          0 eth0
192.168.4.0     0.0.0.0         255.255.255.240 U         0 0          0 eth0
# ifconfig -a
eth0      Link encap:Ethernet  HWaddr FA:16:3E:6E:22:F9
          inet addr:192.168.4.13  Bcast:192.168.4.15  Mask:255.255.255.240
          inet6 addr: fe80::f816:3eff:fe6e:22f9/64 Scope:Link
          UP BROADCAST RUNNING MULTICAST  MTU:1454  Metric:1
          RX packets:423 errors:0 dropped:0 overruns:0 frame:0
          TX packets:343 errors:0 dropped:0 overruns:0 carrier:0
          collisions:0 txqueuelen:1000
          RX bytes:52701 (51.4 KiB)  TX bytes:40094 (39.1 KiB)

lo        Link encap:Local Loopback
          inet addr:127.0.0.1  Mask:255.0.0.0
          inet6 addr: ::1/128 Scope:Host
          UP LOOPBACK RUNNING  MTU:16436  Metric:1
          RX packets:0 errors:0 dropped:0 overruns:0 frame:0
          TX packets:0 errors:0 dropped:0 overruns:0 carrier:0
          collisions:0 txqueuelen:0
          RX bytes:0 (0.0 B)  TX bytes:0 (0.0 B)

#
Awesome. We have successfully launched cirros instance.
Summary:
- Created the new keypair
- Created new security group
- Applied specific rule to the security to group to allow ICMP & SSH.
- Launched the new instance
- Created the new external IP
- Assigned the external IP to the newly created instance
- Assessed the instance from controller node using the pem key file.
Hope this article is informative to you. Share it ! Be Sociable !!!