

This series of the article is going to provide the step by step method to deploy each component of Openstack cloud Computing platform. As you all know that Openstack is an open source cloud computing platform which support all type of cloud environments. This project aims for simple implementation, massive scalability, and a rich set of features. Cloud computing experts from around the world contribute to the project. Openstack consists of several key projects that you install separately but that work together depending on your cloud needs. These projects include Compute, Identity Service, Networking, Image Service, Block Storage, Object Storage, Telemetry, Orchestration, and Database. In this article series ,we will be seeing “4 node Openstack Architecture” planning and implementation.
In the previous openstack series , we have seen the one of the easiest method to deploy the openstack using the devstack method (Beginners Guide).
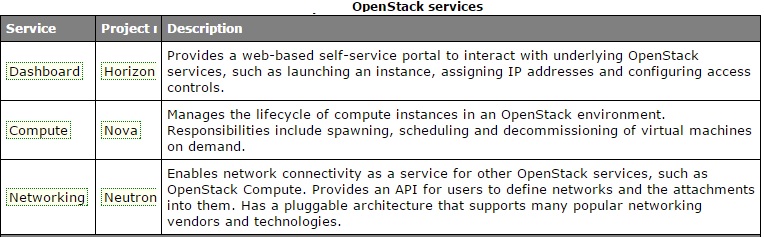
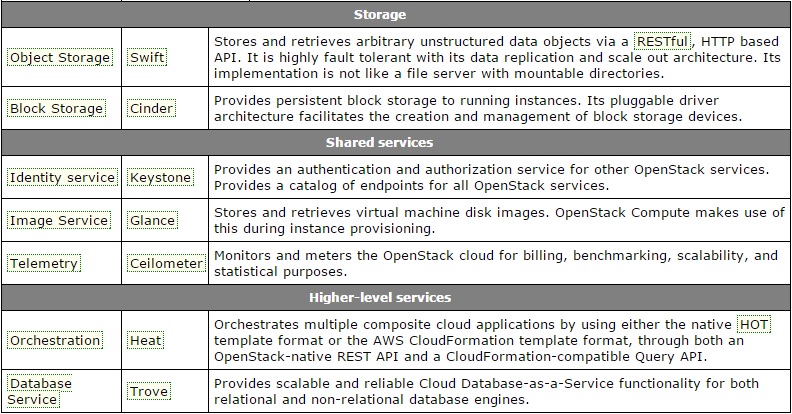
Please go through the below slides to know the various Openstack services functionality.
Openstack Implementation Plan:
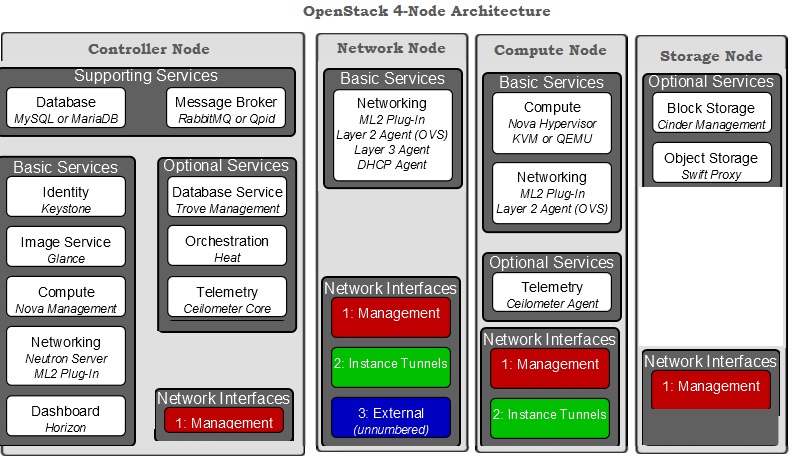
Most of the Openstack’s production deployment will follow the four-node architecture for Openstack services . Here is the functionality of each node.
| Nodes | Openstack Services | Description |
| Node 1 | Openstack Controller (Horizon,Glance, RabbitMQ,Keystone) |
Identity service, Image Service, management portions of Compute and Networking, Networking plug-in, and the dashboard. It also includes supporting services such as a database, Message Broker , and Network Time Protocol (NTP). Optionally , it can also provide Database Service, Orchestration, and Telemetry. These components provides the additional features to your environment. |
| Node 2 | Compute (Nova) | The compute node runs the hypervisor portion of Compute, which operates tenant virtual machines or instances. By default Compute uses KVM as the hypervisor. The compute node also runs the Networking plug-in and layer 2 agent which operate tenant networks and implement security groups. You can also run more than one compute node to provide the more compute resources to the openstack controller node. |
| Node 3 | Networking (Neutron) | The network node runs the Networking plug-in, layer 2 agent, and several layer 3 agents that provision and operate tenant networks. Layer 2 services include provisioning of virtual networks and tunnels. Layer 3 services include routing, NAT , and DHCP. This node also handles external (internet) connectivity for tenant virtual machines or instances. |
| Node 4 | Storage (Swift & Cinder) | This storage node is responsible to provide the Block Storage, Object Storage. |
Let’s Build the Nodes for openstack:
- Install Ubuntu 14.04 64 bit servers on 4 systems [either in Physical machines or within a VMware/Virtual box VMs] with “openssh-server” package installed.
2. Configure each node like below. (Hostname , IP etc..)
| Nodes | HostName | IP Address | Functionality |
| Node 1 | OSCTRL-UA | 192.168.203.130 | Controller |
| Node 2 | OSCMP-UA | 192.168.203.131 | Compute |
| Node 3 | OSNWT-UA | 192.168.203.132 | Network |
| Node 4 | OSSTG-UA | 192.168.203.133 | Storage |
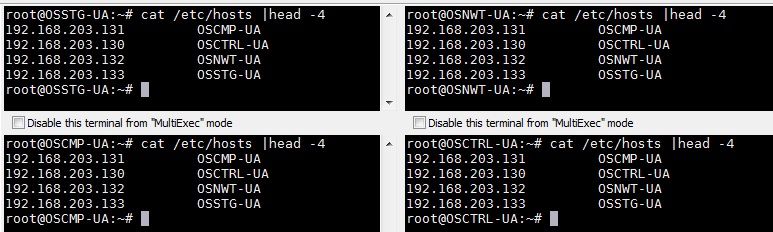
3. Add the below entry on all the hosts for name resolution.
#Openstack Controller Node
192.168.203.130 OSCTRL-UA

#Openstack Compute Nodes
192.168.203.131 OSCMP-UA

#Openstack Network (Neutron)
192.168.203.132 OSNWT-UA

#Openstack Strorage (swift & Cinder)
192.168.203.133 OSSTG-UA
Comment out or remove “127.0.0.1 localhost” entries from all the node’s host file.
4. Configure the second interface as the instance tunnels interface (eth1) on compute node & network nodes.
Tunnel IP’s:
- Compute node = 192.168.204.9
- Network Node(neutron) = 192.168.204.10
On Compute Node:
 root@OSCMP-UA:~# ifconfig eth1
eth1      Link encap:Ethernet  HWaddr 00:0c:29:06:e2:a3
          inet addr:192.168.204.9  Bcast:192.168.204.255  Mask:255.255.255.0
          inet6 addr: fe80::20c:29ff:fe06:e2a3/64 Scope:Link
          UP BROADCAST RUNNING MULTICAST  MTU:1500  Metric:1
          RX packets:237 errors:0 dropped:0 overruns:0 frame:0
          TX packets:12 errors:0 dropped:0 overruns:0 carrier:0
          collisions:0 txqueuelen:1000
          RX bytes:22485 (22.4 KB)  TX bytes:964 (964.0 B)

root@OSCMP-UA:~#
On Network Node:
root@OSNWT-UA:~# ifconfig eth1
eth1      Link encap:Ethernet  HWaddr 00:0c:29:7d:8e:a3
          inet addr:192.168.204.10  Bcast:192.168.204.255  Mask:255.255.255.0
          inet6 addr: fe80::20c:29ff:fe7d:8ea3/64 Scope:Link
          UP BROADCAST RUNNING MULTICAST  MTU:1500  Metric:1
          RX packets:247 errors:0 dropped:0 overruns:0 frame:0
          TX packets:9 errors:0 dropped:0 overruns:0 carrier:0
          collisions:0 txqueuelen:1000
          RX bytes:23425 (23.4 KB)  TX bytes:708 (708.0 B)

root@OSNWT-UA:~#
5. The external interface uses a special configuration without an IP address assigned to it. Configure the third interface as the external interface on network node. (eth2)
Add the below entry in /etc/network/interfaces and save it .
root@OSNWT-UA:~# tail -6  /etc/network/interfaces
#External Network
auto  eth2
iface eth2 inet manual
up ip link set dev $IFACE up
down ip link set dev $IFACE down
root@OSNWT-UA:~#
Bring up the interface eth2.
root@OSNWT-UA:~# ifup eth2
root@OSNWT-UA:~# ifconfig eth2
eth2      Link encap:Ethernet  HWaddr 00:0c:29:7d:8e:ad
          inet6 addr: fe80::20c:29ff:fe7d:8ead/64 Scope:Link
          UP BROADCAST RUNNING MULTICAST  MTU:1500  Metric:1
          RX packets:3 errors:0 dropped:0 overruns:0 frame:0
          TX packets:6 errors:0 dropped:0 overruns:0 carrier:0
          collisions:0 txqueuelen:1000
          RX bytes:244 (244.0 B)  TX bytes:508 (508.0 B)

root@OSNWT-UA:~#
6. Configure the controller node as NTP reference server and any additional nodes to set their time from the controller node.
- Install NTP packages on all the Nodes using apt-get command.
# apt-get install ntp
- Edit the NTP configuration on Network node ,Storage node and Compute node like below.
root@OSSTG-UA:~# cat /etc/ntp.conf |grep server |grep -v "#"
server OSCTRL-UA
root@OSSTG-UA:~#

root@OSCMP-UA:~# cat /etc/ntp.conf |grep server |grep -v "#"
server OSCTRL-UA
root@OSCMP-UA:~#


root@OSNWT-UA:~# cat /etc/ntp.conf |grep server |grep -v "#"
server OSCTRL-UA
root@OSNWT-UA:~#
In the above output, we can see that all the openstack nodes are using controller node(OSCTRL-UA) as NTP server. The “ntpq -p” command confirms that all the nodes are in sync with Openstack controller node.
root@OSSTG-UA:~# ntpq -p
     remote           refid      st t when poll reach   delay   offset  jitter
==============================================================================
*OSCTRL-UA       91.189.94.4      3 u   99  128  377    0.282  -15.576   4.977
root@OSSTG-UA:~#


root@OSCMP-UA:~# cat /etc/ntp.conf |grep server |grep -v "#"
server OSCTRL-UA
root@OSCMP-UA:~# ntpq -p
     remote           refid      st t when poll reach   delay   offset  jitter
==============================================================================
*OSCTRL-UA       91.189.94.4      3 u   32  128  377    0.237   -5.282   2.664
root@OSCMP-UA:~#


root@OSNWT-UA:~# cat /etc/ntp.conf |grep server |grep -v "#"
server OSCTRL-UA
root@OSNWT-UA:~# ntpq -p
     remote           refid      st t when poll reach   delay   offset  jitter
==============================================================================
*OSCTRL-UA       91.189.94.4      3 u  113  128  377    0.471  -22.105   4.027
root@OSNWT-UA:~#
Openstack Controller node is syncing time with internet sources. (By default). No additional configuration required.
root@OSCTRL-UA:~# cat /etc/ntp.conf |grep server |grep -v "#"
server 0.ubuntu.pool.ntp.org
server 1.ubuntu.pool.ntp.org
server 2.ubuntu.pool.ntp.org
server 3.ubuntu.pool.ntp.org
server ntp.ubuntu.com
root@OSCTRL-UA:~# ntpq -p
     remote           refid      st t when poll reach   delay   offset  jitter
==============================================================================
-ns02.hns.net.in 142.66.101.13    2 u   78  128  377   76.966   35.500  31.104
+dnspun.net4indi 120.88.46.10     3 u  119  128  377   83.678    7.101   3.390
-123.108.200.124 123.108.225.6    3 u  127  128  377   75.094   21.590   7.696
+113.30.137.34   212.26.18.41     2 u    8  128  377   77.814   -2.678   6.067
*juniperberry.ca 193.79.237.14    2 u   25  128  377  197.141    5.911   5.170
root@OSCTRL-UA:~#
Choose the Openstack Version:
Ubuntu’s 14.04 TLS version default Openstack release is icehouse but this is EOL support. So we will deploy Openstack Juno release on 14.04 later ,we will upgrade to the latest version kilo.
To make the Ubuntu 14.04 to support the Openstack Juno packages, you need to perform the below steps on all the nodes. (Controller, Compute, network & storage)
root@OSNWT-UA:~# apt-get install ubuntu-cloud-keyring
root@OSNWT-UA:~# echo "deb http://ubuntu-cloud.archive.canonical.com/ubuntu" "trusty-updates/juno main" > /etc/apt/sources.list.d/cloudarchive-juno.list
root@OSNWT-UA:~# apt-get update
root@OSNWT-UA:~# apt-get dist-upgrade
Summary:
- We have seen the various openstack service names and it’s use.
- We have seen the sample architecture of “4 Node Openstack” .
- We have deployed the 4 Ubuntu 14.04 TLS machines (Physical or VM) and defined the functionality of each nodes.
- Configured system IP addresses on each Nodes & added in to the /etc/hosts on all the nodes for local DNS.
- Configured tunnelling IP’s on Network node & Compute Node.
- Used the third NIC card (eth2) for special configuration without configuring any IP address on Network node (neutron)
- Configured the NTP on all the nodes. All the Openstack nodes will use controller node as reference server. Openstack Controller system will sync with internet source by default.
- Selected to the Openstack version as Juno . By default , it was pointing to the icehouse repository.
Openstack Manual Installation will be quite lengthy process. If you are new to Openstack , Please check out Beginners Guide. (devstack Method to simply the installation)
Share it ! Be Sociable !!!