

To provide the external SAN access to the UCS environment, it needs to be connected to FC SAN switches or the Storage box which supports the FCoE. Traditional infrastructure will be still using the FC SAN network as a centralized storage. If you would like to connect the UCS domain to an existing SAN network, you have to configure the FC uplinks ports on fabric interconnect. you can also configure the port as FCoE where you can directly attach the storage which supports the FCoE.
Before Continuing the article , Please see that how to set the port mode in Fabric Interconnect.
Option:1
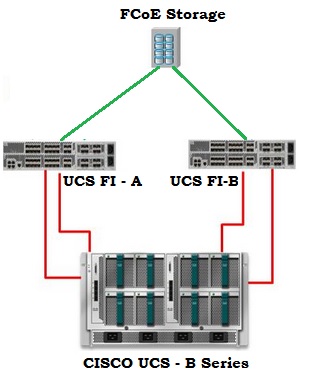
Configure the port FCoE (Only for DAS- Direct attach storage):
1. Login to the UCS manager .
2. Select the equipment pane and navigate it to Fabric Interconnect – > Fabric Interconnect A – > Fixed Module – > “Un-configured Ethernet ports” – > Select the port (Which you want to configure as FCoE).

3. Repeat the same for Fabric Interconnect – B.
4. Connect the storage in to the FI’s FCoE port which we have configured.
Option : 2
Verifying FC uplinks ports: (To connect to the existing SAN )
1. Login to UCS manager
2. Navigate to the Fabric Interconnect – > Fabric Interconnect A – > Expansion Module – > Uplinks FC ports.

verifying the FC uplinks
3. Verify for the Fabric Interconnect B’s Expansion modules as well.

Configuring the port channel for SAN: (Optional)
A Fibre Channel port channel allows you to group multiple physical Fibre Channel ports to create one logical Fibre Channel link to provide fault-tolerance and high-speed connectivity(link aggregation). You can create up to four Fibre Channel port channels in each Cisco UCS domain. Each Fibre Channel port channel can include a maximum of 16 uplink Fibre Channel ports. (From www.cisco.com notes)
1. Go to the “SAN” tab and then “SAN Cloud->Fabric A->FC Port Channels->Right Click and ‘Create Port Channel’”.

2. Then give the port channel a name.

3. select the appropriate ports and select finish .

We have successfully configured the SAN port channel .
Hope this article is informative to you.