


In the last article, we have seen how to install the AI server and configuring AI server with DHCP.But that doesn’t cover ,the installation of customized client like timezone,hostname ,IP address, DNS and root account password etc..Here we will see how we can install Solaris 11 with Pre-customized profile. This setup will give complete hands-off process of installing and configuring the system.
If you just add the client in AI server without creating a profile will end in manual configuration the client after the installation.
1.List the current manifest and service name.
root@UAAIS:~# installadm list
Service Name Alias Of  Status  Arch   Image Path
------------ --------  ------  ----   ----------
default-i386 s11x86SOS on      i386   /export/auto_install/s11x86SOS
s11x86SOS    -         on      i386   /export/auto_install/s11x86SOS

root@UAAIS:~# installadm list -m
Service/Manifest Name  Status   Criteria
---------------------  ------   --------
default-i386
   orig_default        Default  None
s11x86SOS
   orig_default        Default  None
root@UAAIS:~#
2.Create a system configuration profile for new client.
root@UAAIS:~# sysconfig create-profile -o uaclient1.xml
3.System configuration window starts in GUI mode after executing the sysconfig command.Press F2 to continue.
                           System Configuration Tool

     System Configuration Tool enables you to specify the following
     configuration parameters for your newly-installed Oracle Solaris 11
     system:
     - network, time zone, date and time, user and root accounts, name
       services

     System Configuration Tool produces an SMF profile file in ./uaclient1.xml.

     How to navigate through this tool:
     - Use the function keys listed at the bottom of each screen to move from
       screen to screen and to perform other operations.
     - Use the up/down arrow keys to change the selection or to move between
       input fields.
     - If your keyboard does not have function keys, or they do not respond,
       press ESC; the legend at the bottom of the screen will change to show
       the ESC keys for navigation and other functions.

  F2_Continue  F6_Help  F9_Quit
4.Enter the server name which you are going to install and select the network as “Manually”. Pres F2 to continue.
                                    Network

   Enter a name for this computer that identifies it on the network. It must
   be at least two characters. It can contain letters, numbers, and minus
   signs (-).

   Computer Name: uaclient1

   Select how the wired ethernet network connection is configured.

     Automatically     Automatically configure the connection

     Manually          Enter the information on the following screen

     None              Do not configure the network at this time

  F2_Continue  F3_Back  F6_Help  F9_Quit
5.Here the network configuration window for net0. Enter the IP information and press F2 to continue.
                        Manually Configure: net0

   Enter the configuration for this network connection. All entries must
   contain four sets of numbers, 0 to 255, separated by periods.

     NIC:        net0              Settings will be applied to this
                                   interface
     IP Address: 192.168.2.90      Must be unique for this network

     Netmask:    255.255.255.0     Your subnet use may require a
                                   different mask
     Router:     192.168.2.11      The IP address of the router on this
                                   subnet

  F2_Continue  F3_Back  F6_Help  F9_Quit
6.Select “configure DNS” if you have DNS server on the network and continue.
                               DNS Name Service

    Indicates whether or not the system should use the DNS name service.

      Configure DNS
      Do not configure DNS

  F2_Continue  F3_Back  F6_Help  F9_Quit
7.Enter the DNS server IP details and press F2 to continue.
                         DNS Server Addresses

    Enter the IP address of the DNS server(s). At least one IP address is
    required.

      DNS Server IP address: 192.168.2.31
      DNS Server IP address:
      DNS Server IP address:

  F2_Continue  F3_Back  F6_Help  F9_Quit
8.Enter the DNS name in search domain field and press F2 to continue.
                              DNS Search List

    Enter a list of domains to be searched when a DNS query is made. If no
    domain is entered, only the DNS domain chosen for this system will be
    searched.

      Search domain: arenadc
      Search domain:
      Search domain:
      Search domain:
      Search domain:
      Search domain:

  F2_Continue  F3_Back  F6_Help  F9_Quit
9.Enter Alternative DNS as none and continue.
                            Alternate Name Service

    From the list below, select one name service to be used by this system.
    If the desired name service is not listed, select None. The selected name
    service may be used in conjunction with DNS.

      None
      LDAP
      NIS

  F2_Continue  F3_Back  F6_Help  F9_Quit
10.Select the timezone and press F2 to continue.
                              Time Zone: Regions

    Select the region that contains your time zone.

      Regions
    ────────────────────────────────────────
      UTC/GMT
      Africa
      Americas
      Antarctica
      Arctic Ocean
      Asia
      Atlantic Ocean
      Australia
      Europe
      Indian Ocean
      Pacific Ocean

  F2_Continue  F3_Back  F6_Help  F9_Quit
11.Select the country and continue.
                             Time Zone: Locations

    Select the location that contains your time zone.

      Locations
    ────────────────────────────────────────
    ─ Afghanistan
    │ Armenia
    │ Azerbaijan
    │ Bahrain
    │ Bangladesh
    │ Bhutan
    │ Brunei
    │ Cambodia
    │ China
    │ Cyprus
    │ East Timor
    │ Georgia
    │ Hong Kong
    │ India
    v Indonesia

  F2_Continue  F3_Back  F6_Help  F9_Quit
12.Select the desired timezone and continue.
                                    Time Zone

    Select your time zone.

      Time Zones
    ────────────────────────────────────────
      Asia/Kolkata

  F2_Continue  F3_Back  F6_Help  F9_Quit
13.Enter the date and time .
                                Date and Time

   Edit the date and time as necessary.
   The time is in 24 hour format.

     Year:    2013 (YYYY)
     Month:     12 (1-12)
     Day:       23 (1-31)
     Hour:      11 (0-23)
     Minute:    20 (0-59)

  F2_Continue  F3_Back  F6_Help  F9_Quit
14.Enter the root password and new user details .
                                     Users

    Define a root password for the system and user account for yourself.

    System Root Password
     Root password:    *******
     Confirm password: *******

    Create a user account
     Your real name:   unixarena
     Username:         UA1
     User password:    *****
     Confirm password: *****

  F2_Continue  F3_Back  F6_Help  F9_Quit
15.If you have oracle support access, you can provide the username & password.
                            Support - Registration

     Provide your email address to be informed of security issues,
     install the product and initiate configuration manager.

     Please see http://www.oracle.com/goto/solarisautoreg for details.

       Email: lingeshwaran.rangasamy@gmail.com
              Easier for you if you use your My Oracle Support email
              address/username.

       Please enter your password if you wish to receive security updates
       via My Oracle Support.

              My Oracle Support password:

  F2_Continue  F3_Back  F6_Help  F9_Quit
16.If you do not have direct internet connection, you can go for proxy if its already configured in your environment. Here my system doesn’t have interconnection.
                        Support - Network Configuration

     To improve products and services, Oracle Solaris relays
     configuration data to the Oracle support organization.

     Select an internet access method for OCM and ASR.
       No proxy          Use system Internet connection parameters

       Proxy             Enter proxy information on the next screen

       Aggregation Hubs  Enter hubs information on the next screen

  F2_Continue  F3_Back  F6_Help  F9_Quit
17.Here is the system configuration summary .Press to F2 apply to save new profile.
                         System Configuration Summary

   Review the settings below before continuing. Go back (F3) to make changes.

   ─ Time Zone: Asia/Kolkata
   │
   │ Language: *The following can be changed when logging in.
   │ Default language: English
   │
   │ Keyboard layout: *The following can be changed when logging in.
   │ Default keyboard layout: US-English
   │
   │ Terminal type: sun-color
   │
   │ Users:
   │ Username: UA1
   │
   │ Network:
   │ Computer name: uaclient1
   │ Manual Configuration: net0 (e1000g0)
   │ IP Address: 192.168.2.90
   v Netmask: 255.255.255.0

  F2_Apply  F3_Back  F6_Help  F9_Quit
18.Here is the final result of the sysconfig command.
root@UAAIS:~# sysconfig create-profile -o uaclient1.xml
SC profile successfully generated.
Exiting System Configuration Tool. Log is available at:
/system/volatile/sysconfig/sysconfig.log.5793
root@UAAIS:~#
19.To list the currently configured profile on the system.
root@UAAIS:~# installadm list -p
There are no profiles configured for local services.
root@UAAIS:~#
20.To list the currently configured client on the AI server.
root@UAAIS:~# installadm list -c
There are no clients configured for local services.
root@UAAIS:~#
21.Add new AI client’s MAC address to install the remote system.
root@UAAIS:~# installadm create-client -e 00:0C:29:C4:42:45 -n s11x86SOS
Adding host entry for 00:0C:29:C4:42:45 to local DHCP configuration.
root@UAAIS:~# installadm list -c
Service Name Client Address     Arch   Image Path
------------ --------------     ----   ----------
s11x86SOS    00:0C:29:C4:42:45  i386   /export/auto_install/s11x86SOS
root@UAAIS:~#
s11x86SOS – Installer service. (Refer Step:1 output.)
MAC Address- Client Machine MAC address.
22.Supply the newly configured system configuration profile to AI instance. The newly created profile will be used only for MAC Criteria that met for the system.Here you need to provide the xml file which you have created in step 18.
root@UAAIS:~# installadm create-profile -n s11x86SOS -f /root/uaclient1.xml -c mac=00:0C:29:C4:42:45
Profile uaclient1.xml added to database.
root@UAAIS:~# installadm list -p
Service/Profile Name  Criteria
--------------------  --------
s11x86SOS
   uaclient1.xml      mac = 00:0C:29:C4:42:45

root@UAAIS:~#
23. Connect the remote system console where you going to install the operating system.
Make the network card as first boot device.(MAC:00:0C:29:C4:42:45) and save & exit.

24.The remote system installation begins like how i have shown in previous article.
Make sure that you have selected the “automated installation” from menu.
25.Some of the installation screen shots.

26.When the installation completes, system will ask you to reboot it .

User name:root
Password: solaris (This will work till the reboot.After that , you have to use the password , what you have given the SC profile. Step:14).
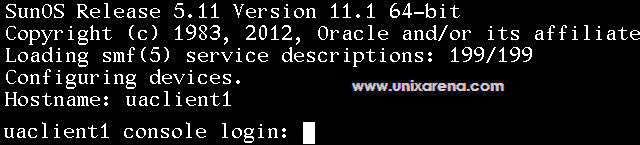
27.After the system reboot,you can see that system has been configured with what we have define in the SC profile.Ex: The default host name for AI installation will be “solaris.”
In the below screen ,you can see system is coming up with client name “uaclient1”.
You can add N number of client’s MAC address and associate with its own configured profile to setup simultaneous installation across the network.
28.How to prevent the client booting from network accidentally ?
You can remove the profile and MAC from the AI server like below. But its better to keep those information in AI server to recover the client machine when the system unrecoverable from OS level.
root@UAAIS:~# installadm list -p
Service/Profile Name  Criteria
--------------------  --------
s11x86SOS
   uaclient1.xml      mac = 00:0C:29:C4:42:45
root@UAAIS:~#
root@UAAIS:~# installadm delete-profile -n s11x86SOS -p uaclient1.xml
        Deleted profile uaclient1.xml.
root@UAAIS:~# installadm list -c
Service Name Client Address     Arch   Image Path
------------ --------------     ----   ----------
s11x86SOS    00:0C:29:C4:42:45  i386   /export/auto_install/s11x86SOS
root@UAAIS:~# installadm delete-client 00:0C:29:C4:42:45
Removing host entry '00:0C:29:C4:42:45' from local DHCP configuration.
root@UAAIS:~#
Summary:
1. Step 2 to Step 18 shows how to create system configuration profile.
2. Step 21 to Step 22 shows that how to add client to AI server and associating MAC with profiles.
3. You can remove the AI client using step : 28
Thank you for visiting UnixArena. Hope this article will be informative for you .