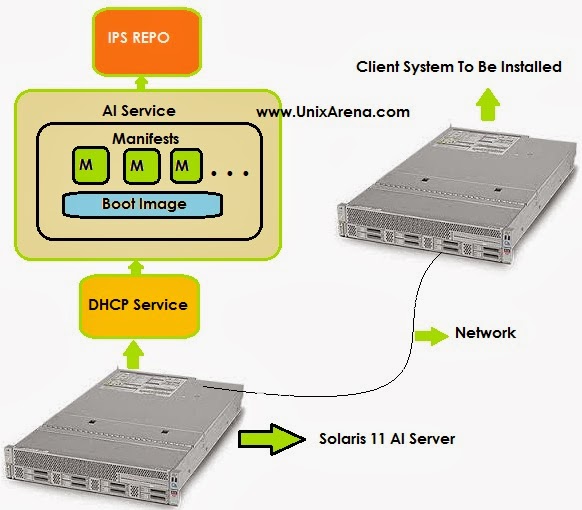
In this post we are going to see how to install and configure oracle Solaris Automated installer. What is Automated installer ? The Automated Installer is used to automate the installation of oracle Solaris 11 on X86 and SPARC architecture over the network.The below picture will describe how the AI works. AI is replacement for Jumpstart server which was exists in the previous version of Solaris.
2. 1GB minimum physical memory and 1GB Disk Free space for the server.
2. It should be configured with Static IP and default router.
root@UAAIS:~# pkg publisher
PUBLISHER                   TYPE     STATUS P LOCATION
solaris                     origin   online F file:///testrepo/
root@UAAIS:~#
root@UAAIS:~# pkg set-publisher -O http://192.168.2.31 solaris
Refreshing catalog 1/1 solaris 704.58 kB
Caching catalogs ...
root@UAAIS:~#  pkg publisher
PUBLISHER                   TYPE     STATUS P LOCATION
solaris                     origin   online F http://192.168.2.31/
root@UAAIS:~#
2.Enable the DNS multicast .
root@UAAIS:~# svcadm enable  dns/multicast
root@UAAIS:~# svcs dns/multicast
STATE          STIME    FMRI
online          2:56:00 svc:/network/dns/multicast:default
root@UAAIS:~#
3.Verify the IP configuration like below. DNS is not mandatory .if you are interested to configure the DNS, check out here.
root@UAAIS:~# ipadm
NAME              CLASS/TYPE STATE        UNDER      ADDR
lo0               loopback   ok           --         --
   lo0/v4         static     ok           --         127.0.0.1/8
   lo0/v6         static     ok           --         ::1/128
net0              ip         ok           --         --
   net0/v4        static     ok           --         192.168.2.31/24
   net0/v6        addrconf   ok           --         fe80::20c:29ff:fe64:74c4/10
root@UAAIS:~# getent netmasks 192.168.2.0
root@UAAIS:~# vi /etc/netmasks  -- > Add the netmask to this file.
root@UAAIS:~# getent netmasks 192.168.2.0
192.168.2.0          255.255.255.0
root@UAAIS:~#
root@UAAIS:~# netstat -rn
Routing Table: IPv4
  Destination           Gateway           Flags  Ref     Use     Interface
-------------------- -------------------- ----- ----- ---------- ---------
default              192.168.2.111        UG        1          0
127.0.0.1            127.0.0.1            UH        3        186 lo0
192.168.2.0          192.168.2.31         U         4      12233 net0
root@UAAIS:~#
root@UAAIS:~# nslookup UAAIS.arenadc
Server:         192.168.2.31
Address:        192.168.2.31#53
Name: UAAIS.arenadc
Address: 192.168.2.31
root@UAAIS:~#
1.Install the AI packages using IPS.
root@UAAIS:~# pkg install install/installadm
No updates necessary for this image.
root@UAAIS:~#
As per the above command output, the AI packages are already installed on the system.
2.Verify the installed AI packages.
root@UAAIS:~# pkg list |grep install/installadm
install/installadm                                0.5.11-0.175.1.0.0.24.1736 i--
root@UAAIS:~#
root@UAAIS:~# installadm create-service -n s11x86SOS -p solaris=http://192.168.2.31/ -i 192.168.2.51 -c 1
Creating service from: pkg:/install-image/solaris-auto-install
OK to use default image path: /export/auto_install/s11x86SOS? [y/N]: y
DOWNLOAD                                PKGS         FILES    XFER (MB)   SPEED
Completed                                1/1       514/514  292.3/292.3  6.2M/s
PHASE ITEMS
Installing new actions 661/661
Updating package state database Done
Updating image state Done
Creating fast lookup database Done
Reading search index Done
Updating search index 1/1

Creating i386 service: s11x86SOS
Image path: /export/auto_install/s11x86SOS
Starting DHCP server...
Adding IP range to local DHCP configuration
Refreshing install services
Creating default-i386 alias
Setting the default PXE bootfile(s) in the local DHCP configuration
to:
bios clients (arch 00:00): default-i386/boot/grub/pxegrub2
uefi clients (arch 00:07): default-i386/boot/grub/grub2netx64.efi

Refreshing install services
root@UAAIS:~#
-n s11x86SOS ————————> Service Name
-p solaris=http://192.168.2.31/ —> IPS repo server.
-i 192.168.2.51 ———————-> PXE client IP’s start from this range.
-c 1————————————-> Only one IP to be allocated to the clients.
If you want to create a customized image for AI service, refer this article. (Last Part)
2.Verify the installer service
root@UAAIS:~# installadm list
Service Name Alias Of  Status  Arch   Image Path
------------ --------  ------  ----   ----------
default-i386 s11x86SOS on      i386   /export/auto_install/s11x86SOS
s11x86SOS    -         on      i386   /export/auto_install/s11x86SOS
root@UAAIS:~# installadm list -m
Service/Manifest Name Status Criteria
--------------------- ------ --------
default-i386
orig_default Default None
s11x86SOS
orig_default Default None
root@UAAIS:~#
3.Add the client MAC address of system which needs to be installed solaris 11 through network.
root@UAAIS:~# installadm list -c
There are no clients configured for local services.
root@UAAIS:~#
root@UAAIS:~# installadm create-client -e 00:0C:29:C4:42:45 -n s11x86SOS
Adding host entry for 00:0C:29:C4:42:45 to local DHCP configuration.
root@UAAIS:~#
root@UAAIS:~# cat /etc/inet/dhcpd4.conf |tail -10
}
host 000C29C44245 {
hardware ethernet 00:0C:29:C4:42:45;
if option arch = 00:00 {
filename “01000C29C44245.bios”;
} else if option arch = 00:07 {
filename “01000C29C44245.uefi”;
}
}
root@UAAIS:~#
4.Verify the AI client information.
root@UAAIS:~# installadm list -c
Service Name Client Address     Arch   Image Path
------------ --------------     ----   ----------
s11x86SOS    00:0C:29:C4:42:45  i386   /export/auto_install/s11x86SOS
root@UAAIS:~#
5.Verify the below services are online or not.Please make it online.
root@UAAIS:~# svcs -a |egrep "dhcp/server:ipv4|install/server:default"
online         23:45:27 svc:/network/dhcp/server:ipv4
online          2:00:06 svc:/system/install/server:default
root@UAAIS:~#
Are we done it ? NO. We need to remove the oracle as publisher from the configuration.Otherwise the automated installation will fail with below error.
Creating IPS image
Error occurred during execution of ‘generated-transfer-1341-1’ checkpoint.
Failed Checkpoints:
generated-transfer-1341-1
Checkpoint execution error:
Framework error: code: 6 reason: Couldn’t resolve host http://pkg.oracle.com/
Here is the Fix:
1.Get the manifest information.
root@UAAIS:~# installadm list -m
Service/Manifest Name  Status   Criteria
---------------------  ------   --------
default-i386
   orig_default        Default  None
s11x86SOS
   orig_default        Default  None
root@UAAIS:~#
2.Export the default manifest associated with SO11x86OS .
root@UAAIS:~# installadm export -n s11x86SOS -m orig_default > /root/orig_default1.xml
root@UAAIS:~#
3.Edit the configuration file which you have exported like below.
root@UAAIS:~# cat /root/orig_default1.xml |grep origin
          origin name="http://pkg.oracle.com/solaris/release"
root@UAAIS:~#
root@UAAIS:~# cat /root/orig_default1.xml |grep origin
          origin name="http://192.168.2.31"
root@UAAIS:~#
4.Update the manifest.
root@UAAIS:~# installadm update-manifest -n s11x86SOS -m orig_default -f /root/orig_default1.xml
root@UAAIS:~#
root@UAAIS:~# installadm update-manifest -n default-i386 -m orig_default -f /root/orig_default1.xml
root@UAAIS:~# installadm list -m
Service/Manifest Name  Status   Criteria
---------------------  ------   --------
default-i386
   orig_default        Default  None
s11x86SOS
   orig_default        Default  None
root@UAAIS:~#
Open the client Machine console:
1.Power on the machine and boot from the network by setting the first boot device as network for X86 machines.For SPARC machines, from OK prompt , “boot net:dhcp – install “
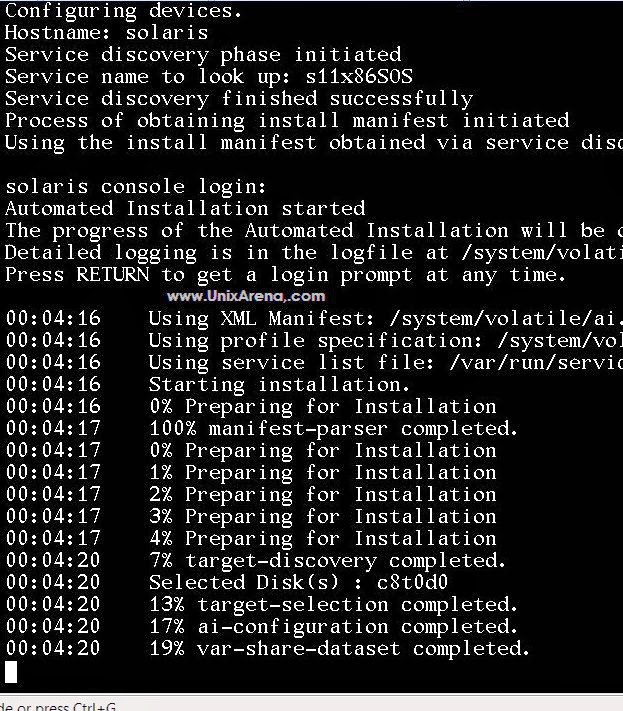
2.You will get below screens when the machine get;s IP from DHCP server.

3.Here are the couple of client installation screens.


Reboot the node and configure the system for use.
The installed machine credentials will be
user name:root
Password:solaris
Hope Now you are familiar with Solaris11’s Automated Installer. In the next post , we will see how to install the pre-configured solaris 11 on the network.
Thank you for visiting UnixArena.
Linux Admin says
Thanks for your help, it is very helpful and useful
krishna says
how to skip the user credentials id:root,pass”solairsin.
Pankaj says
Hi,
While I was trying through jumpstart it throws following error
07:38:35 Install Log: /system/volatile/install_log
07:38:35 Using XML Manifest: /system/volatile/ai.xml
07:38:35 Using profile specification: /system/volatile/profile
07:38:35 Using service list file: /var/run/service_list
07:38:35 Starting installation.
07:38:35 0% Preparing for Installation
07:38:35 100% manifest-parser completed.
07:38:35 100% None
07:38:35 0% Preparing for Installation
07:38:36 1% Preparing for Installation
07:38:36 2% Preparing for Installation
07:38:36 3% Preparing for Installation
07:38:36 4% Preparing for Installation
07:38:39 22% target-discovery completed.
07:38:39 Error occurred during execution of ‘target-selection’ checkpoint.
07:38:39 100% None
07:38:39 Failed Checkpoints:
07:38:39
07:38:39 target-selection
07:38:39
07:38:39 Checkpoint execution error:
07:38:39
07:38:39 Unable to locate the disk ‘[boot_disk]’ on the system.
07:38:39
07:38:39 Automated Installation Failed. See install log at /system/volatile/install_log
Automated Installation failed
I don’t have admin access to jumpstart server to make any changes in XML file and no one in our team has the same.
is there any workaround?
as per my understanding the label of boot disk is boot_dis instead of boot_disk which jumpstart is looking for but that can not be modified more than 8 characters as volume name during format accepts max 8 characters.
Any help is appreciated
-Pankaj
Lingeswaran R says
Here is the example of SPARC server booting from network.
{0} ok boot net:dhcp – install
Boot device: /virtual-devices@100/channel-devices@200/network@0:dhcp File and args: – install
wanboot info: WAN boot messages->console
wanboot info: configuring /virtual-devices@100/channel-devices@200/network@0:dhcp
wanboot info: Starting DHCP configuration
wanboot info: DHCP configuration succeeded
wanboot progress: wanbootfs: Read 368 of 368 kB (100%)
wanboot info: wanbootfs: Download complete
Mon Mar 24 12:24:26 wanboot progress: miniroot: Read 180256 of 243471 kB (7
Lingeswaran R says
To create a SPARC service , we need to use “-a sparc” option