

As you all know Oracle Solaris 11 is available for production and most of the customers are preferred to have Solaris 11 on their datacenters. Even I would like to play with Solaris 11 by upgrading existing Solaris 10 systems.Now the question may raise that,Is it possible upgrade my older version of Solaris to Solaris 11 ? The answer is NO.This will be shock news to everyone but you have to go with this.Even you can’t upgrade Solaris 10 to Solaris11 directly or indirectly. There is no upgrade option has been provided and no tools available from oracle to do this.You need to perform Solaris 11 fresh installation on Solaris 10 systems to upgrade the OS.
For Solaris 11,you have to use “Automated Installer(AI)” instead of Jump-start.In larger environment if you are going to use both Solaris 10 and Solaris 11,then you have to maintain both Jump-start(To install Solaris 10) and AI (To install Solaris 11) servers.
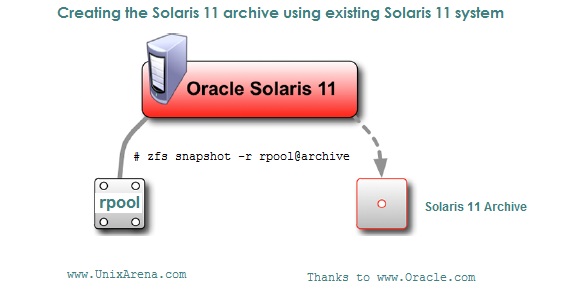
# zfs snapshot -r rpool@archive1
# zfs destroy rpool/swap@archive1
# zfs destroy rpool/dump@archive1
# zfs send -Rv rpool@archive1 | gzip > /nfs_solaris_10/archive_solaris11.zfs.gz
# zpool destroy rpool@archive1
2.Generate the SC profile to configure hostname,Timezone,locale,root password,network information,DNS and NIS. This can be done easily by sysconfig command.(See Profile creation at the end of article.)
3.Now login to Solaris 10 ,and create new rpool to restore Solaris 11 archive.
Note:Solaris 11 archive system’s rpool disk and Solaris 10’s new rpool disk should be in same size and layout to restore archive successfully .

Create rpool using new disk.
# zpool create rpool New_Disk
Note:Solaris 11 X86 will support EFI label disks as boot disk(Ex:c1t1d0).For SPARC ,you have to use SMI label formated disk for rpool aka boot disk(Ex:c1t1d0s0).
Restore the archive data suing below command.
# gzcat /nfs_solaris_10/archive_solaris11.zfs.gz | zfs receive -vF rpool
Now create a swap and dump dataset by using the below commands.
# zfs create -V 8GB rpool/swap
# zfs create -V 6GB rpool/dump
# zfs set primarycache=metadata rpool/swap
Make the rpool bootable using below commands.
# zpool set bootfs=rpool/ROOT/solaris_GZ_11 rpool
# zfs set mountpoint=/tmp/mnt rpool/ROOT/solaris_GZ_11
# zfs mount rpool/ROOT/solaris_GZ_11
# installgrub /tmp/mnt/boot/grub/stage1 /tmp/mnt/boot/grub/stage2 /dev/rdsk/cXtXdXs0       (X86_64)
# installboot -F zfs /tmp/mnt/usr/platform/`uname -i`/lib/fs/zfs/bootblk /dev/rdsk/cXtXdXs0    (SPARC)
# touch /tmp/mnt/reconfigure
Replace the SC configuration file using the new SC profile which we have generated (Step:2)
# rm /tmp/mnt/etc/svc/profile/site/profile*.xml
# cp SC_Profile.xml /tmp/mnt/etc/svc/profile/sc/profile.xml
Now umount the BE and reboot the system with newly configured solaris 11 disk.
# zfs umount rpool/ROOT/solaris_GZ_11
# zfs set mountpoint=/ rpool/ROOT/solaris_GZ_11
Any time you can rollback the upgrade by rebooting with old disk to back to solaris 10.
Note:I haven;t tried this migration.This article is based on oracle white papers and Solaris 11 technical documents.
Thank you for reading this article.