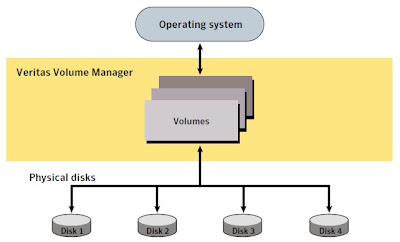
In this post, we will see how to scan the physical disks and bringing the disks in to veritas volume manager control. In this short post, let’s see how to scan new disk in vxvm, disk naming convention and how to bring it in veritas control. Adding disk in to diskgroup ,we will see in diskgroup operation.
Once the VXVM installation is completed, you good to start work on the below things. VxVM presents the disks in a disk array as volumes to the operating system in below manner.
bash-3.00# vxddladm get namingscheme
NAMING_SCHEME   PERSISTENCE   LOWERCASE       USE_AVID
======================================================
Enclosure Based      Yes        Yes            Yes
bash-3.00# vxdisk list
DEVICE  TYPE      DISK GROUP   STATUS
disk_0  auto:none  -    -    online invalid
disk_1  auto:none  -    -    online invalid
disk_2  auto:ZFS   -    -    ZFS
disk_3  auto:ZFS   -    -    ZFS
As per the above output,the system was set to use enclosure based naming scheme. Anytime you can change the naming scheme on the fly.There will be no impact by doing this.
To change the Operating system based naming scheme,
bash-3.00# vxddladm set namingscheme=osn
bash-3.00# vxdisk list
DEVICE    TYPE     DISK    GROUP      STATUS
c1t0d0s2 auto:ZFS   -       -       ZFS
c1t3d0   auto:none  -       -       online invalid
c1t4d0   auto:ZFS   -       -       ZFS
c1t5d0   auto:none  -       -       online invalid
You can set it back to enclosure based using below command.
bash-3.00# vxddladm set namingscheme=ebn
You can match the OS native names(i.e format) with VXVM enclose based names using the below command.
bash-3.00# vxdisk -e list
DEVICE  TYPE   DISK   GROUP STATUS  OS_NATIVE_NAME ATTR
disk_0  auto:none    -   -  online invalid  c1t3d0     -
disk_1  auto:none    -   -  online invalid  c1t5d0     -
disk_2  auto:ZFS     -   -  ZFS     c1t4d0     -
disk_3  auto:ZFS     -   -  ZFS     c1t0d0s2   -
2.Discover New Disks in veritas:
To Scan a new disk in OS level,
bash-3.00# cfgadm -al
bash-3.00# /usr/sbin/devfsadm -Cvc disk
After scanning the disk in OS,Scan the disks in veritas level by using the below command.
bash-3.00# vxdisk scandisks
Note:In older version we may used “vxdctl enable” or “vxconfigd -k” to scan new disks by restarting it vxvm daemon.Symantec recommending to use the above command to scan new disks.
DMP devices
bash-3.00# vxddladm assign names
Now you can see new disks
bash-3.00# vxdisk -e list
DEVICE   TYPE      DISK GROUP   STATUS OS_NATIVE_NAME ATTR
disk_0 auto:cdsdisk -     -     online    c1t3d0        -
disk_1 auto:cdsdisk -     -     online    c1t5d0        -
disk_2 auto:ZFS     -     -       ZFS     c1t4d0        -
disk_3 auto:ZFS     -     -       ZFS     c1t0d0s2      -
disk_4 auto:cdsdisk -     -     online    c1t6d0        -
disk_5 auto:cdsdisk -     -     online    c1t2d0        -
disk_6 auto:cdsdisk -     -     online    c1t1d0        -
3.Bringing the disk in to veritas control
bash-3.00# /etc/vx/bin/vxdisksetup -i disk_0
bash-3.00# /etc/vx/bin/vxdisksetup -i disk_1
bash-3.00# /etc/vx/bin/vxdisksetup -i disk_4
bash-3.00# /etc/vx/bin/vxdisksetup -i disk_5
bash-3.00# /etc/vx/bin/vxdisksetup -i disk_6
If you want to setup the disk in specific format,you can use the below syntax.
#vxdisksetup -i disk_XX format=cds or simple or sliced
By Checking the disk status,you will come to know how its formated and disk
status.
bash-3.00# vxdisk list
DEVICE   TYPE          DISK GROUP STATUS
disk_0   auto:cdsdisk    -   -   online
disk_1   auto:cdsdisk    -   -   online
disk_2   auto:ZFS        -   -   ZFS
disk_3   auto:ZFS        -   -   ZFS
disk_4   auto:cdsdisk    -   -   online
disk_5   auto:cdsdisk    -   -   online
disk_6   auto:cdsdisk    -   -   online
You can find the Veritas volume manager disk replacement here.
Thank you for reading this.You have any doubt,please leave comment,I will get back to you as soon as possible.
